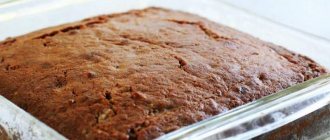
394 – 240 minutes 20 servings
The other day my brother invited me to the Chocolate Shop. He suggested trying a cake called OPERA. Tasty, satisfying... I decided to restore this masterpiece at home, fortunately, there is a reason. The first place I turned to was our favorite website. There is such a cake here, but, no offense to the author, I didn’t understand anything. I decided to dig around on the Internet and this is what I found: there are many options for the cake, apparently due to the fact that two of the greatest confectionery houses fought for the authorship. I chose the version of Gaston Le Nôtre’s house, which (Gaston Le Nôtre), by the way, became the prototype for the chef in the cartoon Ratatouille. Why was I still attracted to this option... As I understand, the author of the article and the site herself translated this recipe from the book of the famous Gaston Le Nôtre, which (the book) was published only in French, English and Japanese. But when preparing this, I’m not afraid of this word, Masterpiece, I did not neglect to take the advice of other masters. And now I offer my “Opera” (L'Opera Cake) for your consideration. By the way, it turned out to be not as difficult to prepare as its description. The cake can be prepared in one evening. I quote the author’s words with his own amendments and additions in parentheses.
Opera cake is a work of confectionery art. Miscellaneous
Boil the remaining cream and add to the mixture. Add the remaining chocolate and steamed gelatin to it. Pour frosting over the cake through a sieve and refrigerate overnight. Dessert decoration is at your discretion. This is exactly how they do it in the homeland of this amazing dessert. Log in to the site to leave comments. To create a topic on your behalf, log in to the site. Any reproduction of site materials without the permission of the editors is prohibited.
Contact information for government agencies, including Roskomnadzor: E-mail: wday. Find recipe:. Home Recipes Desserts Opera cake is a work of confectionery art.
Opera Cake
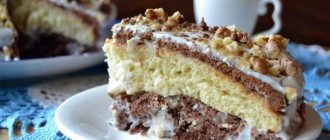
Miscellaneous 0 0 0 0 Opera is a real work of confectionery art. Delicate sponge cakes soaked in coffee syrup, 2 types of amazing creams, shiny chocolate glaze - that’s what this dessert is all about. If you decide to cook it, the photo of the Opera cake will decorate your cookbook.
How to make dough for cakes, cream, impregnation and glaze? Opera cake recipe. Recipe for Opera cake layers The secret of this dessert is an almond sponge cake, which is soaked in aromatic syrup. Looking for an answer? This permanent culinary hit sells a million products a year. It is this combination that has won the hearts of even the most spoiled sweet tooth around the world. The caloric content of dessert is very high - kcal per g, so it is strictly not recommended to consume it in large quantities.
Let's look at the recipe for opera cake step by step with photos in two versions: classic and from Lisa Glinskaya. Now this dessert can be found in many confectionery establishments.
Opera cake: recipe for creams and glaze
It will also come in handy for you. 4L stainless steel mixing bowl with plastic lid and 3 graters. Tefal Intuition saucepan, stainless steel, 20 cm, 2.9 l, with lid. Add a photo. In full screen. We will need 6 proteins for the test. Place the yolks in a separate container, carefully fill them with water and place them in the refrigerator. They can easily spend 2 days there. Now beat the whites to stable peaks, then, without stopping beating, gradually add 30 grams of sugar from the total amount, and beat again to stable peaks.
If the container is turned over, properly whipped whites should not fall out of it.
Be careful with the screening test! Place the whites in the refrigerator. Place the eggs, remaining sugar, almond meal and flour in a bowl and beat for a minute. The photo shows the beginning of beating. The ingredients are simply mixed together. The mass is quite thick, viscous and dark.
The photo shows approximately the middle of the beating process. The mass becomes a little thinner, airier and lighter. This is the mass we should get. Light and airy. A sign of readiness is that the mass no longer brightens or increases in volume.
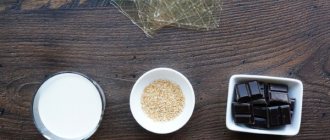
Ingredients
Now mix the dough with the whipped egg whites in three steps. We do this very carefully, using a spatula, using bottom-up movements from the edges to the center, so as not to destroy the air bubbles. After all, the airiness of the biscuit depends on them; there are no other leavening agents in the dough. We get a very airy dough that flows like a ribbon from the spatula.
Now add melted butter and cooled to room temperature to the dough. We pour it in a thin stream along the walls of the vessel. Mix gently with a spatula. Bake the cakes in an oven preheated to 100 degrees for minutes. Focus on your oven.
The biscuit should be well browned, the top should not be sticky, and the center of the biscuit should spring back when pressed. The biscuits rise quite a bit. This is how it should be - don't worry.
Step-by-step instructions for preparing Opera Cake
Step 1
Pour the egg and egg yolk into a mixing bowl. Beat on high speed until foamy and white.
Step 2
In a small saucepan, combine sugar and water, heat over high heat to dissolve sugar, and heat until it comes to a boil. Stirring, cook over medium heat until the mixture reaches 124°C, until thick caramel (it took me about 8-10 minutes). Immediately, without a single delay, otherwise the caramel will harden in an instant (it’s good that my husband was nearby, he helped me heat and pour in the remaining caramel, well, it hardens very quickly!), pour this caramel into the egg mixture, while continuing to beat at high speed (from -due to the lack of my husband and I having 3rd and 4th hands, there is no photo)
Step 3
After a minute, turn the mixer to medium speed and beat for another 5 minutes until the mixture is thick, silky and reaches room temperature.
Step 4
Mash the butter with a fork. It should be very soft.
Step 5
Pour vanilla extract (I use vanillin), coffee syrup and butter into the egg-caramel mixture, step by step. All this time, continuing to beat at medium speed. At first, the cream will separate (it looks like curdled milk).
Step 6
Then turn the mixer mode to high speed and beat the buttercream until it becomes thicker and satiny. The cream will transform and thicken before your eyes.
Step 7
Ganache: Place the chocolate in a bowl.
Step 8
Bring the milk and cream to a boil over low heat, then pour into the chocolate. Wait 30 seconds for it to melt, then gently stir in a circle (one way only) using a spatula until smooth. Be careful not to create air bubbles. Let the chocolate cool slightly, to about 60°C.
Step 9
Cover or cover with cling film and refrigerate until thickened. (Mine was thick right away). You can freeze or refrigerate like buttercream, but if freezing, refrigerate the day before using, then stir until smooth.
Step 10
Mona Lisa sponge cake: preheat the oven to 220°C. Prepare 2 rectangular baking sheets. Line them with parchment paper and lightly spray with oil. The sponge cake should lie on a baking sheet in a thin layer, since the whole idea of the cake is very low, but it should be wide and long. To put it into perspective, it should look like our Quirky Waffle Cake, only enlarged.
Step 11
Beat the egg whites on low speed in a clean bowl until frothy...
Step 12
...then switch to medium-high speed until the whites hold soft peaks. Switch to high speed while gradually adding granulated sugar. Continue beating until the whites form white, smooth, stiff peaks.
Step 13
(I ground the almonds in a blender and sifted them through a sieve; if you do this, the consumption of nuts will be about 200-250 g)
Step 14
(In a bowl with almond flour, sift the wheat flour and powdered sugar)
Step 15
In another bowl, using the hook attachment, beat the almond flour mixed with the wheat flour, powdered sugar and eggs on medium speed for 3 minutes until smooth.
Step 16
Gently fold the egg white into the batter using a rubber spatula.
Step 17
Pour the melted butter into the bowl with the dough and stir with a rubber spatula just until combined.
Step 18
Divide the dough into two parts and spread evenly onto the baking sheets. (This is where I made a mistake! :-( I had a baking sheet on which I baked the cake layer one by one, cut it according to the recipe, etc. My baking sheet began to work at high temperatures and the dough merged on one side, it is better to use small forms and bake 3 cakes) Bake the sponge cake for 5 to 7 minutes or until browned. If your layers are thicker than necessary, then bake for about 10 minutes. (Do not wait longer, I waited for strong browning, and the first cake was slightly burnt) Give Let them cool for 15 minutes and turn them out onto the prepared surface, remove the parchment and let cool completely.
Step 19
Apply coffee syrup evenly using a brush. It should take about 3 tbsp. l. for each (if the cakes are thick, feel free to add half more syrup).
Step 20
Spread coffee cream on top and spread evenly with a spatula. Everything should be very smooth.
Step 21
Carefully place two cut sheets of “Mona Lisa” on top, which together will have the length of the base, tightly connecting the joining points. Repeat the procedure with syrup.
Step 22
Apply ganache over the entire surface. Then apply syrup to the third biscuit and put it in the refrigerator for 30 minutes. Then, using a spatula, trying to make the surface perfectly smooth, without a single lump, apply the remaining cream to the top of the sponge cake. Place in the refrigerator for 1 hour or in the freezer for 30 minutes (photo lost somewhere...)
Step 23
Glaze: Pour cream, 150 g of water, granulated sugar into a small saucepan with a thick bottom and mix very well. Bring to a boil over high heat. Add cocoa and mix well with a whisk. Remove from heat. Stir very slowly to remove all air. We do this using a teaspoon - immerse it in the center of the chocolate glaze, begin to stir slowly, gradually increasing the circles, every now and then slowly lifting the spoon from the surface (I mixed the cocoa with a spoon, apparently that’s why there were practically no bubbles) Cool the glaze to 43°C - it will take a long time, be patient.
Step 24
Pour 30 g of water over gelatin, wait until it absorbs all the water and swells. (The original contained 6 grams of gelatin, but I read somewhere that this was not enough, so I added 10 grams) Place the chocolate glaze in a water bath and dissolve the gelatin in it. It should come apart completely. Then cool the mixture to 24°C. This is very important - if you apply too warm glaze, it will immediately melt the cream and the entire surface of the cake will be covered in unsightly streaks.
Step 25
In the morning, take a long, sharp knife. Place it in boiling water for a minute until it warms up thoroughly. Then trim all sides of the cake until it is a very even rectangle. (I, as a beekeeper’s daughter, decided to do as my dad did when processing frames with honey: I poured a deep pan of water, lowered the largest knife into it, the water boiled, I took out the knife, wiped it and cut it. The knife was still not big enough, so small glaze stains). It's better to use a ruler. Before each new cut on the next side, wash and dry the knife so that the cuts are clean and not smeared with cream or ganache. Cool again.
Step 26
I decided not to deviate from classic cake decoration. I didn’t write OPERA, but I made the decoration in gold.
Step 27
Serving: Cut the cake into square pieces and serve chilled.
The story of one delicious “Opera”
The main thing here is not to rush. Remember the golden rule: measure seven times, cut once! While the biscuits are cooling, prepare the ganache, because it still needs to cool in the refrigerator. Boil the cream, pour in the chocolate broken into pieces. Let stand for a couple of minutes, stir until smooth.
Then add the oil and stir until it is completely dissolved. Place in the refrigerator until the ganache has completely cooled and set. Preparatory stage for making cream.
Pour boiling water over the coffee, dissolve completely and let cool to room temperature. Soften the butter at room temperature, mash with a fork.
Chocolate Opera cake
Opera cake is a French classic. Delicate cake, soaked sponge cake, chocolate ganache and delicate coffee cream. And be sure to have the Opera inscription on the glaze. Despite the fact that there are many layers in it, the height is only 4 cm! So that you can break off a small piece and enjoy the full taste. The most detailed recipe is on Maria Selyanina’s blog. I've been thinking about making this cake for a long time. The only thing that stopped me was that I don’t like coffee. And then I went to MK to Nina Tarasova, where we prepared just the Opera cake, but with matcha tea. It was wonderful! I was afraid that the cream would be heavy or not as tasty as I imagined it to be. But this cake exceeded all my expectations!
And so I was already thinking about making an Opera cake, but chocolate! After all, chocolate is what I love most. And today I made it. I also added Tonka bean to the chocolate ganache. It gives an incomparable aroma to the whole cake! If you have the opportunity to order it from an online store, be sure to do so!
I made a square cake with a side of 18cm.
So first let's prepare the biscuit. Preheat the oven to 200 degrees. First, put almond flour, powdered sugar and eggs into a mixing bowl. Beat for 10 minutes.
Then add melted butter.
While the almond flour and eggs are being beaten, beat the whites with sugar until they form snowy peaks.
Combine everything together, stirring gently with a silicone spatula.
Add the sifted flour and cocoa and stir gently again.
We need 3 cakes. Two will be on one baking sheet, one on the second. We cover the baking sheets with baking paper, pour two thirds of the dough completely onto the entire baking sheet, and pour the last third of the dough onto the second baking sheet so that the dough covers an imaginary square of the mold. For convenience, you can draw with a pencil on the back of the paper. Bake for about 10 minutes. Then take out the sponge cake, turn it over onto a clean sheet of parchment (baking paper) and remove the sheet on which it was baked.
After about 10 minutes I cut out the required squares and turn the biscuit over again so that it doesn’t o class=”aligncenter” width=”500″ height=”335″[/img]
Now for the ganache. Heat the cream and add a whole Tonka bean. Remove from heat and let it brew until the bean releases all its flavor. It can then be taken out and used again several times.
Bring the already flavored cream to a boil again, remove from the heat and add the broken chocolate into pieces.
Stir slowly until completely homogeneous. Once the ganache has cooled slightly, add the butter and stir. In principle, you can put it in the refrigerator for a while. But the ganache must remain plastic, not as liquid as at the beginning, but also not frozen, otherwise it will be impossible to spread it on the cake and you will have to put it in a water bath to soften.
Cook syrup for impregnation. Just bring the water and sugar to a boil and the sugar is completely dissolved. And spread each cake layer with a brush.
For the cream, we need to put the yolks with eggs in a beating container and start beating at high speed until foamy.
Meanwhile, pour water into a saucepan and add sugar. Bring to a boil and temperature of 117 degrees. As soon as the syrup is ready, immediately pour it into the beaten eggs, without stopping beating. You will get a fluffy mass.
Then, when the mass has cooled slightly, add room temperature butter, cut into pieces. Turn the mixer back on to medium speed. You will see that the mass will immediately shrink and the oil will separate. But keep whisking and you will see how the cream will gradually become smooth and soft.
Melt the chocolate in a water bath, cool it slightly and add to the cream. Beat at medium speed.
Let's start assembly. Place the first layer of soaked cake on top. Using a scale, divide the cream into two parts so that the layers are perfectly even. And put half of the cream on the cake, carefully and thoroughly leveling it.
We place the second cake layer on top, and all the ganache on it. We also carefully level everything. In this cake, all layers are perfectly even.
Then the third cake layer, and on it the second half of the cream.
In a blender, grind the chocolate to fine crumbs and sprinkle on top.
And put it in the refrigerator to harden. In principle, all the layers in the cake are so tender that it hardens quickly and well.
Then take it out and use a sharp long knife to carefully cut off the uneven sides.
After each cut, be sure to wash the knife and dry it so that the cut is neat.
And then cut in half and each half into 4 even rectangles.