Preparing for the Christmas holidays takes a lot of time. To please the children and add a festive mood, make your own gingerbread house. Get creative and decorate it with affordable products. Of course, you can buy ready-made blanks, but we will consider several options for independent “construction”.
The whole process can be divided into several stages, each of which should be given enough time so that the result does not disappoint. It is immediately worth noting that the structure hardens quickly. Therefore, it is better to bake a gingerbread house immediately before the feast or use it only for decoration.
How to prepare dough for treats?
The finished cakes should keep their shape, so we will use shortbread dough. Immediately stock up on various spices so that your festive Christmas house will attract attention with its aromas. There are two options for the finished test. Let's take a closer look at them.
1 way. For him we will take:
- 1 kg of baking flour;
- ½ tsp. soda;
- 3 eggs;
- 200 g each of sugar and butter;
- the same amount of honey;
- ginger, cinnamon, cardamom, cloves, allspice add ¼ tsp each.
First, using a mortar, grind all the spices. Add slightly warmed honey, granulated sugar, eggs and butter, which can be replaced with full-fat margarine if necessary. Mix everything well.
Separately combine soda with flour, and then, gradually adding to the spicy mixture, knead the dough. We put it in a plastic bag and put it in the refrigerator for several hours.
Method 2. The dough for the gingerbread house will have a chocolate flavor. The only thing that will have to be changed is to leave only ginger and cinnamon from the spices and remove exactly 4 tbsp from the composition. l. flour, which will replace cocoa in this recipe. We prepare the dough in the same way as in the first version.
Glaze for holiday dessert
You can also use 2 types of glaze. But the main one is icing.
For cooking, prepare the following products:
- 2 egg whites;
- 2 tbsp. l. lemon juice;
- 400 g of powdered sugar.
To achieve a good result, use a mixer.
- Separate the whites into a deep cup and turn on the device at first at slow speed, increasing it over time.
- Gradually, in small portions, add powdered sugar.
- When the consistency begins to hold its shape, add lemon juice. You can use food coloring if you want to use multiple colors for decoration.
As an additional option, you can also use chocolate icing for the gingerbread house.
To cook it take:
- 70 g margarine;
- 4 tbsp. l. cocoa and sugar;
- 2 tbsp. l. milk.
Mix all this in an iron bowl and cook a little over low heat until thickened. You can simply buy a chocolate bar and melt it using another bowl of hot water.
Cardboard blank - gingerbread house template
Now you can use our dimensions, but if you wish, then get creative and first draw the project on a piece of paper. Then it’s easy to implement the idea on cardboard.
So, we will make the following preparations:
- house base – 1 pc. (150x210 mm);
- side walls – 2 pcs. (107x120 mm);
- facade – 2 pcs. (with a wall height of 107 mm, 105x160 mm);
- roof – 2 pcs. (90x140 mm).
To make the house look natural, be sure to cut out windows and doors.
How to bake a gingerbread house?
Now we take our dough out of the refrigerator, divide it into 7 parts and roll it out thinly on baking paper. Place one template on top and carefully cut out the blanks with a knife or a special tool.
There is one trick that will help you immediately “insert frames” into the windows. Take a couple of caramels, you need to crumble them and fill the cut out gaps under the glass with fragments. Everything will melt in the oven and immediately stick to the cake.
Having transferred the blanks along with the paper onto a flat sheet, we send them to the oven, which was preheated to 180 degrees. Usually it takes 6-8 minutes to bake.
When pulling out the finished elements, do not forget that the cakes are brittle.
You can bypass all the above steps, buy ready-made blanks from Ikea and simply glue them together. Let's look at how to do this further.
A simple recipe or how to bake a gingerbread house from raw dough without honey for New Year and Christmas
The so-called simplified method is often used on an industrial scale, since it allows you to quickly achieve the desired result. It’s not difficult to implement this recipe with your own hands at home, although, as far as I know, it is not particularly popular among housewives.
Ingredients
- Wheat flour - 3 cups.
- Sugar – 1.5 cups.
- Butter – 100 g.
- Soda – ½ tsp.
- Eggs – 1 pc.
- Sour cream – 150 g.
- Spices – 1 tsp.
- Water – ¾ cup.
The volume of the listed components makes it possible to obtain workpieces with a total mass of 1,000 g.
Preparing sugar dough
If you decide to learn how to bake a New Year’s gingerbread house from raw dough, then just study the following points:
- Pour water into a metal container, add the entire portion of sugar, place over medium heat and bring to a boil. Stir the syrup as you go and skim off the foam with a slotted spoon.
- After boiling, add the oil and stir until it is completely dissolved. Immediately after this, add baking soda and spices to the mixture, heat it for another 30-60 seconds and remove from the stove.
- When the butter-caramel mass has cooled to 65-70°C and the foam has settled, add the egg and stir.
- Gradually add flour to the caramel mixture and knead the dough, first with a spoon in a container, and then on the work surface of the table.
- Wrap the semi-finished product in cling film and place in the refrigerator for 12-18 hours.
If the dough turns out sticky, you should not add more flour than recommended in the recipe, otherwise it will become too hard. Let it remain soft - later the dough will ripen in the cold. Bake the finished parts in the oven at a temperature of 180-200°C for 8-15 minutes. It is important not to overbake the workpieces; they are laid out hot on a flat surface and pressed on top for a second with something with a perfectly flat plane, for example, glass.
Assembling a gingerbread house with your own hands
Everyone understands that it is necessary to use edible products as glue. Some people use cream icing to join the pieces together. But there is a danger that the structure will collapse under its own weight.
Therefore, it is better to cook thick caramel syrup, for which you need:
- 80 ml water;
- 200 g sugar.
Place all this at once in a small saucepan and boil until brown. At the same time, do not stop stirring so that the mass does not burn.
This “glue” should be used while it is warm, because when it hardens, it immediately hardens and becomes unsuitable for the task at hand.
Now we proceed to the important and, perhaps, the most difficult stage.
- Remove parchment from all preparations.
- Place the base on a flat surface.
- We take the wall of the facade and with a plastic spatula or spoon (only carefully, so as not to leave marks on the wall) apply “glue” to its lower part. Immediately press it to the base.
- Now we take the side wall, but apply caramel not only to the lower part, but also to the end wall, which will be attached to the facade.
- We repeat these steps until all the parts are in place. We install the roof last.
Remember that it is better to apply the adhesive composition to a loose cake layer. After installation, the figure should be held a little so that the caramel “seizes.”
You can glue a gingerbread house from Ikea using the same method. If you realize that you don’t have time and the caramel hardens, then call an assistant. Children will happily work on “building” with you.
How to decorate a gingerbread house
When the main work is over, we need to give our building a festive look. Why is icing used more often? Yes, because it shines attractively and holds its shape. But, you can use not only it.
Often used:
- powdered sugar;
- multi-colored flat candies;
- chocolate M&M's;
- gummies;
- various confectionery toppings;
- coconut flakes.
Once you decide to decorate with white icing, transfer it to a pastry bag or a simple plastic bag, making a small hole in its corner.
Decoration should begin at the joints in order to hide unevenness and glue that has come out due to careless actions. Then we proceed to decorating the windows and door (if you also baked and attached it). Here you can draw various patterns around the edges of the shutters.
On the roof we will make a pattern of tiles or glue candies onto the white glaze. You can also simply apply patterns and make hanging icicles along the edge.
Christmas, New Year's house - ideas
If you have no experience or you just want to make your own, unique gingerbread house with your own hands, then the proposed ideas may help you find “your” option:
- If you are making a rustic hut, don't forget to add a chimney. Draw various snowflakes. From the remaining dough, cut out figures of pets, which you will place on the base of the house, you just have to make it bigger.
- Do you want the lights on in the house? Place a candle inside, and for ease of lighting, do not glue the roof to the walls.
- The shape of the house does not have to be rectangular and even. You might want to implement the idea of a “hut on chicken legs.” Then you will need Baba Yaga, who can easily be molded from the same dough.
- A multi-story gingerbread house is also not difficult to decorate. Suffice it to recall foreign films in which people use colorful garlands, signs and billboards. If you wish, everything should work out for you, and the idea will become original.
- You can assemble a yurt from triangular shortcakes, and place edible figurines with deer and sleighs nearby.
- If you have experience, then try to assemble a carousel, which will need colorful design. Use candies and marmalade here.
When there are a lot of helpers, it’s possible to make a whole town out of gingerbread houses or build a whole fairytale castle. Remain children at heart at least during these holidays and give free rein to your imagination!
This recipe is amazing, the aroma of this house is so maddening and attractive that you want to eat everything at once!
But don't do this! The best thing is that the brightest taste and aroma opens in 2-3 weeks! Then your house will begin to emit such an aroma that you will immediately understand - it’s time! If you prepare this house for Christmas, it will delight you with both taste and aroma until the end of January! Immediately after baking, as soon as the dough cools, it becomes hard, but by the time it ripens, it becomes soft, sometimes even the roof falls in - it will be so soft and melting in the mouth. This gingerbread house recipe is also suitable for novice housewives! How to make dough for a gingerbread house:
(The honey dough recipe was published in the CAKE DECO magazine, author Svetlana, personally tested, written down from my own experience)
To prepare this dough you will need: 500 gr.
honey, 2 eggs, 500 gr. sugar, 300 gr. butter, 50 gr. cocoa, 2 tsp. baking powder, 3 tbsp. l. rum or cognac or 3 drops of flavoring, Spices - 1 tsp. cinnamon, a pinch each - cardamom, cloves, ginger, anise, zest of 1 orange and 1 lemon, vanilla, 1250 gr. flour. Step-by-step preparation of dough for a Christmas house:
1. Place honey, sugar and butter in a large (heat-resistant) container. Place on low heat and heat, stirring. Make sure it doesn't boil!! We wait until the sugar is completely dissolved - take the mixture into a spoon and pour it back, making sure that there are no sugar crystals in the mixture! Remove from heat and leave to cool until warm.
2. Mix half the flour with spices, baking powder, zest and cocoa.
3. Add eggs into the warm honey mixture, not beaten, but simply mixed until smooth, in 2 additions. Add rum/cognac.
4. Gradually stir the spiced flour into the honey mixture with a spoon. Next, we begin to add the rest of the flour little by little, but not all of it. Bring the dough to a state of dense and elastic. And put the dough in a bag in the refrigerator to rest. This will reveal the properties of the dough. Usually the dough rests overnight, the next day you can start adding the rest of the flour. Flour is mixed into the dough until it is elastic, but not hard.
It is not recommended to mix in all the flour specified in the recipe. I have had occasions where much less flour was needed, and also on one occasion where more flour was used than in the base recipe. This happens because of other components - for example, because of the quality of honey.
In order to understand whether there is enough flour, you need to roll out the dough (no thinner than 5 mm) and cut out something not large. I usually try it on a Christmas tree (Photo 2). If the Christmas tree has lost its shape (photo 3) - add more flour boldly! (Photo 4)
Photo 2 Photo 3 Photo 4
BAKE at 180 degrees. The original recipe said 20 minutes, according to experience - no more than 10 minutes. And then, after 8, you should already be careful that it doesn’t burn!
Well, we have the dough ready, we can start building the house! We take absolutely any house template! I made very small ones and made the template myself. If it is difficult for you to draw a template for a gingerbread house, you can take a ready-made one in the previous article How to make a gingerbread house, recipe for goats and gingerbread, master class. or count by cells and draw the same on a notebook sheet.
Roll out the dough, and remember that it must be at least 5 mm. Otherwise, the wallpaper will then be very hard and will never become soft. Lay out the template and cut out the parts. Lay them out on parchment.
And we bake.
If it's burnt...
If you happen to get a little burnt while baking, don’t be upset. We take a knife and scrape it, only carefully so as not to break the workpiece. If the edges are not straight, then the house may “move” during assembly. To avoid this, you can also trim the edges with a knife or grate them. Then your blanks will become even and the house will be easier to assemble!
That's it, the preparations are ready!
The dough is enough to make 4 small gingerbread houses or 1 large one with various decorations such as Christmas trees, fences, etc. It depends on your template! You can either leave the remaining dough in the refrigerator or freeze it! It keeps great! How to assemble a gingerbread house:
We will connect and decorate the pieces with icing sugar.
How to make sugar icing for a gingerbread house:
I take the following ratio: for 1 protein, approximately 200-250 grams of powdered sugar. Why approximately, because proteins are also different, you need to look at the mass. But you shouldn’t decide whether it’s enough or not right away, when you start beating with a mixer, but after 3 minutes, when the mass turns white, and if it’s liquid, then add more powder! You only need to use purchased powder! Otherwise, you will get large particles and the color will not be white. In the industrial production of powder, additional cleaning units and special equipment are used to make the grind very fine. By the way, it is best to additionally sift purchased powder through organza, then the glaze will be perfect.
You need to beat until soft peaks form; if it turns out too liquid, everything will flow; if it’s too thick, it will be difficult to apply and will not stick to the workpiece.
You can apply glaze to the workpieces in several ways: using store-bought pastry bags, using regular bags with a sharp edge, using a syringe, or cream nozzles.
I have different attachments - however, for those who are keen, I recommend buying them! Great potential for creativity opens up! Therefore, I will tell you how I decorate using these attachments.
You can also put the tips in a piping bag, but I think that's a waste of money. Because these bags are disposable, you just throw them away later))) I suggest making cornets from parchment (you have it, since you baked on it!)
How to make a cornet - a bag for glaze with your own hands:
Cut a triangular piece from your roll of paper,
and cut into triangles. It turns out 4 triangles. We cut it carefully; the quality of the cornet made depends on this.
and connect to the corner.
We do the same with the other edge, bringing it to the same corner.
We wrap the resulting edge inward,
carefully cut in two places and wrap the piece on the outside to secure it.
So, we are ready to assemble the gingerbread house, we have the blanks, icing, and cornets.
How to assemble a gingerbread house!
Cut off a corner of the cornet, insert the nozzle into it and apply the glaze with a spoon. We wrap the edge and secure it.
We begin to paint the details, this time I first drew up the blanks and only then assembled them, but you can paint an already assembled house.
When painting, it all depends on your imagination; you can make a complex drawing depicting flowers or brickwork, I had a simple drawing that was accessible to everyone! I made an imitation of tiles on the roof, and decorated the sides with simple curlicues. It looks beautiful if you cover the entire side with glaze, let it dry and paint on top, but it turns out to be a lot of glaze, and I had a house for children!
When the preparation of the blanks is completed, you need to give it time to dry, you can drink tea))))
Then you can start assembling the house! You can assemble the house either on a gingerbread base or, like me, on any other stand - I have disposable plates. Assembling begins with one of the end parts and sides - glaze is applied and, as it were, glued to each other. If the glaze is liquid, it will be difficult to glue, because... It won’t stick; if it’s thick, it simply won’t apply.
Glue all 4 sides and let them dry - I did it for about 20 minutes!
We hold both sides of the roof for a while to prevent them from rolling off, and leave them to dry a little. After that, you can start making snow decorations from the remaining glaze! Don't forget to make like icicles from the roof!
This time my windows are empty, due to lack of opportunity to buy marmalade in Egypt. But if there is such an opportunity, we buy either single-color large pieces or straight pieces (sold in large supermarkets, as briquettes). Cut it off, or take a ready-made marmalade, and glue it onto the icing in place of the window! After drying, you can decorate the window with snow decor. You can also make shutters for windows from the cut out part and glue them to the glaze as well. Sincerely, Antonina Bodyagina
Many step-by-step master classes with photos on baking and sweets, dozens of recipes for delicious cupcakes can be found in the ABOUT TASTY section! Bon appetit and inspiration!
For several years now I have been baking gingerbread houses on New Year’s Eve and Christmas, but somehow they don’t turn out very well, sometimes uneven, sometimes strange. I’ve been talking about this for the last two weeks and now... I came to such an agreement that my husband told me that there was nothing to do there, and it would take a long time to explain... I took it myself and did it...
Well, it’s apparently simple for an engineer-designer, but for us lawyers it’s not possible...
In general, I’m still in shock how it all turned out like that for him, and after all, I dug up a recipe for gingerbread somewhere, I haven’t cooked it like that. And he gave me a lecture that the gingerbread dough should be kept in the cold for a day, what happens in it... some kind of complex word, I can’t undertake to reproduce. And in two weeks the finished product will only get better and ripen. I can only add that the gingerbread is really very tasty. I was surprised that this amount of dough was enough for the house itself, for the large gingerbread at the base, for the Christmas trees and the door. Probably it’s all a matter of pedantry, if it says you need to roll 4 mm, then that’s how it should be.
For gingerbread dough, prepare flour, honey, butter, eggs, sugar, soda.
It is better to take brown sugar.
Place honey, butter, sugar in a bowl.
Place in a steam bath and heat until the butter and sugar dissolve.
Add spices. I would also like to say that this mixture can be prepared in advance. Just grind all the spices in a coffee grinder and sift through a sieve. Add a little flour and soda. Mix.
Remove the mixture from the heat and cool to room temperature and only then beat in the eggs.
Add the rest of the flour and knead the dough. Wrap the dough in film and put it in the refrigerator. The dough should lie for at least a day.
While the dough is cooling, prepare the patterns. Each part will need to be baked in duplicate.
When the dough is ready, you need to roll it out. It is important that the thickness of the parts is the same and therefore it is better to use a roller that rolls out the dough of the required thickness over the entire size of the cake. Using these attachments, set the thickness of the dough. When rolling out the dough sticks, use flour.
Cut out two pieces of each pattern and bake at 180 degrees until done, about 15 minutes.
Remove the finished parts from the sheet and cool.
Let's prepare the mixture for drawing; this will require powdered sugar, egg white, and lemon juice.
Do not beat! Just grind the egg whites with the powder with a fork and add lemon juice. The mixture should not spread and should be comfortable to draw.
Using a pastry envelope, decorate the house at your discretion.
paint the roof to match the tiles, and don’t forget about the remaining two walls.
Christmas trees will also come in handy, they will be like this.
Leave all the parts to dry for a couple of hours and when the glaze is dry, you can assemble the house. To do this, we cook a thick sugar syrup, almost caramel, and do everything quickly, the caramel will set quickly, it is not necessary to spread it over the entire joint, it is enough to fix it in several places. Caramel holds very well and reliably. Although you can glue it to glaze, it takes longer to dry and is more fragile.
The house is ready. Its aroma is so spicy and New Year’s that you can’t do without a Christmas tree!
It would be a new year soon!
Happy and Happy Holidays!
Helpful Tips:
*Instead of cinnamon, ginger and zest, you can use 3 tsp.
any spices for gingerbread *If you want the color of the dough to be darker, then replace a couple of tablespoons of flour with cocoa *You get quite a lot of dough, probably enough for 2 eggs, but I made it with a reserve (you can make cookies from the rest) . *Preparation can be divided over several days: on one day make the dough in the evening and draw a pattern, on another day cut out and bake the house parts, on the third day decorate and glue. 1. Prepare the dough:
Heat honey with sugar until the sugar is completely dissolved.
*It is better to take fine sugar and add it to the honey gradually, in portions, as it melts.
Add butter and spices, stir until dissolved.
Add eggs one at a time, stirring each time until smooth. Sift some of the flour with soda and add orange zest, pour in the honey mixture and stir.
Add the rest of the flour gradually until you get a soft dough. Divide the dough into 2-3 parts, give each a flat rectangular shape, wrap in cling film and put in the refrigerator for 3 hours (or better yet, overnight).
*It will be easier for you to roll out a flat layer of dough than a whole round lump. *The dough immediately after cooking becomes a little sticky due to the honey; after a night in the refrigerator it becomes more convenient to work with. Cold dough is rolled out with a rolling pin with little effort, but it sticks less to your hands and to the board, and it will be easier for you to work with the details of the house. *The dough should be removed from the refrigerator approximately 30-60 minutes before use.
so that it warms up a little.
2. Draw a diagram of the house:
It will be very easy to draw all the details of the house on large sheets of checkered paper. We will need - - 2 pieces of end walls (high), one of them with a window and a door slot - 2 pieces of side walls - 4 pieces of shutters for windows - 2 pieces of window sills - 2 rectangular chimney pieces - 1 rectangular chimney piece with a cutout at the bottom
2 roof pieces - 1 long piece for the chimney at the back of the house - 1 piece for the base of the house measuring 20x20 cm
You can see the dimensions of all the parts in the photo (click on the photo with the left mouse button to enlarge it). Cut out the parts and transfer them to cardboard or thick paper, cut out again.
*The house according to this scheme has slightly trapezoidal walls, with bevels, which makes gluing it a little more difficult. You can simply make the walls rectangular if you want to make it easier to connect the parts.
3. Baking the details of the house:
Roll out the dough to a thickness of 4 mm (it is better not to make the parts too thin, as they will be more fragile, or too thick, as they will be more difficult to work with)
Cut out the details of the house according to the prepared patterns. Mark “logs” on the walls of the house with a stick, and “tiles” on the roof parts with a bottle cap.
*I also made additional parts for the small bench. You can also cut out Christmas trees or little animals from the excess dough using molds (then they can be placed next to the house). *After cutting out large parts and transferring them from the board to a baking sheet, check them again with the pattern and adjust them a little with your hands if the shape was slightly deformed when transferring.
Bake the house parts at 175 degrees for about 10-12 minutes, until slightly golden brown (do not overcook them in the oven).
I made the windows with glass like this:
Having cut out the part of the wall with the window and transferred it to a baking sheet covered with parchment paper, I again laid out the pattern and cut out windows on the baking sheet with a knife and carefully corrected them with the handle of a teaspoon.
*You can also pour caramel crumbs into the windows not immediately, but only after 5 minutes of baking, so they will boil and bubble less in the oven. *I added it a second time, after the first layer had melted, taking the walls with windows out of the oven again. This made the glass thicker.
Remove the parts of the house from the baking sheet carefully, using a spatula, allowing them to cool slightly. The parts of the walls with windows and glass must cool completely on the baking sheet!
The remaining parts can be transferred to a flat surface to cool; you can carefully trim them if something turns out uneven (while they are still warm, it is easier to cut them). Let the finished parts rest for a couple of hours.
4. Prepare the glaze:
Lightly beat the egg white with a fork, sift the powdered sugar and add it to the egg white gradually, stirring thoroughly, until the glaze reaches the desired thickness. The amount of powdered sugar may differ slightly from that indicated in the glaze, you may need more or less, rely on consistency and thickness. You can try putting a little icing in a bag with a small round tip (or just in a bag, cutting off a corner) and try to draw a couple of lines, they should not blur. File the edges of the wall parts using a grater to create oblique cuts at an angle of approximately 45 degrees, this will make it easier to connect them together.
…………………………………………………………………………. Next, we start decorating the walls with glaze, and then we will glue them together with caramel.
Many people do the opposite: first they glue and assemble the house, and then decorate it. It is easier to decorate parts lying on the table than a house assembled vertically, but there is a risk of slightly damaging the already made decor when gluing. It is more convenient to glue a house without decoration, but its decoration will then be less neat. Choose the method that seems more correct for you personally. I first painted the walls and only then glued them together. When gluing, I actually slightly violated what I had drawn before, but then I easily corrected everything once the house was assembled.
You can glue the house together not with caramel, but with the same glaze, but it dries much longer: you will have to hold the walls longer and wait until the parts dry to attach the next ones. Caramel is a little more difficult to work with, but it dries very quickly and sticks stronger than glaze. ……………………………………………………………………………….. 5. Decorate the details:
We draw different patterns-decorations with glaze, glue shutters and window sills, outline the tiles, and glue the chimney. Having drawn the desired patterns, immediately add multi-colored sprinkles where necessary (before the glaze begins to dry out)
I decorated the chimney with whole almonds, or you can sprinkle chopped ones (this will be the “stonework” of the chimney). Allow the glaze to dry completely and only then proceed with gluing.
6.Glue the house together:
Place a small frying pan over high heat, add 1-2 tbsp. sugar, add 1 tsp. water and stir until completely melted. Then add 1 more spoon and stir again until the sugar melts, etc. If the sugar does not melt well at first, you can add a teaspoon of honey and remember to stir constantly, the lumps of sugar will gradually disperse. There is no need to add any more water or honey. Let the sugar simmer for a couple of seconds (but not long so it doesn’t start to burn), turn off the heat. Take the parts, dip the slices into hot caramel and attach one to the other.
*Caramel hardens quickly, so you will also have to work quickly. *Caramel is very hot, be careful not to burn yourself!
Place a bowl of cold water nearby so you can dip your hand in it if you accidentally get hot caramel on it.
*First, we attach the long end wall to the side wall, hold it for 20-30 seconds, then attach another end wall and hold it, and then another side wall. *Have someone help you hold the walls of the house (or you can prop them up with cups or other objects) *Next, attach the house to the base, hold it, slightly pressing it down. If necessary, you can lightly grease the joints from the inside with hot caramel.
*The last thing you need to do is attach the roof parts. Because Since the shape of the walls is slightly trapezoidal, you will have to slightly concave the upper triangular part of the end walls towards the center of the house (otherwise the roof will not fit on the walls). If you made the walls just rectangular, it will be easier. Here I no longer dipped the parts in caramel, but quickly applied it to the joints with a spoon and placed the roof parts on top. Finally, I coated the joint on top of the roof with caramel. *If the caramel hardens in the pan during operation, it can be reheated and melted. I reheated it twice.
If you have the opportunity to spend the whole day in the kitchen, don’t be lazy to make your own gingerbread house! This is an ideal decoration for the New Year's holiday and a great joy for little children, who, by the way, can safely be involved in the process.
Making a gingerbread house is creative and fun! By getting together with the whole family, you can develop a design, come up with an interesting design, and just have fun. So, let's start the process and prepare a gingerbread house, following the step-by-step recipe with photos!
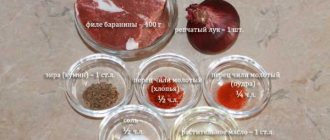
Ingredients:
For the test:
- butter - 120 g;
- honey - 200 g;
- ground ginger - 4 teaspoons;
- cocoa powder - 2 tbsp. spoons;
- ground cinnamon - 1 teaspoon;
- sugar - 100 g;
- baking soda - a small pinch;
- flour - about 300 g (how much the dough will take).
For caramel (gluing):
- sugar - 100 g;
- water - 40 ml.
For the glaze:
- lemon juice - 1 tbsp. spoon;
- egg white - 1 pc.;
- powdered sugar - about 150-200 g.
For decoration:
- colored caramel - 2-3 candies;
- chocolate pillows - about 100 g;
- any confectionery toppings - optional.
A recipe for Easter cake, the serving of which will not leave anyone indifferent!
The brightest day of spring is Easter!
In my family, they start preparing for this holiday several weeks in advance. The apartment is thoroughly cleaned of all garbage, my mother is constantly cleaning or washing something, and my father... March 27, 2020, 17:25
Photo source: pixabay.com
The glaze recipe for a gingerbread house is also simple (proportions are given for 1 protein, you increase the quantity accordingly):
- 1 protein;
- 1 tsp lemon juice;
- 200 g of powdered sugar.
First you need to beat the whites into a foam, and then, in small portions, add the powder. This way you can adjust the thickness of the glaze yourself, since the size of everyone's eggs is different.
Be sure to add some kind of acid (vinegar, citric acid or lemon juice) to the glaze. This is necessary so that the glaze is elastic and not so sweet. And don’t be upset if you suddenly don’t have powdered sugar at home. It is quite possible to replace it with fine sugar, just add it a little at a time to the protein so that the sugar has time to dissolve.
How to make a drawing of a gingerbread house
Photo source: pixabay.com
It is better to make a drawing in advance, choosing the size that suits you. If you are making a house for the first time, then cut out the parts and try to match the paper blanks first. This way you will see what your future gingerbread house will be like and you can adjust the dimensions. Be sure to ensure that the size of the walls and roof, as well as the height of the side and front walls, match.
Another secret: make blanks from cardboard, one side of which is glossy. When you cut out pieces from the dough, it is this smooth side that you place on the dough, so the cardboard will not stick!
Lifehacks for baking preparations
So, the time has come to cut out the blanks for the future house. We take the dough out of the refrigerator, let it rest for a while at room temperature (10 minutes) and begin to roll it out. Roll out the dough immediately on parchment, which will be used for baking, to make it easier to transfer to a baking sheet.
Do not roll out the dough thinner than 0.5 cm, otherwise the walls will turn out very fragile. And now a life hack! If you put strips half a centimeter thick along the edges of the dough and roll them directly with a rolling pin, then the thickness of the dough will be the same everywhere. Is it really convenient?
After you have rolled out the dough, we begin to cut out the parts according to the patterns. This is convenient to do with a pizza wheel. It is better to cut out all the doors and windows using raw dough, although if you forget to do this, you can correct them with a sharp knife immediately after baking.
Photo source: pixabay.com
So, the blanks are cut out, remove the excess dough and carefully transfer the parchment to a baking sheet. Make sure that the baking sheet is level, otherwise the workpieces will be deformed. Bake the gingerbread house parts for up to 10 minutes at 180 degrees. Don't bake them too much, just until lightly golden brown. After baking, let the cakes rest and it is better to assemble them the next day.
How to assemble a gingerbread house: secrets of craftsmanship
On the day you plan to assemble the gingerbread house, it is better to enlist the help of assistants. Usually, children love to do this exciting activity, but you can also involve your spouse!
First, inspect all the parts, since before gluing you need to trim the edges using a regular grater. Since the dough contains baking powder, the dough becomes slightly deformed during baking. Place the walls and roof against each other and see which edges need a little float to get a good fit.
Photo source: pixabay.com
Don’t rush to glue the parts right away, because decorating a vertical plane is difficult - the glaze will flow down. Wall decoration with glaze and decorations is carried out even before the house is assembled.
The parts need to be glued together with icing, which is transferred into a pastry bag and squeezed out as if from a syringe. By the way, a pastry bag can be made from a stationery file by cutting the corner diagonally.
Be sure to think about the base on which your gingerbread house will stand. This can be gingerbread dough (then it needs to be baked along with other parts) or cardboard, or any flat dish. Only if you want to speed up the drying process of the glaze in the oven, do not use a plastic base. The house must be assembled immediately on the base, since it will be almost impossible to move it.
Photo source: pixabay.com
So, the helpers are nearby, we begin to assemble the house. Apply a stripe of glaze to the base and place the first wall. To make the glaze stick better, you can coat the gluing areas with water, but only a little. Now have an assistant hold these two walls while you continue the process on the opposite side. You can also prop up the walls with any convenient objects such as cans to make sure that the house does not fall apart.
After the walls are glued, let the house dry. You can speed up the process by drying the house in the oven, which is well heated, but the fire is already turned off. About 10 minutes and the cream begins to thicken! Just don’t let the glaze start to darken – take the house out right away.
When the walls are dry, you can lay the roof on the glaze. Don't skimp on the glaze - it should practically drip off! And be sure to support the roof with supports in the form of any objects. You can also secure the roof with toothpicks, but if your walls are thin enough, this may damage the dough.
Decorating the gingerbread house
After the house is glued, let it dry for a day. As we have already said, you decorated the side walls even before gluing the house together. And now it’s time to decorate the roof and the “yard” next to the house. This is where your imagination will take maximum flight!
Photo source: pixabay.com
Small candies, sprinkles, nuts, and marmalade are suitable for decoration. And tiles are made from glaze, sweets, nuts (almonds), crispy wafers, etc. Next to the house you can make gingerbread men, icing Christmas trees and any other decor you like.
Photo source: pixabay.com
The remaining glaze is usually distributed throughout the house, as if it were covered with snow. And that’s why all the gingerbread houses look like they’re from a snowy fairy tale!
Photo source: pixabay.com
We hope that with our tips and tricks you will be able to make the best gingerbread house ever. And if you have your own ideas about this, share them in the comments.
Do you want to please your loved ones in an original way? Give them gifts in a jar! And you can see ideas HERE!
New Year's gingerbread house recipe with photos step by step
- First of all, you need to cut out the blanks for the gingerbread house from cardboard. You can find ready-made templates on the Internet or come up with a model yourself. In our example, we made blanks of the following sizes:
- side walls - 2 pcs. (107x120 mm);
- roof - 2 pcs. (90x140 mm);
- facade - 2 pcs. (105x160 mm, with the wall height being 107 mm);
- house base - 1 pc. (150x210 mm).
- Also, do not forget to cut out windows and doors on the facade and side walls. If you want to make a large house, you need to prepare 1.5-2 times more dough than indicated in the recipe.
- Once the templates are prepared, we begin kneading the dough. Mix the softened butter with sugar and beat with a mixer until a soft and fluffy mass is formed. Add liquid honey and beat again.
- In a separate bowl, mix the dry ingredients: ginger, cinnamon, cocoa powder, baking soda and 100 g of sifted flour.
- Add the dry mixture to the oil mixture in portions, stirring. Gradually add flour and knead the dough.
- We adjust the dosage of flour during kneading: it may be needed a little more or less than indicated in the recipe. The dough should be soft and slightly crumbly, not sticky to your hands. Roll it into a ball and place it on the refrigerator shelf for 20-30 minutes - after cooling, the dough will become more elastic.
- Roll out a thin layer on parchment paper and cut out parts of the future house using the templates. We make sure that the thickness of the layer does not exceed 3 mm! If you make the layer thicker, the dough may remain loose inside, and the workpieces will not be strong enough. In addition, the finished house can simply collapse under its own weight.
- Carefully transfer the parchment with the parts to a baking sheet. We decorate the windows of the house with caramel. To do this, grind it into fine crumbs, for example, by placing it in a plastic bag and tapping it with a chop mallet. Place caramel crumbs in the “windows”. When exposed to temperature, the caramel will quickly melt, and the windows will become colored, as if the lights were turned on in the house.
- We bake the components of the house for about 8-10 minutes at 180 degrees - do not overbake! Freshly baked dough will be soft at first, but will then harden very quickly.
- We collect the scraps of dough and bake cookies using molds in the shape of Christmas trees, deer, people, etc. By the way, ready-made cookies can also be used in the design of the house.
- When all the component parts are completely ready, we begin to “assemble” the gingerbread house.
- We will glue the parts of the house together using caramel. To prepare it, pour sugar into a fireproof container with a thick bottom and add drinking water. Stirring, bring to a boil over medium heat.
- Continuing to stir, cook the sweet mixture until golden brown. To check readiness, take a small amount of syrup and place it in a container of cold water. If a solid caramel forms after a couple of seconds, the syrup is ready!
- Now let's move on to the most important stage. Carefully, so as not to get burned, dip the parts of the house end-to-end into hot caramel and quickly fasten them together. First, we glue the side wall and facade together and attach them to the base.
- Then we attach the second side and the back wall of the house. You need to work quickly, as the caramel hardens very quickly. At this stage, it is better to get an assistant, since it will be difficult to hold the house together alone. To prevent the unused caramel in the bowl from hardening, it is better to cover it with a lid and periodically warm it up over low heat.
- Last but not least, we attach the roof. Leave the formed house for about an hour.
How to make gingerbread house frosting
- Mix cooled raw protein with lemon juice. Beat until white foam is obtained.
- Add sweet powder in portions, without ceasing to work with the mixer. As a result, the whites need to be beaten into a stiff mass, otherwise the icing on the house will not harden. If necessary, increase the dosage of powder.
- Place the glaze in a plastic bag and cut off the tip. Carefully process the gluing areas to hide traces of caramel. We apply glaze to the roof, and then attach chocolate pads to imitate tiles. If desired, we complement the house with any confectionery toppings. You can also use the glaze to form “icicles”. If the consistency of the glaze is correct, they will hold their shape well and harden quickly.
Congratulations! You made your own gingerbread house! Unfortunately, gingerbread dough quickly becomes stale and hard. Therefore, if you want to have a tea party, it is better to do it immediately after preparation, or simply leave the house as decoration. We wish you pleasant and happy holidays!
A simple recipe for a gingerbread house in the oven with templates and patterns
Another simple option for preparing dough for holiday crafts with templates and drawings.
Ingredients:
- Flour – 700 g
- Butter – 200 g
- Honey – 200 g
- Sugar – 250 g
- Eggs – 2 pcs.
- Cocoa – 25 g
- Baking powder – 1 tsp.
- Cognac (rum) – 1 tbsp. (not necessary)
- Lemon, orange zest
- Spices (cinnamon 2 tsp, ginger 1 tsp, ground black pepper 0.5 tsp, cloves 0.5 tsp, nutmeg 0.5 tsp)
- Cocoa 1-3 tbsp. (for a natural brown color one is enough, for chocolate lovers you can use 2-3 spoons)
Preparation:
- Combine butter, sugar, honey, heat over heat until dissolved, avoiding boiling.
- Add cocoa, remove from heat, stir.
- Cool the mixture slightly and add the eggs, beaten with a fork, one at a time.
- Add alcohol, lemon or orange zest, spices, add flour little by little, kneading the elastic dough (at the end it is more convenient to knead not with a spoon, but with your hands on a table sprinkled with flour).
- Divide the workpiece into three parts, wrap it in cling film, and cool it in the refrigerator overnight, preferably overnight, but at least for 3-4 hours.
- We take it to the table, let it rest for an hour, roll it out with a rolling pin on cling film or parchment, cut it out according to the pattern, remove the excess.
- Bake on parchment (it’s convenient to roll out on it to minimize damage to parts when transferring to the oven) at 180 degrees for 10-15 minutes.
- Cool directly on the baking sheet, do not even leave it warm, otherwise the cookies may break.
- We fasten the walls, roof, and other elements of the craft with glaze, as described in the first paragraph.
By the way, you can make gingerbread or cookies from the leftover dough; this amount of base is enough for additional baking...