Delicious “Mushroom” cookies: recipe with photo of the finished dessert
This dessert can be prepared in different ways and using different forms. Today we will present you with several options. For one of them, you need to prepare a double-leaf mold with “mushrooms”. This dessert should not be filled with filling, as it is prepared in its entirety, but turns out very tasty and tender.
So, to knead the dough for “Mushrooms” cookies, you need to purchase:
- good margarine (intended for baking dessert) - about 250 g;
- medium country eggs - 3 pcs.;
- apple cider vinegar and table soda - a dessert spoon each;
- fine granulated sugar - about 1.5 cups;
- high-grade light flour - from 800 g (add until an elastic dough is obtained);
- vegetable - used to lubricate the mold.
Soviet cookie recipe
During Soviet times, filled cookies consisting of two halves were very popular. Forms for such baking made it possible to make nuts, cones, shells and mushrooms.
To bake mushrooms in this form on gas, you need to take:
- 2 eggs;
- 95 g sugar;
- 180 g melted margarine;
- 1.5 g soda;
- 2.5 g salt;
- 390 g flour;
- vanillin to taste;
- boiled condensed milk, thick jam or cream for filling.
Cooking method:
- Pour margarine into the eggs mashed with sugar, stir, add slaked soda and other ingredients, knead until smooth.
- Lightly grease the baking dish heated on gas, then fill the recesses in it 1/3 with dough and bake the mushroom halves over the fire, spending 2-2.5 minutes per batch. To prevent the baked goods from burning, the pan must be turned over every 30-45 seconds.
- If the dough has slipped out of the edges of the mold somewhere, you need to carefully cut it off from the hot halves with a knife. Fill the cooled cookies with cream and combine in pairs to make mushrooms.
Preparing the sand base
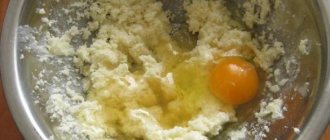
Before you make whole “Mushroom” cookies in a mold, you should mix them thoroughly. To do this, you need to beat the chicken eggs with a blender, and then add granulated sugar to them and wait until it is completely dissolved. Meanwhile, place it in a bowl and melt it over low heat. After this, it needs to be cooled a little.
After the granulated sugar has melted, add margarine to the sweet egg mixture, add soda, and then add light flour. The wheat ingredient must be added until you get a uniform, soft and elastic base that does not stick to your fingers.
With added starch
To achieve a crumbly cookie texture, housewives replace part of the flour, and sometimes all of it, with starch. For baking, you can use both corn and potato products. The first gives more tenderness and the feeling of products melting in the mouth, but even with potato starch the baked goods are quite crumbly.
List of necessary products for one batch of shortcrust pastry with added starch:
110 g butter or margarine; 2 eggs; 110 g sugar or powdered sugar; 3 g salt; 5 g baking powder; 215 g starch; 335 g flour.
Preparation:
Grind soft, creamy butter with sugar or powdered sugar.
After all the sweetener crystals have dissolved, stir in the eggs, salt and a mixture of baking powder, starch and flour. The dough should be quite dense. Divide the total mass into four parts, wrap each part in film and put it in the refrigerator to stabilize. After 30-60 minutes, take out small dough balls one at a time and form mushroom cookies. From this dough you can make bottle-shaped champignons, boletus mushrooms in the oven, or cookies from two halves in a gas mold.
We bake double “Mushrooms” (cookies) in the form
If anyone remembers, the presented delicacy can be made not only in whole form, but also in half. However, this will require a different form. It looks like this: the dish has two doors, in one of which there are recesses in the form of mushrooms, and in the other there are bulges that make a cavity in the product where the filling can be placed. By the way, “Nuts” cookies are often made using a similar mold.
So, to make the presented delicacy, we will need:
Making homemade treats in the oven
If you don’t have molds for preparing “mushrooms” on the stove, you can bake them in the oven. However, to form such cookies you will need a regular plastic bottle.
So, what ingredients are needed to make Mushroom Cookies? The recipe with a photo of this dish requires the use of such products as:
- natural butter - approximately 250 g;
- medium-sized granulated sugar - a full glass;
- medium country eggs - 2 pcs.;
- cocoa powder - a small spoon;
- sifted high-grade flour - 4 cups;
- table soda - half a dessert spoon.
Without form using a bottle
At first glance, these cookies are difficult to distinguish from real champignons, and such delicious beauty is prepared without any equipment. To shape the cookies, you only need the thin neck of a plastic bottle.
When starting to bake crumbly champignons from shortcrust pastry, you should prepare:
180 g butter; 145 g powdered sugar; 2 eggs; 3 g salt; 7 g baking powder; 310 g flour; 190 g corn starch; 90-100 g cocoa powder.
How to knead the dough and form mushrooms using a bottle:
Beat soft butter together with powdered sugar until fluffy, then beat in eggs one at a time. Combine the bulk ingredients (except cocoa), mix thoroughly and add to the dough. The result should be a soft and plastic mass. Divide the entire lump of dough into balls no larger than the size of a walnut. Next, dip the neck of the bottle in cocoa and press it into the dough ball so that part of it fills the neck, forming a stem. Using a rotating motion, unscrew the neck of the dough and place the formed mushroom on a parchment-lined baking sheet. To ensure that the champignons retain the roundness of their caps, they can be baked in suitable-sized hemispherical molds, for example, for nut cookies.
When all the champignons are formed, place the baking sheet with them in the oven for 20-25 minutes, preheated to 180 degrees. It is worth taking into account the fact that due to starch, the baked goods will be light, perhaps they will only slightly brown at the edges.
Knead elastic dough
To bake “Mushrooms” cookies in the oven, mix the shortbread dough. To do this, you need to soften the butter (butter) at room temperature, and then beat it together with granulated sugar and using a mixer. Next, you need to sift the high-grade wheat flour along with baking soda into a separate bowl. After this, the bulk mass must be gradually poured into the oily mixture and everything must be mixed thoroughly. As a result, you should get an elastic and fairly soft dough that does not stick to your fingers.
How to make a treat in the oven
Mushroom cookies cooked in the oven have two great advantages: they do not require special molds for baking, and children can be involved in the cooking process. They will enjoy not only the process of eating, but also creating mushrooms.
For delicious baked goods and a pleasant time with children you will need:
200 g powdered sugar; 220 g butter; 1 egg; 1 yolk; 40 g corn starch; 240 g flour; 2 g vanillin; 4.5 g baking powder; 200 g sugar; 75 ml water; 3-4 g citric acid; 30-40 g cocoa powder; poppy seed to taste.
How to make mushrooms in the oven:
Knead the butter, which has become softer at room temperature, with the bulk components of the dough (powder, starch, baking powder, vanillin and flour). Add the egg with the yolk and knead into a soft, elastic mass, which should be refrigerated for half an hour. Divide the stabilized dough into pieces weighing 25 g. Form hats from half by rolling into balls, which are flattened on one side. From the other part, make legs in the form of sausages, 6-7 cm long and with a pointed cone on one side. Place the caps and legs on a baking sheet lined with parchment. To ensure that the legs retain their shape and do not spread into a flat cake in the oven, they are baked in bags made of baking paper. Temperature and approximate baking time are 180 degrees and 25 minutes, respectively. So that you don’t have to cut out a recess for the stem in the caps, before baking you can press it with your finger and put a parchment ball, which can then be easily removed from the finished caps.
While the preparations are cooling, cook a beautiful light caramel-colored syrup from water and sugar. At the end of cooking, add citric acid to it. We collect mushrooms. Dip the blunt end of the stem into caramel syrup and then into poppy seeds, allowing the syrup to set for 2-3 minutes. Make a small depression in the caps with a knife, into which insert the pointed part of the stem, previously dipped in syrup. Allow the parts to stick together well. When all the mushrooms have been collected, add cocoa to the remaining syrup and heat it a little, then dip the mushroom caps in it and color them a beautiful chocolate color.
The process of formation of “mushrooms”
As mentioned above, to form such products we need a plastic bottle without a cap. We will tell you how to use it below.
So, small balls with a diameter of 4 centimeters should be formed from the kneaded base. After this, they need to be laid out on a surface sprinkled with light flour. You also need to pour cocoa into a deep bowl. Next, you should take a plastic bottle and dip its neck well into the brown powder. Now, having taken a portion of the dough, you need to press it into the container and carefully twist it, then remove it. You should have a beautiful “mushroom” formed. All other cookies should be made in the same way.
Serve a delicious homemade delicacy to the table
After all the “mushrooms” are baked, they must be removed from the sheet and placed on a plate. If desired, the caps of the products can be dipped in homemade chocolate glaze, and the legs can be sprinkled with powdered sugar. This delicacy should be served in a cooled state along with unsweetened but hot tea or strong coffee.
COMPOUND
DOUGH:
200 g margarine 2 cups sugar 1 cup sour cream 1 egg 1 cup starch ~800 g flour vanilla pinch of salt 1/2 tsp soda quench with vinegar
SYRUP:
2/3 cup sugar 4 tablespoons water
First of all, make 100 small bags from squares of parchment paper (or baking paper) with a side of 6-7 cm. It's not difficult and doesn't last long, although it sounds scary. Grind softened margarine with sugar. Add a glass of sour cream, 1 egg, vanilla, a pinch of salt, half a tsp. slaked soda with vinegar, 1 cup starch, 800 (approximately!) g. flour. Knead soft plastic dough. Divide into 2 equal parts. Make 100 balls from one. Bake on an ungreased baking sheet. These will be the mushroom caps. In the baked hats, you need to make indentations in the center of the flat side with a knife with a sharp tip - the legs will be glued into them. This should be done WHILE THE HATS ARE WARM. Once cooled, the products become brittle. Roll out legs from the second part of the dough: one side is wider, the other is narrower - as usual with mushrooms. Place the legs into bags and bake. (The bag will not allow the thin end of the leg to spread out, and the entire leg, having slightly increased during baking, will not lose its correct tapering shape. The legs should not fit tightly into the bags, the bags should not be too narrow).
Next, I recommend unpacking the caps and legs. Those. match the legs to the already made recesses so that they more or less match. If necessary, the recess in the cap can be carefully adjusted with a knife to fit “your” leg.
Make syrup. Boil 2/3 cup sugar with 4 tbsp. l. water. Dip the thin ends of the legs into the resulting syrup, connect them with the caps and lay them out to dry. After half an hour or an hour the syrup will set. Then you can, acting quite carefully, continue to work with mushrooms. The syrup will have cooled down by this time, so you will need to heat it up by adding a spoonful of water and stirring. Now you need to imitate the ground on the legs. To do this, dip the mushroom stems first in syrup, then in a container with poppy seeds. Give the “ground” a little time to set, then you can proceed to the final stage - painting the caps. To do this you need to add a little water and 1-2 tbsp. l. cocoa into the remaining cooled syrup, and boil it again. Dip the mushroom caps into this fondant. Leave to dry. It is good to leave overnight for final drying.
Comments:
I make fewer bags, about 70. Some of them will tear when you take out the baked legs, but many will remain intact and can be used a second time.
I don't set out to make exactly 100 mushrooms. And I don’t try to make them exactly the same so that they look like stamped ones. I simply tear off approximately equal pieces of dough (2.5 cm in diameter) and combine both legs and caps on one baking sheet, making sure that the quantities of both are equal. By baking the stems and caps together in each batch, it is easier to make the indentations in the caps before they cool and become brittle.
Drying mushrooms sometimes develop streaks at the bottom, where the caps touch the surface on which the mushrooms lie. During the drying process, the mushrooms must be turned over once so that the area with the drip also dries out. It is convenient to dry on plywood.
Don't be intimidated by the process. It is relatively labor intensive, but not difficult and enjoyable. Already at the age of 10-11, I prepared these mushrooms completely independently from start to finish. By the way, younger children can also be involved in the cooking process - as assistants. And how delighted the kids are at the sight of such a delicacy! What haven’t I done with these mushrooms! It goes without saying that they were always the highlight of the sweet table when children were invited. I also took it to school for my son’s birthday, having made a “gift set” for each child (in a small bag with a beautiful string - a couple of mushrooms, accompanied by cute homemade cookies of a different type). And she wove a basket from colored cardboard strips, and put these mushrooms in it in an artistic way. disorder. And then this basket was packed in a transparent, rustling film, decorated with a bow, and it turned out to be a wonderful present. In general, the game is worth the candle.
Have you ever had children ask to try pickled mushrooms from an adult table? As you know, due to the chitin contained in mushrooms, this product is contraindicated for children up to a certain age.
But so that the kids don’t feel offended by the untasted delicacy, invite them to make “Mushroom” cookies with you.
These mushrooms are definitely suitable for everyone, even the smallest ones. The little one loves to sculpt from dough, and it also develops fine motor skills. As a result, you will get a whole basket of delicious, aromatic sweet mushrooms, and you will kill two birds with one stone: you will practice modeling with the children and feed them an unusual afternoon snack.
Step-by-step preparation
- Place 200 g of soft butter into the bowl of a kitchen machine or simply into a deep bowl. You can replace it with the same amount of margarine, but it must be at room temperature and not melted.
- To the butter add 400 g of sugar, 200 g of sour cream 15% fat, 1 medium chicken egg and a pinch of salt. Mix everything thoroughly in a food processor until smooth. If you don't have a food processor, then use a mixer.
- Add 800 g of wheat flour and 1 tsp to the resulting mass. baking powder. The latter can be replaced with 1/2 tsp. soda quenched with vinegar. Stir everything thoroughly until it has a homogeneous consistency. The dough should be soft and not at all sticky.
- Divide the resulting dough into 4 equal parts, each of which is wrapped in cling film. Place all the pieces of dough in the refrigerator for 1-1.5 hours, they should cool well.
- As you work, remove the dough from the refrigerator one at a time. From one part of the dough we will form mushroom stems. Using a pastry spatula or knife, cut the dough into pieces.
- Roll out each piece of dough into a rope. Its thickness may vary depending on how thick the mushroom stem you want. Cut the tourniquet into small pieces 3-5 cm long. You can cut pieces of different sizes so that the mushrooms look natural.
- From each piece we form a mushroom stem. We transfer all the preparations to a wooden board and put them in the freezer for 30-40 minutes.
- While the mushroom stems are frozen, we move on to preparing the caps. To do this, take another piece of dough from the refrigerator and cut it into 4 equal parts. Roll out each piece into a sausage and divide it into equal parts corresponding to the size of the mushroom cap.
- From each piece of dough we form a ball in our hands and press it down a little on top so that the caps are larger.
- Cover a baking sheet with parchment paper and lay out all the mushroom caps prepared from the dough.
- Preheat the oven to 210 degrees and set the hats to bake. They need to be cooked until they are lightly browned. On average, 10-15 minutes is enough.
- Remove the baked hats from the oven and let them cool slightly. Then in each cap we use a knife to cut out a small indentation for the stem of the mushroom. This must be done while the caps are still hot, but do not burn your hands too much.
- Remove the frozen dough legs from the freezer and place them on a baking sheet lined with parchment paper. Bake them in an oven preheated to 210 degrees for 10-15 minutes.
- To make it easier to glue the legs into the hats, you need to cut off a thin edge.
- Let the dough legs cool completely; if desired, you can remove all excess, give the legs a more realistic shape and trim them using a fine grater.
- You can glue the legs and caps using egg white glaze. To prepare it, place 1 chicken protein in a deep bowl and stir it a little. Gradually add about 200 g of powder into the bowl with the protein and stir everything without stopping until smooth. The white glaze should be very thick.
- Transfer some of the white icing into a pastry bag. Cover the rest of the glaze with a kitchen towel to prevent it from drying out.
- We select the caps and legs and place them on a wooden board in pairs. Pour a small amount of egg white glaze into the recess of each cap and glue in each stem. When gluing, each leg must be held for a few seconds so that it grips well.
- When all the mushrooms are glued together, leave them on the table for 10-15 minutes so that the protein glaze hardens well.
- The stems and caps of mushrooms can be tinted with glaze. To do this, transfer a small amount of it into a bowl and dilute it with about 1 tbsp. l. water. Dip the stem of each mushroom into the resulting glaze of liquid consistency and add a tone to the inside of the cap. Let the cookies stand for another 15-20 minutes on the table.
- To decorate the mushroom stems, put the remaining glaze in a deep bowl and add 1 tbsp. l. water, stirring everything thoroughly until smooth. In a separate bowl prepare 2 tbsp. l. dry poppy.
- First, apply glaze to the bottom of the leg, then dip it in dry poppy seeds. We decorate the stem of each mushroom in the same way and leave them to stand for several minutes until the glaze completely hardens.
- To decorate the hat, melt 100 g of chocolate. Dip the cap of the mushrooms and place them on the grill. You can also apply chocolate to the mushroom cap with your finger. Ready mushrooms must be given time during which the chocolate will completely harden.
- Our mushrooms are completely ready, and they can be transferred to a beautiful plate. In a very original way, you can serve cookies in the shape of mushrooms by placing them in a wicker basket.
Cookies "Mushrooms" recipe with photos at home
How to make shortbread dough
Cream the butter with sugar. If you remove the butter from the refrigerator in advance (15-25 before cooking), its creamy structure will easily mix with sugar.
Cut the butter into 1cm wide pieces to help the butter heat up faster.
Beat one chicken egg into the sugar-butter mixture.
Mix the dough vigorously, add 1 teaspoon of baking powder.
The flour must be sifted in advance and added to the dough in parts.
Knead a homogeneous shortbread dough.
Wrap the dough into a ball with cling film and put it in the refrigerator.
Divide the chilled shortbread dough into two parts. The mushroom stems will be formed from one, and the caps from the other.
Place the stems and caps on a floured surface. We form the parts of the mushrooms quickly, without allowing the dough to melt in our hands. Mushroom stems should have a pointed tip. Mushroom caps are a small depression on the inside (the place where the stem will be inserted).
How to make a mushroom cap: first roll a ball with a diameter of 1 cm, then lightly squeeze it with your palm to give it a flattened shape.
Don't worry if your mushrooms are not perfectly even and differ from each other in size and shape. In a real forest, all mushrooms are different.
To decorate the legs of the mushrooms, we need the white of one egg and a poppy seed.
Dip each mushroom leg in the egg white (immerse only the lower part of the leg), then lower it into a saucer with poppy seeds.
The size of the mushrooms may vary, but you need to try to ensure that the cookies are not large (the mushrooms will increase in size in the oven).
You need to try to ensure that only the lower part of the mushrooms comes into contact with the poppy seeds - this will make the cookies more beautiful.
Place the cookie dough on a baking sheet lined with parchment and bake in the oven for 15-20 minutes (until we see a golden “tan”).
While the “Mushrooms” are baking, prepare the icing for gluing the cookies together.
Honey (1 tbsp) dissolved on a stove with 3 tbsp will serve as a special “glue”. spoons of sugar.
Stir the sugar-honey mixture on the stove and bring it to a homogeneous liquid state.
So, it's time to glue the legs and caps to make delicious mushrooms.
The glaze hardens very quickly, so try to work quickly to have time to glue all the mushrooms together.
You can make a hole in each cap using a knife to make it easier to glue the mushrooms together.
Pour some glaze into the cavity:
Place the leg on the glaze and press down firmly.
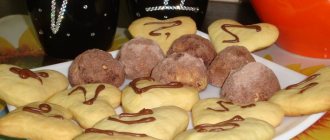
These are the cute mushrooms you get. Leave the cookies for a while to allow the pieces to stick together.
The most delicious baked goods are the ones our mother made for us as children. Today we will get nostalgic and prepare mushroom cookies, but on our own and with the help of a simple and interesting recipe.
- 125 grams of sugar;
- 100 grams of sour cream;
- a pinch of salt;
- 1.5 cups flour;
- 1 chicken egg;
- 75 grams of butter;
- 1 gram of vanillin;
- ¼ teaspoon of soda;
For fondant:
- 50 grams of sour cream;
- 3 tablespoons sugar;
- 2 cubes of dark chocolate;
- 50 grams of butter;
- 3 tablespoons cocoa.
The products have been prepared. From the list of ingredients it is clear that the delicacy should be not only tasty, but also beautiful in chocolate glaze. We will prepare mushroom cookies in a mold on gas; for this we will need a special baking dish. So, let's begin.
Cookies “Mushrooms” in a mold
Ingredients:
- Eggs - 3 pieces;
- Sugar - 1 glass;
- Butter - 250 grams;
- Sour cream - 0.5 liters;
- Vanilla sugar - To taste;
- Salt - To taste;
- Baking powder - 1-2 teaspoons;
- Vodka - 1 teaspoon;
- Flour - 2-3 glasses;
- Chocolate - 250-300 grams;
- Sprinkles - To taste
How to make “Mushroom cookies” in a mold
Beat the eggs. Then add softened butter, sour cream, sugar, vanilla sugar, a pinch of salt, baking powder and vodka to the eggs. Beat everything again with a mixer. Add 2-3 cups of flour and knead the dough quite thick. Heat the mold over the fire. Place the dough in the mold and fry in the mold on both sides over medium heat, it takes 5-7 minutes, use the smell as a guide. Let the finished mushrooms cool. While the mushrooms are cooling, prepare the glaze. Melt the chocolate in a water bath. Dip the mushrooms into chocolate, giving them “hats.” If desired, sprinkle the caps with sprinkles or chopped nuts. Place the mushrooms in the refrigerator to allow the glaze to harden. To make the legs white, prepare a light protein glaze. To do this, beat the whites alone with powdered sugar until white thick peaks. Dip mushroom stems in egg white and let dry. Ready-made Mushroom cookies in a mold are ideal to serve with cocoa, tea or coffee. Bon appetit!