Views: 747
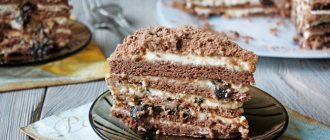
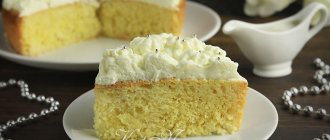
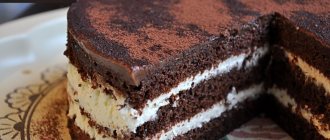
Very beautiful, delicate red velvet cake. The originality of its execution and taste delight everyone, young and old.
- Step-by-step recipe for a delicious red velvet cake
- Red Velvet Cake step by step video recipe
It is not difficult to prepare it at home and please your loved ones and yourself with a wonderful dessert.
The peculiarity of the preparation is that the color of the cakes must remain unchanged - red or chocolate shades and white buttercream.
Cakes do not require additional impregnation; cakes baked according to this recipe are very tender, tasty, and have sufficient moisture.
Preparation
Cakes
1. Let's prepare bright cakes, for which we pour kefir into a bowl, pour soda into it, mix and leave for 15 minutes so that the soda and kefir react.
2. Now we divide three medium eggs into whites and yolks. We send the yolks to kefir, which has already settled.
3. Sift flour into the dough (I have four types), add low-fat cocoa and add a couple of teaspoons of baking powder. Next, beat it all with a whisk until smooth.
4. Add a sweetener or sweetener, as well as a pinch of vanillin. Beat again.
5. Now take one tablespoon of warm water and add food coloring to it. It is advisable to use red dye, because we are making a red velvet cake.
Mix and add to the dough. Whisk everything together until smooth.
6. Now beat the 3 whites that were lying aside with a mixer with a pinch of salt until strong peaks form. Then use a silicone spatula to gently fold the whites into the red dough.
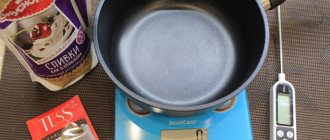
7. We got 628 grams of dough in total. We need to bake 3 cakes, which means that for one cake we use approximately 200 grams of dough. We measure weight using scales.
8. Pour the dough into a mold with a diameter of 15 centimeters. Place in the oven for 10-15 minutes at 180 degrees. And so we bake 2 more cakes. In total you will get 3 finished cakes.
Cream
1. Place soft cottage cheese and cottage cheese into a bowl (you can use regular cream cheese from Hochland). Add sweetener.
You can use what you like best - honey, sorbitol or erythritol. We also add vanilla sugar, about 2-3 teaspoons.
2. Beat the cream until smooth and soft with a mixer or whisk.
3. We get a delicate, delicious cream, which we put into a bag, the most ordinary one, plastic. Or you can use a pastry bag, it will be even more convenient.
Red Velvet Cake - a very tasty recipe
There is nothing difficult about making this amazing cake. Some people simply put the ingredients in one bowl for the dough and in a second bowl for the cream and, without much hassle, immediately beat all the ingredients in the bowls in one go.
You can do it this way, but when mixing and beating all the components occurs sequentially, the dough has time to absorb the necessary amount of air and the cakes turn out much more porous and tender. And the cream becomes more airy.
For the test we need:
- Flour - 320 gr.
- Sunflower oil - 200 ml.
- Sugar - 300 gr.
- Kefir 3.2% - 250 ml.
- Butter - 115 gr.
- Chicken egg – 2 pcs.
- Cocoa powder – 20 gr.
- AmeriColor Super Red gel food coloring – 2 tsp.
- Vanilla extract – 2 tsp.
- Wine vinegar – 1 tsp.
- Baking powder – 5 gr.
- Soda, salt - 4 g each.
For cream:
- Cream cheese - 400 gr.
- Cream 33% - 250 ml.
- Powdered sugar - 150 gr.
- Vanilla extract – 2 tsp.
A prerequisite for achieving the desired result is to use all ingredients at room temperature!
Preparing the dough
1. To make the cakes as tender as possible, when making the dough, it is very important to sift all bulk ingredients through a sieve. It is not necessary to sift each component separately. It is enough to place a fine sieve in a deep bowl and pour into it sequentially everything that is necessary to obtain the flour mixture. Since we have the most flour, we should pour it out first.
2. Pour very high-quality aromatic cocoa powder on top. It is its rich taste that will determine whether we will be able to achieve a delicate chocolate aftertaste or not.
The ideal option would be to use alkalized cocoa powder, which gives maximum chocolate flavor. Otherwise, you can increase the amount of cocoa by 5 grams. or use chocolate flavoring.
3. To make the dough loose, add soda mixed with baking powder. There is no need to extinguish the soda in advance. Baking powder alone will not be enough, so it is advisable to immediately combine it with the second soda powder that “raises” the dough.
4. Thoroughly sift the resulting set of bulk products into a bowl and, for greater homogeneity of the mass, carefully move with a whisk.
5. Place butter that has melted to room temperature in a second deep bowl. In order for it to mix well further, it is better to cut it into equal pieces in advance.
6. Add granulated sugar to the butter, trying to distribute it evenly into the butter pieces so that later they mix better.
7. To obtain a homogeneous sugar-butter consistency, it is best to use a mixer - this will speed up the process of combining such dissimilar products and will allow you to slightly strain your hand when mixing.
8. When the butter and sugar are well combined, first add one egg and beat it thoroughly with them. And then pour in the second egg and also ensure uniform mixing of the entire mass.
Since the butter is quite fatty, it is consistent beating that allows all components to mix evenly.
9. While constantly whisking, pour in wine vinegar. Subsequently, it will interact with soda in the dough and will allow the cakes to be double fluffy.
10. Follow with vanilla essence. It will give the dough a light vanilla aroma and hide the taste of soda, baking powder, vinegar and oils.
11. Pour sunflower oil into the mixture whipped with a mixer in a thin stream.
12. As soon as the sunflower oil is mixed with the previous ingredients until smooth, also add kefir in a thin stream with constant stirring and continue beating for about two minutes.
13. The next important step in preparing tender dough for sponge cakes is to gradually pour flour into the liquid part of the dough. This really needs to be done in parts so that unnecessary flour lumps do not form and mixing occurs evenly.
14. When we have a homogeneous thick creamy consistency with a slightly chocolate tint, you can pour in red food coloring and use a mixer to distribute it throughout the dough.
15. The result will be a very beautiful smooth bright red shiny elastic mass, which can be left to stand for a couple of minutes.
16. Since the dough already contains enough oils, it will not stick or burn in the baking pan. Therefore, you can not make French shirts and even put bottoms from split molds, but simply put two split ring parts of the molds directly on the silicone mats. If you are afraid of such an experiment, then still use the entire form (with the bottom). Divide the dough equally into two twenty-centimeter molds.
17. Next, be sure to preheat the oven to 160-170 degrees, and only then bake so that all the leavening components begin their reaction under the influence of temperature and the cakes become air-porous in the process. Bake for about 30 minutes (depending on oven).
We check whether the cakes are ready in the most usual way - pierce them with a toothpick and, if there are no traces of dough left on it, they are completely ready. If not, then they should be left in the oven for another 5 minutes and checked for readiness again in the same way. Allow to cool directly in the pans on the table.
Ready-made cakes usually spring back well if you press lightly on them. To maintain this elasticity, they can be removed from the molds and wrapped in cling film, and then placed in the refrigerator on the middle shelf for four hours to cool (but this is not necessary).
You can immediately, after cooling, start preparing the cream and decorating the cakes.
Preparing the cream
Cream plays an equally important role in the taste of the cake. A lot depends on its choice and preparation: the saturation of the cakes, the flavor combination of the dough and the creamy layer, the aftertaste and tenderness of the delicacy in the mouth, etc.
A cream based on soft cheese and cream is ideal for Red Velvet. Based on these ingredients, not only a delicate layer is obtained, but also an excellent final “coating”.
To prevent the cream from splitting and cracking, it is best to use powdered sugar instead of regular sugar. And just like with dough, it’s better to beat all the ingredients separately and then combine them.
1. Place the soft cream cheese in a deep bowl and beat thoroughly with a mixer. Mascarpone, Ricotta, Philadelphia, and even any creamy curd cheese will do.
2. Then pour powdered sugar into the cheese mass and beat again with a mixer so that the powder is evenly distributed in the cheese.
3. To eliminate the cheese taste and add vanilla tenderness to the cream, it is advisable to add vanilla essence.
If you wish, at this point you can add food coloring to the cream, but in the classic version of “Red Velvet” it should remain white.
4. Beat the ingredients well until they form a paste.
5. Pour heavy cream into a separate deep bowl. The fatter they are, the thicker and richer the cream will be.
6. Beat the cream until large, non-falling peaks appear. Ideally, the whipping cream should thicken and look as if it was just squeezed out of a factory can.
7. Carefully add whipped cream into the cheese mixture in small portions, stirring with a silicone spatula.
8. The result should be a very thick cream, similar in consistency to very fatty, thick village sour cream, in which “a spoon stands.”
Assembling the cake
So, the cakes are baked, the cream is prepared. Now you need to combine them so that you get a gorgeous cake that guests will remember for a long time.
1. When baking, the top of each cake may turn out to be slightly uneven and when assembled, instead of a beautiful cake, you may end up with an incomprehensible angular pyramid or, even worse, a “collapsed tower.”
That is why it is advisable to carefully cut off this unevenness with a knife. You should get a voluminous, even sponge cake. If the cake turns out to be quite tall, you can cut it in half, then the finished incomparable delicacy will have twice as many cake layers layered with cream.
2. Place the first sponge cake on a stand or a beautiful dish, on which we will then serve the cake. Apply a good thick layer of cream evenly in a thick layer so that it even extends slightly beyond the edges of the cake, so that later it will be easier to coat the sides with it.
You can lay strips of baking parchment under the edges of the cake, which will serve as a kind of protection against staining the dish with cream and crumbs. When the assembly of the cake is completely completed, the parchment can simply be carefully removed and the area around the sweet masterpiece will be clean.
3. Place the second cake layer on top and lightly press it with your hands so that a tighter fit appears, the cream can penetrate into the pores of the cake layers and some of it smears the edges of the red biscuits.
4. Spread an even layer of rich, rich cream on top of the second sponge cake. It should be at least half a centimeter thick. Excess cream can be immediately applied to the sides of the assembled cake layers with a spatula.
5. Gradually apply all the remaining cream to the sides and carefully level it so that the cake is coated equally thick on all sides. Ideally, the creamy final layer should be about a centimeter thick.
6. It is necessary to place the assembled composition in the refrigerator for several hours so that the cream hardens and becomes resistant to touch. If fingerprints remain, it is better to leave the cake to cool.
What ingredients will be needed?
This MK provides cream cheese cream, although the original recipe uses regular butter-based cream. But it is this kind of cream that will help make the cake juicier and more suitable for decoration, since it takes the shape you set with your own hands well.
For the test you will need:
- 50 grams of cocoa powder;
- 2.5 cups sugar;
- 4 eggs;
- 1 heaping teaspoon of baking soda;
- 350 milliliters of kefir of any fat content;
- 450 grams of flour;
- baking powder - a couple of packets;
- a little salt;
- vegetable oil - 2 cups;
- red food coloring, liquid or gel (gel is used in this master class).
We will make the cream cheese cream with our own hands as follows:
- curd cream cheese - 450 grams;
- one and a half glasses of fresh cream 35%;
- a little powdered sugar to taste (about 150 grams);
- Flavorings are added as desired - vanilla, essence or liqueur.
For decoration you will need mastic; for this MK you can make it from condensed milk with your own hands:
- a full glass of powdered sugar;
- 150 milliliters of raw condensed milk;
- 5-7 milliliters of lemon juice;
- from 200 to 300 grams of milk powder or cream.
We recommend: Video: DIY paper cakes
This recipe can be called combined. It is the creamy curd cream that is most suitable both for layering cake layers and for decorating the finished cake, since the cake will not be covered with fondant, such cream will help level the side surfaces of the product. The dough in this recipe turns out to be quite dense; if you don’t like dry cakes, then you can make one and a half times more cream with your own hands for good soaking of the cakes.