Ease
A delicious appetizer - boiled lard roll will decorate the festive table. You can take sandwiches from it for lunch: at work, at a picnic, at the cottage, at school. Recipe with photo.
An easy recipe for boiled lard roll will save your budget and free you from obsessive thoughts: “What to feed your family?” because there will always be a delicious answer to your question in the refrigerator.
To prepare the roll, we take soft lard with meat layers and soft skin 3-4 cm thick, rectangular in shape. Lard can be used raw or salted with salt or in brine (not old). The amount of salt in each of these cases will be adjusted during the cooking process.
We prepare the following ingredients:
Prepare a strong thread for tying the roll.
Peel the garlic cloves and chop them with a crush, mortar or knife, whichever is convenient for you.
We rinse the lard under running water, removing soot and dirt from the skin. We make transverse cuts 2 cm wide with a sharp knife, not cutting 0.5-1 cm to the skin.
Salt the whole piece on top with a small pinch of salt and pepper it. Sprinkle small pinches of salt and pepper into the cut holes, filling them evenly with chopped garlic. Distribute the garlic so that there is enough to fill all the cuts. Do not sprinkle salt on pre-salted lard.
Roll the lard as tightly as possible into a roll in the direction shown by the arrow in the figure. If the lard is thick and does not curl into a roll, you can roll it in half.
We tie the roll tightly with a strong thread.
Place in a saucepan and fill with clean boiling water. It is advisable for the roll to be completely submerged in water, but if the volume of the pan is not enough, you can let it stick out a couple of centimeters from the water. Add salt to the water to taste depending on the volume of water.
Bring to a boil on a gas or electric stove burner, turn off the noise, cover tightly with a lid and cook over low heat for 1.5 hours. If the roll is not completely covered with water, you need to turn it over to the other side in the pan after 45 minutes.
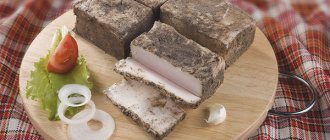
We remove the boiled roll from the broth by the threads, place it on a dish and cool it by placing a press on it, for example a bottle of water. After cooling, remove the threads.
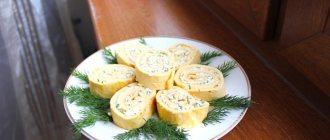
Cut into rings and make sandwiches. A dish with sliced rolls also looks great and appetizing on the holiday table.
If you do not like fatty lard, place the boiled lard roll cut into rings on a platter in the freezer. It will stay there for a long time. Remove the roll rings as needed 15-30 minutes before eating to allow them to defrost slightly.
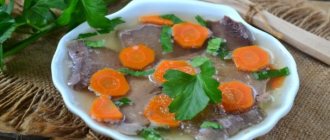
Place the very tasty broth obtained when preparing the roll in the refrigerator for a while until the fat thickens.
We remove the fat, which can later be used to fry anything.
We use the broth to prepare first and second courses.
If you like dishes with garlic, try this recipe for chicken marinated with garlic and honey. Delicious!
1legko.ru
Recipe 2. Lard roll boiled with garlic.
This is a very tasty and easy-to-prepare snack, which is even easier to prepare than the previous version of the boiled roll. To prepare a roll of boiled lard with garlic, you will need lard with meat veins no more than 4 cm thick and a soft, not thick skin.
Ingredients.
- Lard 1.5 kg,
- Garlic - large head,
- Salt - to taste
- Ground black pepper - to taste
- Tying thread
Cooking process
.
Grind the garlic by passing it through a press. We wash the lard and scrape off all dirt from the skin. We make transverse cuts in the lard, not reaching the skin. Salt and pepper the lard on top, and also stuff the cuts with a mixture of salt and garlic. We roll the lard very tightly along the cuts, as shown by the arrow in the figure.
Tie the roll tightly and place it in a pan with lightly salted water. After the water boils, turn the heat to low and cook the roll for 1.5 hours. It is recommended to turn the roll over halfway through cooking. When the boiled roll with lard and garlic is ready, it is recommended to cool it under pressure before eating, and only then remove the threads.
How to make a lard roll. Pork lard roll recipe
Have you ever tried lard roll? If not, then today we will describe several detailed recipes, thanks to which you can make the presented snack yourself. It should be noted that there is nothing complicated in preparing this cut. However, one cannot help but say that it turns out to be very fatty and high in calories. In this regard, it is highly not recommended to use it every day.
Boiled lard roll with meat layer
To prepare boiled lard roll you need:
- thin lard with a small layer of meat;
- coarse (table) salt;
- black pepper (peas);
- white pepper (peas);
- caraway;
- garlic;
- Bay leaf.
First of all, it is recommended to select the dishes in which the dish will be prepared; the water should completely cover the workpiece.
It is necessary to remove the skin from the main product, sprinkle with salt crystals and leave for 30 minutes so that the lard is salted. In the meantime, all the available spices need to be crushed into a homogeneous mass (but if there are large pieces in the spice powder, it’s not a big deal). Rub the resulting mixture onto the inside of the roll, roll tightly and tie with twine or thick thread. To make the roll more flavorful, place several bay leaves under the threads.
Place the workpiece in a bag. After the water boils, cook over low heat for at least 2 hours. When the time is up, remove the finished delicacy from the container and allow the fat to drain. After that, cool the boiled lard roll with the meat layer, first pressing it down with a weight (this will make the meat delicacy denser).
After cooling, place the dish in the refrigerator and leave for 12 hours.
Heat treatment
How should you cook lard? A roll boiled from this product turns out very tasty and tender. Of course, you can simply put it in boiling water and cook over low heat. However, this process will contribute to the rendering of fat, which will make the product less tasty. In this regard, we offer you another cooking option.
Thus, the formed lard roll must be placed in a thick plastic cooking bag, and then tied very tightly. After this, the product must be immersed in boiling water and cooked over very low heat for about 2 hours.
Recipe 3. Roll boiled from lard with carrots and pepper.
The proposed recipe for boiled lard roll is a very worthy snack for any occasion. For cooking, I recommend taking a piece of lard with a meat streak weighing 1 kg. The lard should not be thick.
Ingredients:
- lard with layer – 1 kg.
- coarse salt - 2 tbsp. spoons
- pepper mixture - 1 tbsp. spoon
- carrots - 1 large
- bell pepper – 1 piece,
- garlic – 1 large head
- greenery
- thyme - to taste
- coriander - to taste
- mustard - to taste
Preparation.
Pepper and salt a piece of lard, season with spices and leave to soak in the aromas for an hour and a half. At this time, cut the carrots and peppers into thin strips, cut the garlic cloves lengthwise. Tear the greens with your hands. Place all this on a piece of lard. You can also make small cuts in the lard and stuff them with vegetables. We tie the lard with a thread, under which you can also insert several bay leaves.
Pack the roll in a bag or culinary sleeve. Cook for 2 hours. Place the finished roll under pressure without removing it from the bag overnight. Serve the boiled roll cut into thin pieces.
Boiled lard roll is always delicious. See for yourself
Boiled lard roll
- one of the varieties of tasty snacks that can be prepared from lard. Thick lard is perfect for salting, and if it also has a meat layer, then there is nothing better than making bacon from it or baking it in the oven in spicy spices or smoking it.
In addition, I recently discovered another very tasty dish - lard roll. Moreover, you can prepare either a boiled roll from lard, or smoked or baked in the oven. With a little effort, an ordinary piece of lard can turn into a delicious snack.
Today I want to show you how to cook boiled lard roll - a step-by-step recipe with photos. I suggest cooking not just in salted water, but in a decoction of onion skins. Thanks to the husk, the lard will look like smoked lard. Lard roll with meat layer
, boiled in onion skins turns out incredibly tasty if you make it with filling. You can use dried apricots, carrots, and walnuts as filling.
Ingredients:
- Thin lard - 1 kg.,
- Onion peel - 2 handfuls,
- Bay leaf - 2 pcs.,
- Water - 2 liters,
- Salt and spices - to taste,
- Carrots - 2 pcs.
Proper serving of snacks to the table
How should lard be served at the dinner table? The boiled roll must be removed from the pan, and then wrapped in thick foil and wait for the product to cool completely. After this, it is advisable to keep the snack in the refrigerator for 24 hours.
After the specified time has passed, the lard roll can be safely cut into not very thick pieces. It is advisable to serve this appetizer with mustard or horseradish. It should be noted that this product can be stored in the refrigerator for quite a long time. It is also very convenient to take with you on a hike; you just need to wrap it in cling foil.
Recipe 1. Boiled lard roll with chicken.
The beauty of this recipe is not only its excellent taste, but also the fact that chicken reduces the overall calorie content of the product and introduces much-needed proteins into the dish.
You will need:
- Thin lard - 2 kg,
- Chicken breast – 1 large or 2 smaller,
- Salt - to taste
- Pepper - to taste
- Garlic – 1 head
- 3 bay leaves
Preparation.
To prepare the roll, the lard should be on the skin. Its thickness should not exceed 1.5 centimeters.
The prepared piece of lard must be spread out, salt and pepper. Then you need to put chicken meat on one half. Salt the chicken again and squeeze the garlic onto the chicken.
We wrap the lard into a tight roll, leaving no empty spaces in the middle. We tie the roll tightly with thread. We wrap the lard roll in a food bag or in a culinary sleeve and tie the bag, after releasing all the air from the bag. We also put 3 bay leaves and a few peppercorns in the bag.
Place the roll in the bag in a saucepan with cold water and place on medium heat for 1.5 hours.
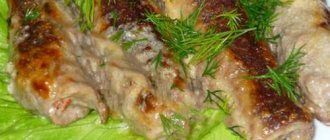
The finished boiled lard roll with chicken should be wrapped in paper or foil and cooled before use. Serve sliced.
How to cook lard roll in the oven?
You can make this high-calorie snack in different ways. How to cook pork roll on the stove was described in detail above. Now we want to tell you how to bake such a dish in the oven. For this we need:
- pork lard as fresh as possible - about 1200 g;
- large juicy carrot – 1 pc.;
- fresh garlic cloves – 10 pcs.;
- fine granulated sugar - ½ small spoon;
- mustard – 2 large spoons;
- ground sweet paprika - dessert spoon;
- crushed red pepper - dessert spoon;
- crushed black pepper - dessert spoon;
- liquid smoke – 4 large spoons;
- fine table salt – 2 large spoons.
Forming and heat treatment process
After the lard has been processed, you need to start preparing the marinade. To do this, you need to mix mustard with granulated sugar, salt, sweet ground paprika, chopped garlic, as well as pepper (red and black) and liquid smoke. If the taste of the last ingredient does not suit you, then you don’t have to use it.
After receiving the aromatic marinade, they need to generously lubricate the entire processed and dried piece of lard. Next, the carrots, chopped on a coarse grater, should be evenly placed on the product. Finally, the layer must be wrapped in a tight roll and tied with a rope. In this state, the lard needs to be placed in a baking sleeve and left aside for a few minutes. After half an hour, the snack can be safely sent to the oven. In this case, the kitchen device must be preheated to a temperature of 180 degrees.
It is recommended to cook a tasty and aromatic pork roll with carrot filling for 90 minutes. This time should be enough for the appetizer to fully bake and become as tender and soft as possible.
How to cook lard roll in the oven:
1. If your undercut is of a different shape or weight, it’s okay, as long as it rolls up and fits in the sleeve and in the oven. Rinse the lard and get to work. First, salt the undercut, then rub the salt over its entire surface with your hands, after which we place the product in a sealed bag and send it to a cold place for 5 hours. During this time, the undercuts will be saturated with salt.
2. Remove the lard from the refrigerator and place it on the table. Now is the time to rub it with spices and bake it. To begin, distribute the ground black pepper evenly, also rubbing it with your hands on all sides.
3. Rinse the bay leaf with running water, dry it, then knead it with your hands and spread it over the inner surface of the future roll. 4. Peel the garlic, chop in a blender or garlic press and distribute over the entire surface of the undercut. 5. Now roll the undercut very tightly into a roll and wind it with nylon thread so that during baking it takes exactly the shape we need. 6. In this recipe, we definitely use a baking sleeve, since there is a skin on the underbelly and without a sleeve it will turn into a “crumb”. So, we place the prepared package in the sleeve and use special clamps to tightly close the edges. Place the undercut roll in the oven preheated to 180 degrees Celsius and bake for 60 minutes. ready. Cut it into slices and serve hot. By the way, it is best to prepare porridge as a side dish for this dish.
We serve delicious and high-calorie cuts to the table
After the above-mentioned time has passed, the culinary sleeve with the roll should be carefully removed from the oven and placed on a flat plate. After the lard has cooled slightly, the bag needs to be opened and the product transferred to a container with a lid or tightly wrapped in cooking foil. In this state, it is advisable to keep the finished roll, baked in the oven, in the refrigerator for several hours.
When the lard has completely hardened, you can safely remove it and cut it into not very thick and large pieces. It is advisable to present such an unusual roll to the dinner table along with slices of bread, as well as mustard or some other sauce.
It should be especially noted that consuming such a snack is extremely undesirable for those who have problems with the gastrointestinal tract, as well as excess weight.
fb.ru
Lard roll with skin, baked in the oven
Lard turns out very tasty if you bake it in a roll in the oven. You can roll the roll with the skin, after washing and drying it. And in order to give the dish additional aroma and a special original taste, you can add mustard, garlic, as well as many other spices and aromatic vegetables to the lard in the roll.
One of the most delicious cooking options is a lard roll with carrots, mustard and garlic. This savory roll will have both spicy and sweet notes. It is carrots that add a delicate taste and present this dish to us in a new way. It’s hard to imagine cooking lard without garlic and mustard. Together they give the dish a delicious taste and aroma.
A lard roll baked in the oven takes on a very appetizing appearance. The lard skin, when baked, acquires a beautiful golden hue. Cutting into portioned pieces is a pleasure. This amazing dish will decorate any holiday table!
Prep time: 3 hours Cooking time: 1 hour
Description
Boiled lard roll is a simple, but tasty and very satisfying dish of Ukrainian cuisine, which you can easily prepare at home using our step-by-step recipe with photos.
To do this, you will need the simplest and most affordable products: thin lard, which can easily be rolled into a roll, some chicken (we will stuff the roll with it, although you don’t have to do this) and spices (salt, garlic, pepper). These ingredients will make an excellent Ukrainian snack or sandwich filling.
One of the advantages of boiled lard roll, in addition to its excellent taste, is its long shelf life. This roll can be stored in the refrigerator for two weeks or even more . But we don’t think you’ll be able to test this, since the lard roll with chicken according to our recipe is usually eaten almost immediately after cooking. It's the latter that we'll deal with now.
Description of preparation:
Buy thin lard for the roll (no more than 1.5 cm thick), otherwise it will be difficult to roll.
Process well, scrape the skin with a knife, wash on all sides. Lard can be salted in advance, sprinkled with salt and left overnight in the refrigerator. But I prefer to cook from fresh, it is softer and more tender, easy to twist. In the process, I will tell you how to pickle and what to do. See how to make a lard roll with skin and try it, my family likes it, especially if eaten with black bread and green onions. Good luck! Purpose: For lunch / For a holiday table / Inexpensive Main ingredient: Meat / Offal / Lard Dish: Appetizers / Dishes with filling Geography of cuisine: Russian cuisine
Cooking steps
We prepare the products necessary for the roll: 2 kg of thin lard, one chicken leg and spices.
If the lard is a little thick, as in our case, it needs to be trimmed, otherwise you won’t be able to roll it into a tight roll. You can make lard from the scraps or use them for frying into borscht.
Salt and pepper the prepared piece of lard to taste, but do not skimp (!). Then place the skinless chicken leg cut into small pieces on it. You can also add chopped carrots (it will give a beautiful color, but also the taste of boiled carrots, which not everyone likes) and garlic (if you don’t mind the subsequent bad breath). We'll stick to chicken.
We wrap the lard into a tight roll without voids in the middle and tie it with thread. Now you can immediately put it in a saucepan filled with water and let it simmer for 1.5 hours over low heat. But in this case, a significant portion of the fat will be rendered, and the taste of the roll will not be the same.
Therefore we will do things differently. We wrap the roll in a regular food bag (for example, from under bread), squeeze out the air, tie it tightly and put it in cold water, and then put it on the stove for the same 1.5 hours. If you are afraid that the polyethylene will melt during the cooking process, you can wrap the roll in a cooking sleeve, but believe me, this is not necessary, because the food bag, gradually heating up along with the water in the pan, does not melt. Yes, you can put a couple of bay leaves and a few black peppercorns in the water (in the first cooking option) or in a bag (in the second) to enhance the aroma of spices.
Cool the finished boiled lard roll, wrap it in paper or foil and store it in the refrigerator. As we have already said, it is stored for quite a long time. We serve sliced lard with bread, mustard or horseradish.
xcook.info
Boiled pork lard roll, step-by-step recipe:
1.
Place the onion skins in a saucepan and cover with cold water. Boil it for 10 minutes, then remove the pan from the stove, cover with a lid and let it brew while you make lard.
2.
Wash the layer of lard under cold running water and scrape the skin with a sharp knife.
3.
Dry the lard and place it on the table, skin side down. If the layer is very large, it is better to divide it into several parts. This will make it easier for you to roll it up, and you won’t need to look for a large cooking pot.
4.
Peel two heads of garlic and grind them in a blender into a paste. Add black pepper and salt to the mixture and mix well again.
5.
Rub the garlic gruel onto the inner surface of the lard. If you decide to add meat, then cut it into very small pieces and distribute evenly throughout the layer.
6.
Prepare harsh, strong threads. Twist the roll very tightly and pull it in several places with threads.
7.
Place the finished rolls in a pan and pour in the strained onion broth. Salt the broth and put the pan on the fire.
8.
When the lard boils, turn the heat as low as possible and cover the pan with a lid. Now the lard should not even be cooked, but simmer quietly for 3 hours.
9.
Remove the lid from the pan, drop a couple of bay leaves into the broth and find a lid with a slightly smaller diameter than the pan itself. The lard needs to be melted and pressed a little. To do this, lower the lid directly into the pan and place a jar of water on top. If you don't have the right size lid, use a regular flat plate.
10.
When the onion broth has cooled, drain it and place the rolls on a wire rack to drain. Although the rolls are already ready, it’s not worth eating them yet. You need to give them time to stand for a day in the refrigerator.
11.
If you have some garlic paste left, grease the rolls with it, pack them in plastic bags and put them in the refrigerator.
This is how easy it is to make a boiled roll from pork lard so that it has the taste, color and smell of a smoked roll.
Ingredients
100 g pork or beef
Homemade recipe
- Rinse the lard in cool water, scrape the skin with a knife and cut off any excess protruding parts (the lard layer should be as even as possible, about 2-3 cm thick). Rub the lard (inner surface) with salt and a mixture of peppers.
- Peel the carrots and cut into strips or cubes, wash the meat and cut into cubes about 1 cm thick. Peel the garlic and cut into thin slices. Place a strip of carrots, meat and garlic across the lard, sprinkle with dried dill and roll tightly into a roll.
- Tie the roll with coarse thread so that it does not fall apart and put it in a cellophane bag or wrap it in cling film. Tie the bag well, put it in a saucepan and fill it to the top with hot water, put it on the fire.
- After boiling, add black and allspice peas and bay leaves to the boiling water. Cook the lard roll for about 1.5 hours at low boil. Remove the pan from the heat and leave until completely cool.
- Remove the roll from the water, remove the bag and threads, and place in the refrigerator for half an hour to an hour. Cut the boiled lard roll into portions and serve as a snack. Bon appetit!
Similar recipes:
Baked lard roll
Mackerel in brine
Cheese balls with garlic
Your feedback and advice
New on the site:
For dessert season:
We are in social networks
to follow FOODideas on Facebook
- Recipes Main courses
- First meal
- Side dishes
- Sauces
- Salads
- Snacks
- Bakery
- Dessert
- Beverages
- Conservation
- On the stove
FOODideas (food ideas) is a site dedicated to the art of cooking at home, which contains the best culinary recipes with photographs and detailed step-by-step instructions, especially so that you can prepare any, even the most complex, dish at home.
foodideas.info
How to cook “Lard roll with skin”
1. Prepare the necessary spices, lard, meat and carrots. It is better to take a rectangular or square piece of lard, trim the edges.
2. Sprinkle the prepared lard with salt (3 tsp will be enough) on both sides and leave for 2-3 hours. Then just scrape off the excess salt with a knife; there is no need to wash the lard.
3. Prepare a set of spices, chop everything, grind in a mortar. Combine spices with chopped garlic. Grate the lard.
4. Peel the carrots, wash them, grate them on a Korean carrot grater. Spread over the surface of the lard. Step back 5 cm from the edge and place the chopped chicken fillet.
5. Roll the roll as tightly as possible and secure with thread.
6. There are several options for preparing this roll: in a pan in cling film, in the oven in a sleeve or foil. I decided to make it in foil, wrapped the roll in foil several times and put it in a hot oven for 90 minutes, temperature 160-180 degrees.
7. Open the foil, there will be a lot of lard, it can be poured into a jar and used for other recipes. Cool the roll at room temperature, then wrap it in a bag and place it in the refrigerator to harden for 6-8 hours or overnight.
8. In the morning, remove the threads, cut the roll into slices and try it! Tip: you can serve the roll with horseradish or mustard, green onions, and black bread.
Boiled lard roll. Step-by-step recipe with photos
Boiled lard roll is one of the varieties of delicious snacks that can be made from lard. Thick lard is perfect for salting, and if it also has a meat layer, then there is nothing better than making bacon from it or baking it in the oven in spicy spices or smoking it.
With thin lard, the opposite is true - many housewives do not know what to cook tasty from it and use it most often as a frying dish. Thin lard can be used to make a delicious spread for sandwiches. You can read how to make it here - lard with garlic through a meat grinder.
In addition, I recently discovered another very tasty dish - lard roll. Moreover, you can prepare either a boiled roll from lard, or smoked or baked in the oven. With a little effort, an ordinary piece of lard can turn into a delicious snack.
Today I want to show you how to cook boiled lard roll - a step-by-step recipe with photos. I suggest boiling the roll not just in salted water, but in a decoction of onion skins. Thanks to the husk, the lard will look like smoked lard. A lard roll with a meat layer , boiled in onion skins, turns out incredibly tasty if you make it with filling. You can use dried apricots, carrots, and walnuts as filling.
How to cook boiled pork lard roll
Cut a piece of fresh lard to thickness so that it can easily be rolled into a roll. The trimmings can be used for any other dishes. Do not cut off the skin. Rinse the lard and dry with a paper towel.
Season the inside and outside of the lard with coarse salt and a mixture of peppers, and massage with your hands. Sprinkle with spices and press them slightly onto the surface. Leave the lard in the bag for 1.5 hours until it is slightly salted.
Meanwhile, prepare everything for the filling. To do this, cut the carrots and bell peppers into strips, peel the garlic, and roughly tear the greens.
Place all prepared ingredients on the inside of the lard. By the way, you can make slits in it and stuff them with vegetables - it will look beautiful when cut. I sometimes add a handful of raisins to these rolls for a sweet touch.
Now take the twine and tie it around a piece of lard, rolling it into a roll. You can insert laurel leaves and greenery between the threads.
Place the roll in three bags, tie each one in turn into a knot.
Boil a large pot of water in advance and place the roll in it. Cook it over low heat for about 1.5-2 hours.
Remove the finished roll from the water and place it under a small weight in a cool place overnight. After this, you can tear the bags and remove the product from them. Break off the threads and cut the roll into thin pieces.
Serve the lard roll chilled with horseradish or mustard. Pickled vegetables will also go well with it.
Pork lard roll in skin is a traditional Ukrainian dish, natural and very tasty.
This meat delicacy is baked in a conventional oven.
Any housewife can master the recipe for a lard roll; the main thing is to choose the right main product for its preparation.
You need to buy fresh lard with skin, layers no more than 2 cm thick, 0.5 kg each.
Undercuts will not work; you can take less expensive lard with a small cut of meat and soft skin from the sides of the pig.
If the skin separates well from the fat, it means the pig was young. This is exactly the kind of lard that is needed for baking it in a roll.
Ingredients for 2 layers of lard:
- pork lard - 1 kg
- garlic - 1 head
- ground cumin - 2 tsp. no slide
- ground coriander - 2 tsp. no slide
- ground black and red hot pepper to taste
- chopped dry parsley - 2 tbsp. l.
- bay leaf - 12 leaves
- salt to taste
Boiled lard roll - recipe
Place onion skins in a saucepan. To prepare boiled lard roll, you can take the peels of regular white onions and red onions. Rinse it with cold water to remove dust particles and other contaminants.
Place in a saucepan. Add a pinch of salt and bay leaf. Fill it with cold or immediately hot water. After boiling the onion broth, let it cook for another 10 minutes. While the onion peel broth is being cooked, you can start preparing the lard roll in order not to waste time.
So that lard can be wrapped in a roll, we use, as I wrote above, thin lard with skin. A very tasty roll will be made from overgrown lard (this is what lard with a layer of meat is called). This is what my piece of bacon looks like for a roll. Before cooking, I always rinse the lard with cold water and dry it with napkins or a paper towel.
To make the lard roll tasty, you can’t do without spices. You can take ready-made spices for lard or meat, or mix your favorite spices. For the lard roll boiled in onion skins, I used paprika, curry, thyme, black pepper, ginger powder and coriander. Mix all spices in a separate bowl.
Add salt to the spices to taste.
Mix spices with salt.
Use your hands to generously coat the lard on all sides.
Now you need carrots. Grate it on a medium or fine grater. Place carrots on top.
Now you need to make a roll from lard. To do this, roll up a piece of lard. Wrap it tightly with thread so that it does not unravel during cooking.
You can tie a lard roll with a special weave, just like sausages or meat for smoking are tied. Place the finished lard roll in the onion peel brine.
Boil lard in onion skins over low heat for 15 minutes. It is recommended to turn the roll over during cooking so that it is colored evenly on all sides with onion pigments.
boiled lard roll in onion skins looks like . Leave the roll to cool. Once it has cooled to room temperature, place it in the refrigerator and let it sit for a few hours. After this, cut the thread. If you plan to cut the entire roll for a large holiday table, then you can remove all the threads at once.
Using a sharp knife, cut it into pieces up to 1 cm thick. As you can see, bright inclusions of orange carrots look very appetizing in the roll. The sliced lard roll looks beautiful on a plate garnished with fresh herbs.
Enjoy your meal. I will be glad if you liked this lard roll recipe. Using this recipe, you can prepare any other roll with one or another filling. Also, store the roll in the refrigerator in a plastic container or plastic bag. Try making chicken roll with gelatin as well.
How to make boiled pork lard roll. Recipe
First of all, I remove the skin. To do this, I insert a knife between the pulp and the skin, cut it a little and with my hands pull the skin up away from me. It comes off easily, but if it’s difficult somewhere, I help with a knife. After this procedure, I rinse the piece of lard thoroughly under warm water and leave it to dry on a towel. I don't throw away the skin. I clean it with a knife to remove dirt, rinse it, let it dry, then roll it up and put it in the freezer in a tight bag. It will come in handy when I cook jellied meat (there are a lot of gelling substances in the skin).
I sprinkle coarse salt on a layer of lard. I rub it with my hands, as if massaging it only on one side, the one that will be inside the roll. There is no need to salt the outside.
I let it salt for half an hour. During this time, I peel the garlic (put more of it) and prepare the spices. My set contains all types of pepper, coriander and cumin. If you don’t like something, exclude it or add others to your taste. Of the obligatory only ground pepper, in principle, you can limit yourself to this. In general, the choice is huge: paprika, chili, thyme, Provençal herbs and even ginger and curry.
I pour it into a mortar and grind it. Not into powder, let there be small and large particles - it will be tastier and more aromatic. Don’t skimp on spices; without them, a boiled lard roll won’t turn out delicious, it will be bland.
I sprinkle the aromatic mixture and generously rub a piece of lard on top and on the sides. Again, there is no need to rub the outside.
I squeeze the garlic onto a piece of lard through a press (alternatively, grate it through a coarse grater) and sprinkle with paprika. For lovers of spicy snacks, I recommend mixing paprika with chili powder.
Now the most crucial moment: the grated layer needs to be rolled into a tight roll and tied with twine so that it does not unravel during the cooking process. You can roll it either on the wide or narrow side, the main thing is that there is no gap between the layers. If you have experience, pull the lard roll using the sausage tying method (braiding). I just wrapped it with twine and pulled it tight so that it would cut into the lard.
I slipped bay leaves under the twine in several places. If the weaving is curly, then in order not to disturb the binding, you can put bay leaves on top of the roll.
Placed it in a thick plastic bag and tied it. Then two more took turns, each also tying a knot. He poured two liters of water into the cauldron, lowered the roll and put it on high heat. As soon as it boiled, I lowered the heat to minimum. Cover tightly with a lid and cook at a barely noticeable boil for two hours.
The finished roll was taken out of the cauldron into a wide dish with sides. I didn't untie it.
He pressed it down with a board and placed a weight (a pan of water) on the board. In this form, I left it to cool to room temperature for several hours.
Then he removed the weight and opened it. Without removing the binding, I transferred it to a container, poured the brine into it and transferred it to a cool place (in the refrigerator or cellar). I left it there until the morning.
Overnight the lard roll steeped, gained flavor and became denser. Now you can remove the binding, but I left it for the photo, I only cut it from a small piece.
Well, friends, the boiled lard roll with a meat layer is ready, it’s time to set the table! It is good to serve it with pickled or salted (fermented) tomatoes, cucumbers, cabbage, boiled potatoes and black bread. Don't forget mustard or horseradish. Strong drinks are optional. I will be glad if you like the lard roll recipe and share your impressions in the comments. Bon Appetit everyone! Your Plyushkin
.
Video version of the cooking process with minor changes
Step 1: choose lard.
To prepare a lard roll, you don’t need to spend a lot of money and buy mind-bogglingly expensive lard, the simpler the better, the undercut for preparing this type of roll is definitely not suitable; other equally tasty dishes are prepared from it. Take ordinary, inexpensive lard with a slight meaty coating. The main thing is that the lard is fresh, preferably homemade, with a soft skin that easily separates from the pulp. Lard from the sides of the pig will work for you. Preheat the oven to 180 degrees.
Step 2: wash, skin and season with lard.
We take the lard in our hands and, using a knife, clean the skin from dirt under cold running water; pigs are not very clean animals, so we clean them carefully and diligently. Then we wash the lard and remove the skin from it by hand. If you bought very fresh lard from a young pig, the skin will come off with one jerk of the hand. If the lard is less fresh, place the lard on a cutting board and help yourself peel off the skin with a kitchen knife. Then take salt and rub the lard with it on both sides. There should be a little more salt than you usually put on pork chops, about one teaspoon for each roll. Now, to make the lard aromatic, we will use spices. Take 2 teaspoons of ground cumin, 2 tablespoons of ground parsley, 2 teaspoons of ground coriander,
one level teaspoon for each roll and rub these spices into the lard on both sides.
Then
peel 1 head of garlic Place 12 laurel leaves on top, 6 for each piece of lard, and sprinkle with two types of ground pepper, red and black, to taste.
Step 3: Roll up and prepare the rolls for baking.
Let the layers of lard sit for a bit in spices and salt, 10 minutes is enough,
and roll the roll with clean hands.
Just fold one edge of the lard and roll it into a tight tube with your hands away from you. Then wrap the roll in pork skin and tie it with chef's twine - a thread soaked in vegetable oil. Pork rolls can be baked in foil or in a baking sleeve, the tastes of these rolls are slightly different, first try 2 options and choose what suits you best. We wrap one roll tightly in foil, put the second in a baking sleeve and pinch it with a clamp. The rolls are not large, about half a kilo each, the approximate diameter of the rolled roll is from 7 centimeters and above, but not more than 10 centimeters.
Step 4: bake lard rolls.
Place the rolls prepared for baking on a baking sheet and place in an oven preheated to 180 degrees. Bake them for 1 hour and 30 - 40 minutes.
Then remove the baking sheet with the rolls from the oven, carefully holding it with a kitchen towel.
Unroll and place the finished rolls on a wire rack with a plate placed under it to drain excess fat. Let the rolls cool, transfer to a clean plate and put in the refrigerator for 3 - 4 hours
to firm up. The excess fat drained from the rolls can be used in the preparation of any other culinary delights.
Step 5: serve the lard roll.
The lard roll is served on a plate, cold, cut into small rings.
This roll can be served with fried or baked potatoes, mashed potatoes or boiled rice. It can be eaten with any type of bread. The lard roll is very impressive with mustard, ketchup and bitter horseradish. Often this type of roll is included in cold cuts, which are cut for the festive table. An excellent appetizer for aperitifs and a great addition to red borscht. There are no time limits for lard roll; it can be eaten for dinner, lunch and breakfast, with or without a side dish. Bon appetit! — − Lard roll can be stuffed with herbs, dill and parsley, red currants, prunes, and Crimean onions. − If you want your roll to be meatier, use lean meat; chicken breast is perfect. Cut it into layers, add spices and roll it together with a roll. It turns out very tasty and less fatty. - Of course, the aroma in the kitchen will be mind-blowing, but you shouldn’t try the hot rolls, since they are very fatty and people who are not used to eating fried lard often may end up suffering from pain in the liver. − If you don’t like the set of spices selected in this recipe, you can add those that you like best. − If you don’t have chef’s twine soaked in vegetable oil, you can tie the rolls with thick thread. − Do not make the rolls very thick (more than 10 centimeters), the lard inside such rolls does not bake well.
To make the cut beautiful, I suggest preparing a roll of lard with carrots, chopped on a Korean grater. And use chicken breast as a filling, which compensates for the lack of a large amount of meat in the roll. From the seasonings I chose garlic, black and hot pepper, coriander and thyme, and added a little sweet ground paprika for color. If you wish, you can expand the list to include ground cumin and dried herbs, such as dill seeds and parsley.
Which lard to choose?
For cooking, thin lard is best, which can be easily rolled into a roll. It is desirable that the shape of the piece be rectangular and large, at least one edge is about 30-35 cm. You can take the back, but a roll made from the underbelly (belly) will be especially tasty, where there is at least a small layer of meat. The piece must have skin on it - a lard roll in the oven will hold its shape better and acquire a special taste. Try to choose a soft skin. When baked in a sleeve, it will remain that way and will not turn into a “cracker”.
Total preparation time: 130 minutes Cooking time: 120 minutes Yield: approximately 700-800 g
Boiled lard roll. Photo
www.kushat.net
Similar recipes:
- Quick salted cabbage recipe
- how to salt meat for smoking at home...
- Classic sauerkraut recipe in a jar quickly
- how to cook meatballs correctly
- Meatball soup delicious recipe
- Soup recipe for a one-year-old child