Pilaf with dried fruits is incredibly tasty! Among his fans are vegetarians, children, supporters of a healthy lifestyle and simply those with a sweet tooth. There are several ways to prepare pilaf. Dried fruits can be stewed separately, or added to rice when boiled. Nuts will give the pilaf an unusual and interesting taste.
Instead of rice, some use legumes, wheat, corn, millet, and assorted cereals. Among the spices, turmeric, saffron, cumin, and cinnamon are added to sweet pilaf with dried fruits. With different technologies, even identical products will produce different pilaf. The authors of the site “Quick Recipes” have prepared a small selection of recipes for preparing pilaf with dried fruits at home. You can check them out below!
recipes for cooking pilaf with dried fruits
Sweet pilaf with dried fruits
Ingredients:
- rice 250 gr.
- dried apricots 60 gr.
- prunes 60 gr.
- raisins 60 gr.
- carrots 1 pc.
- brown sugar 1 tbsp. l.
- butter 50 gr.
- nutmeg 1 pinch
- vanilla powder 1 pinch
- ground cinnamon to taste
- ground cloves to taste
- ground cardamom to taste
- salt to taste
Let's cook pilaf with dried fruits together
General information:
- Cooking time: 60 minutes;
- Number of servings 4.
Cooking method:
- Prepare all the necessary ingredients. Cut dried apricots and prunes into slices. Cut the carrots into strips.
- Pour the carrots into the pan, brown slightly, add spices and sugar. Stirring frequently, cook the carrots until they are caramelized. Now add all the dried fruits and fry for a couple of minutes.
- Cover with an even layer of rice. Fill with hot water until it covers it by about 2 cm.
- Wait until the liquid is absorbed, cover the frying pan with a lid, reduce the heat to low and simmer for 40–45 minutes. Rice should never be disturbed during the simmering process. Bon appetit!
Lenten pilaf with dried fruits
preparing pilaf with dried fruits at home
Ingredients:
- Rice - 2 cups
- Onion - 3 pcs.
- Carrots - 2 pcs.
- Raisins to taste
- Dried apricots to taste
- Prunes to taste
- Salt to taste
- Seasonings to taste
General information:
- Cooking time: 70 minutes;
- Number of servings 4.
Cooking method:
- Wash raisins, dried apricots and prunes well and add hot water to swell. Wash the rice well. Shred the carrots into large cubes (halves, quarters).
- Chop the onion the same way. Fry the carrots a little in vegetable oil, add the onions to it. Then add dried fruits - thanks to them, the vegetables should caramelize. Place rice and fried vegetables and fruits in a mold.
- Fill with hot water, its level should be about two fingers higher than the rice (2–3 cm). Add seasonings to taste. We put our pilaf in the oven (the grill should be cold!). Temperature - 150–180 degrees.
- After letting the pilaf rest for a while under the closed lid (you can wrap it in a clean towel to absorb steam), after ten minutes we open the pilaf and put the plate on it. The pilaf turns out crumbly, aromatic, with a slight sourness.
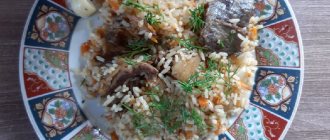
Pilaf with dried fruits
Ingredients:
- Rice - 200 gr.
- Dried apricots - 50 gr.
- Prunes - 50 gr.
- Raisins - 30 gr.
- Dried cherries - 30 gr.
- Onion - 1 pc.
- Carrots - 1 pc.
- Vegetable oil - 2 tbsp.
- Spices and seasonings - to taste
General information:
- Cooking time: 40 minutes;
- Number of servings 4.
Cooking method:
- Prepare all the necessary ingredients. Rinse the rice well in several waters to remove excess starch until the water runs clear. Wash the dried fruits well and soak them in warm water for 10 minutes. Meanwhile, cut the onion into cubes and the carrots into thin slices.
- To prepare lean pilaf, take a cauldron or thick-walled pan. The main thing is that the dishes retain heat well. Fry the onion in hot oil until transparent, then add the carrots. Stirring, fry the onions and carrots for 5-7 minutes. While the vegetables are sautéing, salt the water from the dried fruits, dry them and cut them into strips. I left the raisins and cherries whole.
- Add dried fruits to vegetables. If you are using cumin or coriander, add it now, it will begin to release its flavor and aroma in the hot oil. Stir and keep on fire for 1-2 minutes. Now it’s the turn of the rice, put it on top of the vegetables and dried fruits. Distribute the rice evenly, add salt to taste, add paprika and turmeric.
- Add cold water at a ratio of 2:1 with rice. Pour the water carefully so that the rice does not mix with vegetables and dried fruits; you can use a strainer or slotted spoon and pour water through them. Cover the dish with a lid and cook the pilaf over high heat for 15–20 minutes (look at your dishes and stove, the rice should be slightly undercooked), then turn off the heat and keep the pilaf under the lid for another 10 minutes. That's all, lean pilaf with dried fruits is ready.
Growing and caring for artichokes in open ground
Artichoke is a rather large plant (up to 2 m high), perennial, belongs to the Aster family. A characteristic feature of artichokes are powerful, spiny leaves collected in a rosette. Like all representatives of this family, the artichoke is demanding on watering, light, and soil fertility.
The plant successfully winters in central Russia under organic cover - fallen leaves, hay, sawdust, but in the northern regions artichoke bushes will have to be dug up and stored in a dark, cool place until spring. It is believed that the artichoke is frost-resistant enough to survive short-term spring frosts, but in fact, lowering the temperature at night to −1 already kills the growing points, which means it negates the future harvest. But don’t panic - it’s enough to cover the seedlings with lutrasil until mid-May or at night when there is a threat of frost.
A distinction is made between growing artichokes from seeds or from root cuttings. The latter is only possible if one of your friends already grows this vegetable, because today not a single nursery in Russia can offer such a plant in the form of cuttings, moreover, there are no zoned artichoke seeds.
Caring for an artichoke is not particularly difficult - like all plants of this family, it needs abundant watering, removing weeds, loosening the soil and fertilizing. The artichoke responds well to any feeding with organic and inorganic fertilizers, but foliar feeding is especially useful - spraying with a solution consisting of
- 25 g superphosphate
- 10 g potassium chloride
- 10 g wood ash
Such spraying is carried out once a month not only to compensate for the lack of microelements in the plant, but also to prevent the invasion of aphids and butterflies.
Growing artichokes in Russia is very difficult due to the poorly suited Russian climate for this. In the south, it is grown as an annual, planting seeds every spring directly into open ground. The further north the region, the more difficult it is to cultivate artichokes. In Central Russia and to the north, their cultivation is possible only in greenhouse conditions using the seedling method.
The agricultural technology for growing artichokes is simple and includes the following mandatory procedures:
- Watering.
- Feeding.
- Loosening.
- Weeding.
- Treatment against diseases and pests.
Artichokes ripen unevenly, so harvesting usually extends over a long period from late August to October. The green mass remaining after cutting the artichoke can be used as livestock feed or for composting.
For artichokes, it is very important to choose the right place for growing. It is immediately necessary to exclude shaded areas and places open to the cold north wind; in such conditions the plant feels oppressed and will not bloom. Excess soil moisture also has a negative effect on plantings. If the groundwater level is close to the surface, then a powerful taproot may well reach it and rot. In this case, the plant will die.
The best place to grow artichokes is on a southern slope of a hill, protected on the north and east sides. The soil is desirable to be loose, fertile or well-fertilized, moderately moist with a low groundwater level.
The beds for planting young plants must be prepared in advance. The site for future planting is dug up with humus, and mineral fertilizers are additionally applied. Typically, potassium sulfate and superphosphate are used for this purpose (4 0 g and 200 g per 1 sq. m., respectively). Then ridges with a height of at least 20 cm are formed, into which young seedlings are planted at a distance of 0.7-1.0 m from each other. A distance of 0.9-1 m is required between adjacent ridges.
Important! After planting the seedlings, the beds with planted young plants should be watered abundantly and then mulched with hay or mown grass.
Artichokes can be grown not only for food, but also for decorative purposes, so some gardeners plant them near the house along paths or alleys. In this case, it is better to propagate seedlings in peat pots, and then plant young plants in individual holes about 0.5 m deep. In this case, it is better to increase the distance between neighboring seedlings to 1.2-1.5 m.
Important! Growing seedlings throughout the entire period in individual peat pots eliminates the need to pick plants and thus avoids stress during transplantation.
The first time after transplanting seedlings into open ground, watering should be moderate but frequent. This will increase the survival rate of plants. Then the frequency of watering can be reduced. Excess moisture is rather harmful for artichokes, so you need to be guided strictly by the weather and water the beds only if the soil dries out. Usually once a week is enough.
Feed young plants regularly. After rooting and the appearance of new leaves, the beds are watered with a solution of slurry approximately once every 2 weeks. You can use special complex fertilizers intended for feeding vegetable crops, applying them in accordance with the instructions on the package.
Important! To more economically use space in a greenhouse or garden bed, you can sow a compacting crop between the rows of artichokes - radishes, lettuce, spinach.
In the first month, weed control should be carried out regularly. By the end of this period, the plants grow greatly, the shadow of their leaves covers the entire root zone. Therefore, weed control becomes irrelevant; they will simply stop growing there. The root zone should be loosened constantly and deeply. If the soil is dense and loses breathability, the plant will stop growing and will not bloom.
Preparing for winter
Despite all the efforts and attempts to cover artichokes in some way for the winter, it is usually not possible to preserve the plants in the ground until spring. However, in the second year of life, the crop significantly increases its yield, and the quality becomes much better. Therefore, many gardeners dig up plants for the winter along with the soil on their roots, and with the onset of the warm season, they plant them again in open ground.
To preserve the plant in winter, it is necessary to carry out a number of preparatory measures.
- Trim the stems.
- Remove the leaves, leaving a few in the rosette.
- Carefully dig up the artichoke from all sides and remove it from the ground along with the lump of roots.
- Place the plant in a large bag or pot.
- Store in a basement or subfloor.
In winter, dug up artichokes should be stored at a temperature not lower than 0 °C and with minimal lighting.
Important! In the southernmost regions of Russia, you can try to preserve artichokes directly in the ground in winter, using multi-layer shelters for thermal insulation. However, even with this method, there remains a high probability of them freezing in winter or damping out in spring.
Artichokes can be cultivated in various regions of the country, but not everywhere this can be done in open ground. In most regions, to grow them it is necessary to use a greenhouse or other film shelter.
The growing season of artichokes is quite long and lasts 6-7 months. In the conditions of the Moscow region, it is not possible to provide it, so only the seedling method is used. For cultivation, it is better to use early and mid-season varieties of artichokes, such as Krasavets, Gurman or Sultan. All these species are included in Rosreestr and are recommended for cultivation in all regions.
The process of growing seedlings and transplanting them into open ground has already been described above. To cultivate artichokes in the Moscow region, it is advisable to use a greenhouse. This will smooth out temperature fluctuations and provide the plants with a more pleasant microclimate.
The short and hot Siberian summer is not enough for normal ripening of artichokes. However, it is quite possible to grow them in a greenhouse. To get the harvest as early as possible, you need to give preference to the earliest ripening varieties, such as Violet or Maisky 41. Artichokes are grown in Siberia using seedlings. In this case, the harvest can be harvested at the end of August or early September.
The variable climate of central Russia is poorly suited for cultivating heat-loving artichokes. To get a harvest, you need to use the greenhouse method, planting seedlings obtained from seeds under cover in mid-May. If artichokes are grown in a multi-year cycle, then after harvesting the plants are dug up and stored in the basement until next year. Even in a greenhouse, under good cover, you cannot leave them in the ground.
The climate of the Urals is variable. It often depends on the movement of air masses from neighboring regions, both from the south and from the north, and the temperature can change rapidly within a short time. Artichokes can be grown in such conditions only in greenhouses, using seedlings.
Sweet pilaf with dried fruits
homemade recipe for pilaf with dried fruits
Ingredients:
- 2 cups rice
- 0.5 cups dried apricots
- 0.5 cup prunes
- 0.5 cups raisins
- 0.5 cups (melted) butter
- 0.5 cups dates
- 0.5 cup figs
- pinch of salt
- sugar to taste
General information:
- Cooking time: 50 minutes;
- Number of servings 4.
Cooking method:
- Melt the butter in a cauldron or thick-bottomed saucepan. Place all the washed and thoroughly dried dried fruits into it and simmer over low heat for 20 minutes.
- Then add washed rice to the pilaf and fill it with lightly salted water two fingers above the level of the rice. You can't interfere. You can sprinkle with sugar to taste, keeping in mind that dried fruits will also add sweetness to the pilaf.
- After boiling, turn the heat to low. When the water has evaporated, scoop the rice towards the center.
- Cover the pan with a lid and wrap it in a warm blanket for 15 minutes.
- Remove the lid, turn the dish over onto the pan and tip it over so that the dried fruits cover the top of the pilaf. Bon appetit!
Pilaf with dried apricots and raisins
a simple recipe for making pilaf with dried apricots
Ingredients:
- Rice - 500 gr.
- Dried apricots - 300 gr.
- Raisins - 200 gr.
- Butter - 300 gr.
- Salt - 0.5 teaspoon
General information:
- Cooking time: 30 minutes;
- Number of servings 6.
Cooking method:
- Prepare food. Soak dried fruits for 1 hour in cold water, then rinse. Dried apricots, finely chopped. Mix with raisins. Rinse the rice thoroughly.
- Melt half the butter in a cauldron. Place some dried apricots and raisins on it (a quarter of the total amount).
- On top is a thin layer of washed rice (a quarter of the total amount). So lay out several layers of dried fruit and rice, the top layer should be rice.
- Prepare the remaining butter by melting it. Dissolve salt in a glass of water.
- Pour the remaining butter over the surface of the prepared mass (after melting it), add salted water to cover the top layer, but no more.
- Place the cauldron on low heat, close the lid and simmer for 1–1.25 hours. If necessary, you can add a little water. Bon appetit!
Propagation by seeds
Artichoke (Cynara) is a perennial of the Asteraceae (Asteraceae) family. It is unpretentious, almost like thistle or burdock. True, only in the south. It has been grown there since ancient times. Artichokes were known in Ancient Egypt, Rome and Ancient Greece. Our climate is also suitable, but not in everything. Gardeners and gardeners are interested in species that have large and tasty fruits (achenes).
Spanish artichoke
When choosing seeds, you should pay attention to early maturity. Early varieties: “May 41”, “Violet early”. Mid-season varieties: “Gourmet”, “Krasavets”, “Sultan”. Late varieties: “Large green”, “Maikopsky tall”.
Artichokes are grown through seedlings. Seeds can be sown as early as February to have some time to spare. The mid-season variety "Sultan" requires 120 - 130 days from the moment of germination to "economic suitability".
You can sow seeds not only at the end of winter, but also in spring (March - April). There is also an option for autumn sowings (August - September). The sowing depth for fairly large seeds is 1.5 - 2 cm. Shoots appear in 6 - 7 days. They definitely need to be thinned out.
I do not carry out pre-sowing treatment of artichoke seeds (soaking, cooling, etc.). But picking (in the phase of one true leaf) is desirable.
Winter-spring seedlings are planted in a permanent place from May to July (depending on the sowing date). For autumn sowings - in the spring of next year. In some cases, a slight recess (maximum 5 cm) is useful.
The seed method is the only possible option for growing artichokes in the Russian climate. Seeds of these plants can be purchased at the store or ordered online.
Recommended timing
You need to start growing artichoke seedlings at home around mid-February. Preparatory work with seeds is carried out in several stages:
- Swelling. The seeds are placed in a small container with settled water at room temperature for 11-12 hours.
- Pecking. The seeds removed from the water are wrapped in a damp cloth and covered with film. They should be kept in a warm place for the next 5 days. In this case, you need to make sure that the fabric does not dry out. At the same time, it must be washed daily with clean water to prevent the formation of mold.
- Hardening. Seed stratification significantly increases the chances of obtaining a harvest. The bag with hatched seeds is placed in the refrigerator for 2-3 weeks, maintaining a temperature of about 2-5 °C.
After stratification, approximately at the end of the 1st decade of March, the seeds are planted in special containers for seedlings.
For planting seeds, you can use both individual and group containers, and in their absence, any suitable containers. A small layer of drainage made from small pebbles or coarse sand must be poured onto the bottom. The containers are filled with ready-made soil mixture for seedlings. You can buy it at the store or prepare it yourself.
To do this, mix humus, river sand and turf soil in equal proportions. The resulting mixture must be sifted so that no lumps form.
Important! About 1 week before the planned planting of seeds, the soil mixture should be spilled with a solution of potassium permanganate for disinfection.
Seeds are planted in grooves about 1 cm deep at a distance of 4-5 cm from each other. The seeds need to be laid out carefully, since by this time they should already have a hatched sprout about 1 cm long. After this, they are carefully sprinkled with earth and moistened with a spray bottle, and the containers with future seedlings are transferred to the window. There is no need to cover them with film or glass.
Artichoke seedlings usually emerge from the ground fairly quickly. Until the first true leaf appears, it is advisable to maintain the air temperature at 22-25 °C, and then reduce it to 15 °C. This is necessary so that young plants do not stretch out. It is also necessary to provide for the possibility of artificially increasing the duration of daylight hours for her, since at this time of year there is still insufficient sunlight.
Important! Artichoke seedlings do not like excess moisture, so they need to be watered very sparingly. The water must be defended.
After the seedlings grow, they need to be planted in separate containers. This will require containers of at least 0.5 liters for each plant. Before picking, the group container with seedlings is spilled generously with water. Individual pots are filled with soil mixture, and plants are carefully transplanted into them. In this case, the tap root is pinched for better formation of lateral roots. Containers with transplanted artichoke seedlings are watered and returned to the window.
Important! Picking delays the ripening of the first harvest by 7-10 days.
10-12 days after planting, the seedlings are fed with an infusion of mullein diluted with water in a ratio of 1:10. 2-3 weeks before transplanting into open ground, seedlings begin to harden, periodically exposing them to the air. The hardening time is constantly increasing. In the air, seedlings must be shaded, protected from direct sunlight.
There is an opinion that if you vernalize the seeds, that is, expose them to low temperatures, then you can get artichoke fruits in the first year. But in practice, what happens is not at all what is expected - the artichoke blooms in the first year of life (in 70% of cases), but the plant, weakened by unnatural flowering, does not have time to grow stronger and dies during wintering. If the main purpose of planting an artichoke is to obtain fruit once, then this method can be used.
Vernalization of artichoke seeds should begin in the first half of February. The seeds are placed in a sowing box on damp sand. In this position they should be at a temperature of 22 - 25 C until the pipping phase (6 - 10 days). It is important that the sand is always wet, and in order not to wash away the seeds with a stream of water, spraying should be used.
Artichoke seeds are sown in early March in planting boxes filled with a soil mixture consisting of equal parts of garden soil, humus and sand. After about 10 - 15 days, when the first true leaf appears, the seedlings are picked - transplanted into separate containers. Artichoke seedlings are quite large, so peat humus pots with a volume of at least 0.5 liters should be used as growing containers. When picking, you should pinch off the end of the root of the sprout so that a powerful root system can be formed in the future.
Caring for seedlings consists of watering and fertilizing. 2 weeks after picking, it is necessary to fertilize the seedlings with a solution of mullein 1:10, and after another 2 weeks - with complex mineral fertilizer.
At the beginning of May, you should begin hardening the seedlings. And already in mid-May, young artichokes can be planted in open ground.
Sweet pilaf with dried fruits in a multicooker
Ingredients:
- Raisins 100 gr.
- Prunes 100 gr.
- Dried apricots 100 gr.
- Long grain rice 300 gr.
- Butter 50 gr.
- Water 400 ml.
- Salt to taste
- Walnut 35 gr.
- Honey to taste
General information:
- Cooking time: 35 minutes;
- Number of servings 4.
Cooking method:
- To prepare sweet pilaf with dried fruits we will need: long rice, dried apricots, prunes, raisins, walnuts and honey.
- Pour over raisins for 10 minutes. warm water. Then drain the water and rinse the raisins. Pour prunes for 10 minutes. warm water. Then drain the water and rinse the prunes.
- Cut the prunes into halves or quarters. Pour dried apricots for 10 minutes. warm water. Then drain the water and rinse the dried apricots.
- Cut the dried apricots into halves or quarters. Mix prepared dried apricots, prunes and raisins in a bowl.
- Grease the multicooker bowl generously with butter and pour the washed cereal into it. Fill with water.
- Add dried fruits and mix gently. Add salt to taste. Place the bowl in the multicooker and cook on the “pilaf” or “buckwheat” mode for 30 minutes. (any program for cereals).
- Cut the nut kernels into large pieces. When serving, pour honey over sweet pilaf with dried fruits and sprinkle with nuts. Bon appetit!
1Benefits of sweet pilaf components
You can add various dried fruits to the dish: prunes, dried apricots, dates and even nuts; sugar can be replaced with honey or served separately to taste. Various spices are suitable for sweet pilaf; it is best to add turmeric, cinnamon, nutmeg or vanillin.
- Pilaf is considered an Asian dish; in each country it is prepared in its own way, for example, in Thailand, in addition to dried fruits, bananas and coconuts are added, and served in banana peels or thin pita bread. Some vitamin mixtures are prepared over a fire, sometimes baked in the oven, after adding a few eggs.
- Rice contains more than 80% complex carbohydrates and approximately 8% essential amino acids for each person. Therefore, dishes made from such grains are very filling and popular. Rice should be eaten to improve the functioning of the central nervous system and brain because... it contains trace elements, B vitamins, lecithin, potassium. Also, it is worth emphasizing that rice grains do not contain gluten.
- Dried fruits are a unique product that has virtually no contraindications, does not cause an allergic reaction, and can also be eaten as an independent dessert or added to main dishes.
- Despite the fact that raisins are a sweet product, they contain absolutely no sugar, but only glucose and fructose, which does not increase the level of insulin in the blood, and is also useful for patients with diabetes. Raisins are a high-calorie product, so you shouldn’t overeat, because... Excessive consumption risks obesity.
- Raisins are rich in potassium, phosphorus, iron, magnesium, B1, B2, B5, PP. Thanks to B vitamins, the functioning of the nervous system improves, it has a sedative effect on the body, and raisins are also recommended for people with insomnia. The product contains various antioxidants, especially oleanolic acid, which stops the growth of bacteria that cause oral diseases.
- Dried apricots are a product obtained by drying apricots. You can eat it as a separate dessert, or adding it to meat, fish dishes, side dishes and desserts. Also, dried apricots are often added to sauces. Dried apricot contains vitamin A, B1, B2, C, PP, minerals, potassium, calcium, magnesium, fiber and AA.
Proper consumption of dried fruit in the daily diet stabilizes hormonal balance and is a preventive measure for the development of anemia, heart attack, stroke, and heart disease. Eating dried apricots helps remove toxins from the body, and also, due to the fact that dried apricots contain pectin, heavy metals are removed along with toxins.
Fruit pilaf in a cauldron
preparing pilaf with dried fruits at home
Ingredients:
- 150 g dried apricots;
- 100 g raisins;
- 100 g prunes;
- 2 pcs. carrots;
- 1 PC. onions;
- 3 cups rice;
- spices to taste.
General information:
- Cooking time: 50 minutes;
- Number of servings 4.
Cooking method:
- Wash the dried apricots, raisins and prunes thoroughly and soak them in hot water for a while. When the dried fruits are filled with moisture and become soft, cut them into small pieces.
- Cut the carrots into cubes or circles. Finely chop the onion head. Heat the vegetable oil slightly in a frying pan and fry the carrots and onions in it. Add some coriander to the vegetables and cook them until they turn golden brown.
- Add dried fruits to the pan with carrots and onions and continue frying them. Soon the fruit will give up some of its sweetness to the vegetables, making them slightly caramelized.
- Place the washed rice and fried fruit and vegetable mixture in a cauldron for pilaf. The ingredients can be mixed or laid out in layers. Pour hot water over the rice so that the liquid covers the food by 2-3 cm. If necessary, dissolve the spices in the water.
Pilaf “Kishmish”
An old Uzbek recipe, the preparation of which will take about 2-3 hours, and all because it is prepared in large quantities. Grocery list:
- 800 grams of rice;
- 700 g beef;
- 700 g carrots;
- 100 grams of tail fat (the so-called lamb fat);
- 3 onions;
- 3 garlic;
- half a glass of chickpeas and sultanas;
- 1 tablespoon barberry;
- spices to taste.
- The chickpeas are cleaned in advance and left to soak for 7 hours. At the very beginning, the rice is placed in water and remains in it.
- Onions and carrots are chopped, and the meat is shredded into small pieces.
- In a heated cauldron, fat tail fat is melted, the greaves are discarded and the meat is added. Cook for 20 minutes until done. Place on a plate.
- When the fat boils again, add vegetables, chickpeas and spices. Cook for about 30 minutes.
- Increase the heat, put rice in the cauldron in an even layer and pour in 700 ml of water so that all the rice is under water.
- Place the contents of the cauldron on a plate, and add the previously fried meat on top.
Calorie content: 350 kcal per 100 grams, 14 g proteins, 10 g fats, 30 g carbohydrates.