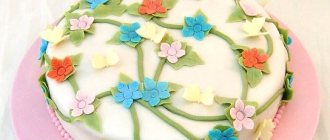
DIY cake “Machine” step by step. Without mastic - it's easy
So, more details. Let’s look at how to prepare the “Machine” cake with your own hands step by step without mastic. There can be many options. Let's focus on a rather simple cake.
For the cakes you will need: 5 cups of sugar, 6 eggs, a teaspoon of soda, 2 pinches of salt, 400 grams of soft margarine, 750 ml of kefir and 6 cups of flour. For cookies you need to take a tablespoon of honey, 100 grams of margarine, a glass of sugar, 2 tablespoons of sour cream, 0.5 teaspoon of soda, 1 egg, 2 cups of flour and a bag of vanillin. For custard: 2 cups sugar, 6 tablespoons flour, 4 eggs, 4 cups milk.
Cookie
Making the “Machine” cake with your own hands step by step without mastic is not too difficult. Let's start with the wheels. To prepare cookies in a water bath, you need to melt the egg, sour cream, honey, margarine, sugar and vanillin, stirring occasionally. Once everything is mixed, add soda and a little flour. Everything is mixed again. Next, add flour in small portions. Sticky dough is being prepared.
The wheels of the future car are cut out using a champagne glass. Of course, you get a lot of cookies. And there should only be four wheels. However, it won’t disappear, will it? It will also come in handy at the holidays. A depression is made in the center of the cookie. The tread pattern is pressed into the sides with a fork.
Cakes
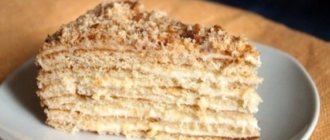
Making your own “Machine” cake step by step without mastic is very simple. The next point is the cakes. Mix margarine, soda, salt, sugar, eggs and half of the kefir. Little by little we begin to add flour, and at the very end - the remaining kefir. The dough should be slightly thick. You need to take a large saucepan so that you can easily mix all the ingredients.
Cover the baking tray with baking paper. Place the dough on it with a spoon and spread it evenly over the surface. The cakes are baked at a temperature of 200 degrees. The result is four large cakes and one smaller one.
Forming a cake
And now the most important thing. from prepared ingredients? First you need to cut out the cakes. The length of the cake is 30 centimeters, width - 15 centimeters. The bottom cake is made a little smaller so that the machine does not “lie on its belly.”
The cakes are stacked on top of each other. Cover with cream.
Next, the top of the machine (its head) is formed. Its height is 3 centimeters. Length - 18 centimeters, width at the back - 7 centimeters, width at the front - 10 centimeters. Stripes are laid out on the sides to give the “head” a roundness.
Spaces are cut out for the wheels. The distance to the front is 3 centimeters, to the rear - 4 centimeters. Having measured these distances, you need to attach the wheels and cut out the necessary places.
Next, the machine is formed - the cakes are cut off. Roundings are made on the sides. The remaining cake and scraps are mixed with the remaining cream and a small amount of water, and the whole thing is whipped with a blender. The result is the so-called “sculpting mass”. It is needed in order to give the machine its final shape. Cookies are inserted into the wheel spaces. The windows and muzzle are cut out. To ensure that the parts hold tightly, they can be lubricated with a small amount of vodka. The cake goes into the refrigerator overnight for soaking.
How to prepare “Machine Cake” step by step with photos at home
For the cake we will need sponge cakes, as in the recipe “Chocolate in boiling water” cake. Only the amount of ingredients is different. I like this composition better. I prepared the white sponge cake as in the Bunny Cake recipe. You will also need cream 33%, condensed butter, powdered sugar, cognac, sugar mastic, food coloring, canned pineapple.
The chocolate sponge cake must stand for 8 hours, then cut it into 2 layers and cut to size 30x20 cm.
Also cut the white sponge cake into 2 layers and cut to size 30x20 cm.
Heat sugar with pineapple syrup (150 ml) until completely dissolved. Cool and pour in cognac. If you cook for children, do not use alcohol. This cake is for adults. We saturate all the cakes and let them sit for a while, if suddenly you added excess impregnation, it will drain here and not in the cake.
Icing
What about the next day? A cake in the shape of a car at home also needs to be decorated. This can be done using icing - a mixture of powdered sugar, egg white and lemon juice. Icing is suitable for creating inscriptions using a pastry syringe and patterns (including three-dimensional ones). They can be made on plain parchment and transferred to the cake after drying.
The main thing is to avoid moisture when working with icing. Both hands and tools must be completely dry. You should not place decorations in the refrigerator. It dries wonderfully in the open air.
Cream machine cake
Greens, herbs, flowers. Cereals, cereals. Confectionery. Canned foods.
Coffee Tea. Dairy products. Flour and flour products. Meat and meat products. Vegetables and legumes. Nuts, seeds, dried fruits. Nutritional supplements. Seasonings, spices. Fish and seafood.
Preparation time: 3 hours. Cooking time: 20 hours. Number of servings: 25 pcs. Type of cuisine: European. What to cook in: in the oven.
Fruits and berries. Cooking method. Grill, barbecue. Freeze, refrigerate. Bake, bake. Cook, simmer.
Type of food. Gluten-free recipes. Vegan recipes. Vegetarian recipes. Children's menu. Diabetic recipes. Low calorie recipes.
Decorating a cake in the shape of a car with cream
Proper nutrition healthy lifestyle. Meal time. Lunch. On holidays. New Year.
Chocolate and cream
Another great decor option is chocolate. You need to melt the tile, pour the cake, level the surface with a knife and put the dish in the refrigerator. In half an hour the beautiful cake will be ready.
Using white chocolate and food coloring you can create colored frosting. In addition to synthetic dyes, juices or syrups are also used. For quick decoration - the best option.
The “Machine” cake made from cream, or rather, decorated with it, also looks very attractive. The child will definitely like it. Moreover, you can add chopped nuts, berries, and pieces of fruit to the cream.
Shavings and shapes
You can decorate the cake using shavings. The chocolate must be grated on a coarse grater. If you heat the chips slightly, they curl very nicely.
Or you can add figures to the machine. After the chocolate has melted, it needs to be poured into silicone molds. The product dries at room temperature. Any chocolate is used for these purposes - regular, porous, white, bitter or special confectionery.
In a word, if you want to give your child a pleasant surprise, the “Machine” cake is perfect for this. The master class presented in this article will definitely help you with this! Good luck!
A cake in the shape of a car is not only a child’s joy. Previously, we have already made a children's cake with mastic according to the drawing ,
which can also be made with cream.
Today we will try to make a dessert also in the shape of a car, but we will simplify the task for ourselves: we will form the shape of the car “by eye”, and then we will mask all the irregularities with cream. So, let's start assembling the cake in the form of a machine, which does not require much time.
Since we are preparing a boy's cake in the shape of a car, let's talk about cars. Did you know that a modern vehicle consists of several thousand parts, in particular 15 and up to 20 thousand. Of these tens of thousands of automotive parts, only up to 300 spare parts are among the most important components. It is these 300 parts that account for the largest percentage of costs when operating a car of any category.
The history of the origin of the car is quite long and interesting, but let's talk about the first racing cars.
The appearance of the first racing cars happened thanks to the first speed competitions. So, during the period of motorization of the whole world, the first racing competitions were organized in France in 1894 along a route from Paris to Rouen itself, with a length of about 127 kilometers. Resourceful calls to participate in automobile “races” at that time were sounded and published in the following form: everyone is invited to participate in the “Horseless Carriage Competition.”
The prize of those competitions was 5 thousand francs, and the main (and only) condition for participation in the competition was a speed of 10 km/h. Note that this was the desired maximum speed criterion. And the winners received a prize for reaching the speed of their car up to 12 km/h with an engine capacity of 2.5 hp: the Peugeot and Panhard-Levassor team.
Cooking step by step
- Before you start cooking, you need to draw a Kamaz cake on paper at home. It will be very useful in the process when you need to take into account dimensions.
- From the sponge cake you need to cut out the base - the bottom of the future car.
- The cake can be soaked in syrup or immediately coated with cream. In this version, sour cream is curd, but yogurt is also perfect. Place berries or chopped fruit on top.
- Cover with the second cake layer and repeat layers. Separately lay out the cabin using cake layers.
- In order for the cabin to hold well, you can add fruit only to 1-2 lower layers, and then just coat it with cream. Separately, beat the butter with condensed milk (optional) and cake scraps. Generously coat the cake with cream on all sides and put it in the refrigerator for a couple of hours.
- In the meantime, you can do the mastic. It needs to be colored and rolled out thinly. Cover the frame with black mastic and trim off the excess.
- You can make wheels using available materials - round cookies and rice balls from children's breakfasts.
- They must be wrapped tightly in black mastic.
- The cabin must be decorated with red mastic.
- Make a body from biscuits coated with cream. It can be wrapped in mastic of any color. Carefully install it on the frame, smearing it with water.
- Here are almost all the tips on how to make a Kamaz cake. All that remains is to decorate the windows in the cabin and the windshield. If desired, you can use small flagella to make windshield wipers, as well as headlights. Be sure to mold the letters by gluing them onto the cake with water or vodka.
So, hello) A week before my son’s fourth birthday, the thought came to me whether I should bake a cake in the shape of a car. After New Year's Eve, gingerbread houses are no longer scary) It's decided. My son took a long time to choose a car brand, and I painfully and nervously dug through the Internet. I suggest you look at how we did it))
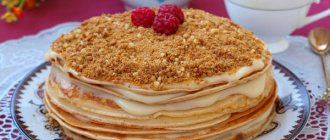
Toyota. A chocolate sponge cake and chocolate cream were chosen according to a special recipe. I don’t reveal the recipe, only the process. Sazu I apologize for the quality of the photo. I took a photo from an iPad. We bake biscuits. They needed 2 of these sheets.
The second sponge cake wanted to burn slightly, but I easily scraped everything off with a bread knife like this on the hot sponge cake.
Next I prepared this stand, I felt comfortable with it. A piece of styrofoam, foil and cling film that happened to live in our house. My husband drew out the size for the stand using a matching typewriter.
I placed my hint on the biscuits and cut out the cakes. I didn’t do the wheel arches, I decided later. Just biscuit rectangles, layered with cream. There, there, near the sah. There are scraps of powder, I applied these 4 scraps as the 4th layer, smeared them together. Well, I was too lazy to bake a third sponge cake because of one cake layer, but the cut turned out to be original. All cakes are soaked. The bottom one is rum, the rest is apple juice.
Well, the fifth cake was even, everything was neat. Covered thickly with chocolate cream.
Then into the refrigerator. When the workpiece froze (drain the butter in the cream, of course), I began to give it shape. Two assistant cars on the table. Yes, yes. There is a joke about a crow and geese. About me, yes) iPad photo, you can see how my hands were shaking)) nervouskkkk. In this photo I am already leveling the future car with crumbs mixed with cream (vopschemta potatoes)
The shape of the Toyota was created by eye, with knives and scissors. Let it harden in the refrigerator. While the machine was resting, I was preparing mastic to cover the cake. From American marshmallow. YouTube rules) 150g marshmallows, 150g powder (homemade is not suitable, only factory-made, there are no grains of sugar, I have other Etker and a tablespoon of drained butter. Microwave it for a minute, with drained butter, then add powdered sugar.
It is better to add the dye at this stage, after microwave.
I prepared white, because my son chose the color until the last moment), and chocolate, for the wheels. Here it is, kneading. I'll reveal a secret. Before kneading, the spoon must be lubricated. oil Then this harmful mass does not stick. And don't wear gloves! Yyyy. Because I was laughing like I was stuck to my glove.
We knead until it looks like this. like plasticine. Knead on a table greased with butter, you can sprinkle it with powder, as the hostesses on the Internet advise, and laugh. Starch is also a good helper, but only later. Wrap the finished mastic in film and rest.
Here I covered the car with a cream of sugar and butter. More oil. To harden into oak.
Frozen into oak. With wet, warm hands (hot water) we perform the final leveling. We stroke, gently and carefully. The mastic will reveal all the irregularities. Ironing. And yes, there should be a lot of cream.
wheel, biscuit, chokomastika.
Purple dye was added to the white mastic. By the way, our dyes are lousy. Still, next time I’ll order prof. dyes. As a result, the result was lilac mastic, which tore after coating. She took it off and threw it away.
I was sad for two hours and kneaded a new one) By that time, my son decided to want an orange car)
I didn’t take a photo of mixing the new batch; I forgot out of frustration. I made the orange one denser.
I cut out the wheel arches, but I had to press mastic into them. But it was only later that I realized that I had done something wrong. The cake took 2 days to prepare, coffee, cigarettes and nerves. My head didn't cook at all)
The parcel boy is right there. Strokes) Like)
The stand for the car needed to be covered with gift paper, but I couldn’t find it at home, and I was too lazy to look for it. Therefore, baking paper. On the IKEA picture rack. Housewives write that ceiling panels are also suitable, who knows whether to believe them))
I painted the glass. In a good way, they had to be cut out of mastic, etc. The strength was no longer there.
Well, actually, here it is. I planned to remake the wheels, even though I didn’t like them, I didn’t even bother making rims for them. There are some imperfections, yes, the bottom of the cake is unfinished, and in general)
My husband put the wheels in with a firm hand) And they magically came up and lifted the car, as it should be. The bow has already been torn off and eaten by the birthday boy, there was a candle too) I never show my son here, sorry)
In general, for the first time in my life, it’s not bad, I think. And also, the girls who make such things at home to order are mega-hard workers. I can’t imagine how much I would value this cake, my nerves, my strength.
They didn’t give me anything to fix or clean up; the guests were delighted. By the way, the cake was at least three kilos, we ate it all. For the first time I see clean plates after the cake) And everyone took a bite home with them)
So, mothers, bake cakes for your children. This is so cool) And happy belated birthday)
Is there a holiday coming up for a car enthusiast and you want to give him a sweet gift? Then try making Kamaz cake at home using step-by-step photographs.
The recipe for making Kamaz cake is more like instructions for decorating it. Bake the sponge cake according to a proven recipe, and you can make absolutely any cream. Berries or fruits can be passed through a blender and added to the cream.
Number of servings: 1
A simple recipe for homemade Kamaz cake step by step with photos. Easy to prepare at home in 7 hours. Contains only 195 kilocalories. Author's recipe for home cooking.
- Preparation time: 13 minutes
- Cooking time: 7 hours
- Calorie count: 195 kilocalories
- Number of servings: 1 serving
- Occasion: For children
- Difficulty: Easy recipe
- National cuisine: Home cooking
- Type of dish: Baking, Cakes
How to make a cake machine
Many housewives use round springform pans for biscuits – I’m no exception. We don't care what shape the sponge cake will be, but it's easier to form a cake machine from a round pan.
We cut the cake like this: remove the rounded parts from the sides, divide one of them in half.
We place the piece, which is divided in half, on the front part of the base of the sponge cake.
The front side looks like this.
We’ll leave the scraps for now and use them as crumbs to form the full shape of the machine.
We will not leave a fairly tall sponge cake intact: we cut it lengthwise into several pieces to layer it with cream.
You can layer the cake using completely different creams, and to diversify the dessert in the cut, add food coloring to the creamy mass.
Grind the biscuit scraps (it’s easier to use a blender).
Mix biscuit crumbs with cream.
We should get a mass similar to cake dough.
But let's first cover the mock-up of the cake, which we will beat with soft butter, to which we will immediately add - it can be seen in the center of the unstirred mass.
After thorough mixing, we get such a beautiful cream.
We coat the cake on all sides and put it in the refrigerator to settle - to harden.
After the cream has hardened, we will draw on the cake fragments of the main details that we will need to clearly highlight when decorating.
Prepare light, perfectly whipped.
Add a little food coloring to it.
This is such a bright cream that we will use to determine lightning, headlights, and even the number of years of the birthday person on the cake.
We begin to work on decorating the car - drawing out the details.
Fill the drawn parts with a creamy mass.
Gradually cover the cake with creams of the desired color.
Draw the rear windows. Not every housewife knows how to make drawings using a pastry bag with nozzles, but it doesn’t matter - we draw with stripes.
Cake in the shape of a car - a step-by-step master class with photos and a detailed description of the cooking process. This machine cake is decorated with fondant, but you can decorate it with buttercream using our step-by-step recipe.
It's no secret that most men, young and old, are crazy about cars. And if you want to please your man with a delicious and unusual gift, prepare him a cake in the shape of a car! And no matter how old he is - 1 year or 99, we are sure that he will appreciate your gift. And our master class with step-by-step photographs will help you prepare this wonderful cake in the shape of a car with your own hands.
The cake machine presented in the master class is made of white sponge cakes with curd-butter cream and blueberry jam. But you can use another option. The main condition is that the cream that covers the cake machine is buttery, and that the cakes are not too soft and brittle. Biscuit is ideal.
If you want to make a chocolate cake machine, then we recommend that you prepare chocolate cakes according to this recipe
and use this
chocolate cream
.
If you are preparing a cake in our version, then instead of blueberry jam you can use any other jam, as well as fresh berries - blueberries, blueberries, raspberries.
INGREDIENTS
:
FOR CAKES:
- Eggs - 8 pcs. large or 10 small
- Flour - 2 cups
- Sugar - 2 cups
- Baking powder - 2 tsp.
- Vanilla sugar - 2 sachets
FOR CREAM:
- Cottage cheese 5-9% - 400 gr.
- Butter - 200 gr.
- Powdered sugar - 250-300 gr.
- Blueberry jam - 200-300 gr.
FOR MASTIC:
- White marshmallow - 300 gr.
- Powdered sugar - 500-600 gr.
- Food colors - green, yellow, red
FOR DECORATION:
- Round chocolate cookies - 4 pcs.
- Chocolate - 30-50 gr.
Preparation process
Bake a biscuit in advance for a product in the form of a machine, you can even do this a day in advance, according to this MK you will need a rectangular shape of about 30*20 cm. So, let's get started:
- Mix the eggs with sugar.
- Gradually add vanilla and flour.
- Beat everything with a mixer until smooth.
- Cover the pan with parchment and blot it, pour out the third part of the dough, bake for about 15 minutes at 190 degrees.
- Also divide the remaining dough into two parts and bake two cakes.
- Cool the cakes on a wire rack and soak them in syrup or leave them dry if desired.
We recommend: Suitcase with money - original birthday cake
Mastic for MK can be made as follows:
- Pour a portion of water over the gelatin and let it swell; as soon as all the crystals have dissolved, put the saucepan on the fire and heat its contents for 5-10 minutes so that all the gelatin crystals are completely dissolved.
- Pour powdered sugar in a heap onto a clean, dry table or board, pour in slightly cooled gelatin in a stream, and top with vegetable oil and lemon juice.
- This mass must be kneaded until elastic; the resulting dough should not stick to your hands or crumble into crumbs. If necessary, add more powdered sugar or add water if the mastic is too thick, which is unacceptable in this master class.
- The finished lump must be placed in a bag and closed tightly. Immediately before designing the product in the form of a machine according to MK, the mastic will need to be divided into parts and tinted with liquid food coloring.
When the mastic and biscuit base are ready, you can move on to actually decorating the cake for boys according to our master class.