Careful selection of raw materials
First you need to decide on the raw materials, that is, the berries or fruits that you want to use.
The main rule here is : take raw materials that are evenly ripe, that is, each berry or fruit is of an identical degree of ripeness.
This advice is followed in order to obtain an identical degree of readiness.
As you understand from the name, jam is boiled.
Accordingly, if you cook raw materials of different degrees of maturity, you will end up with a completely heterogeneous mass. Some berries (for example) will be firm and textured, while others will be complete mush.
Of course, for experienced cooks it makes sense to use this effect. For example, overripe berries (again, for example, there can be fruits and even vegetables) become a kind of background, and less ripe ones interestingly intersperse the surface of this background with hard and slightly crunchy details.
However, this option requires deep understanding and even some artistic taste, so it is better to take raw materials of identical maturity.
In order to make such a selection, look at the color and consistency of the raw materials. Take only evenly colored and slightly soft berries and fruits - they are fully ripe.
By the way, pay attention to the size, because it is ideal when the raw materials have an identical size, so to speak, berry to berry.
Recipe for fried cherry jam
Cherry jam is cooked in various ways: in syrup and without it, in one go or in several. I haven’t made a post on this topic yet, but all the recipes are similar to making cherry jam, I described the 8 most interesting and delicious of them here>>.
I usually cook without syrup in two batches. First, add sugar, let it boil over low heat and completely dissolve the sugar. Then I leave it for several hours, and then cook it until done.
I make this jam from small varieties of cherries with pits. It is thanks to the seeds that the pleasant almond taste is obtained, for which we love it so much.
When I lived in Kazakhstan, cherry bushes with small berries grew at our dacha. I thought that this is how it happens)). But after moving to the Stavropol region I saw an amazing picture: not shrubs, but huge cherry trees grow here. So large that picking berries from them can be problematic even from a stepladder. Some people break branches to pick berries from them. It’s a pity, of course, but there are a lot of cherry trees growing everywhere. And what’s interesting is that for some reason they used to be planted not only in dachas and gardens, but right outside the courtyards on the streets. In the spring, when the cherry blossoms bloom on the streets of villages and towns, it is simply indescribable beauty!
Unfortunately, I don’t have a photograph with a general overview, but this is how I captured the blossoming of my cherry tree.
Of course, there are other varieties of cherries, less tall and with larger berries. I have this variety called shpanka. And it bears fruit earlier than others.
It was from these cherries that I fried jam.
How to cook
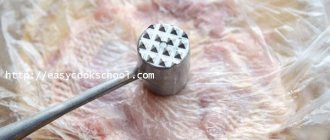
I wash the berries and pull out the seeds using a homemade wire hook; you can purchase a special stone squeezer or use an ordinary hairpin. It is better to work with gloves, because cherry juice is then difficult to wash off your hands.
I measure the peeled cherries into a glass and add a full glass with a good heap. I measure out the sugar in a glass of the same size and pour it in without a slide.
I take a cast iron frying pan with high sides. It should be dry and there is no need to lubricate it with anything, but it should be preheated.
I don’t know if it’s possible to use another frying pan, in any case it must have a thick bottom
.
My frying pan fits two glasses of berries and two glasses of sugar.
Pour everything into a bowl, bring to a boil over high heat with constant stirring, while the sugar dissolves.
Then reduce the heat to medium and fry for 20 minutes, stirring occasionally and skimming off the foam.
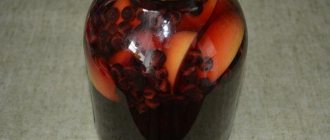
I immediately pour the hot jam into small jars with screw-on lids.
Of course, this work is painstaking, but it is not necessary to prepare so many berries, and how nice it will be to drink tea with such delicious jam in winter and treat your guests!
I also love making dumplings with cherries. Especially now from fresh berries.
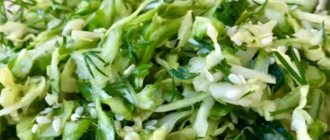
Have you tried zucchini jam? Unusual, but very tasty! Come get the recipe!
Wash fruits correctly
Delicate berries may be damaged during the washing process, so care should be taken.
Use a colander and a light stream of water, you can take, for example, a shower.
After this, you need to leave the berries to allow the water to drain and dry a little.
If we are talking about something denser and more durable, then a simple stream of running water will do. You can even help with your hands to make washing more effective.
Before you start washing, sometimes you need to carefully sort through the available raw materials, clean them of twigs and dirt.
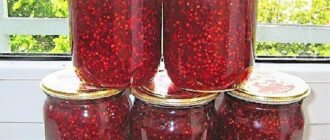
“LIVE JAM” FROM RASPBERRY AND CURRANTS
From raspberries:
For every 1 kg of raspberries, 1.5 kg of sugar. Sort the raspberries and put them in a cup. Cover with sugar and leave for 2 hours. Then stir with a wooden spatula in one direction. Stir the jam for 24 hours until the sugar is completely dissolved. Pour into sterile and dry jars jam, cover with plastic lids and store in the refrigerator for about 4-5 months. If you want to store the jam for a short time, then you can reduce the amount of sugar by 500 grams.
From currants:
For every 1 kg of currants, 1.5 kg of sugar. Sort the currants, remove the stems so that there are only berries, wash and place in a sieve to drain excess liquid. Transfer the currants into a cup. Cover with sugar and leave for 2 hours. Mix. Using an immersion blender, beat until smooth. Pour the jam into sterile, dry jars, cover with plastic lids and store in the refrigerator for about 4-5 months. If you want to store the jam for a short time, then you can reduce the amount of sugar by 500 grams.
Selection of dishes
First, you should dispel a couple of myths that were previously perceived as normal and were actively used. Let's start with copper.
We strongly advise you not to cook jam in a copper container.
Firstly, fruits and berries will dissolve copper oxides, as a result you will get a patina on the dishes and a little copper in the jam itself, and secondly, copper ions destroy ascorbic acid, that is, the end result is a product without this vitamin.
As you can see, this noble metal, although it remains useful, is not at all the optimal option for jam.
Let's continue with aluminum, which is also not needed at all for jam. The issue is again in oxides, but now of aluminum, which are destroyed under the influence of fruit and berry acids. As a result, your jam ends up with aluminum, which clearly has no business there.
What is the best option - you ask . These options are:
- enamel dishes - but only without chips;
- stainless steel utensils.
The second significant issue regarding dishes is the choice of container, and here you should recommend a basin that is optimal from all sides.
In terms of cooking jam, basins are much better than saucepans; they heat up better and produce a thinner layer of jam, which ultimately becomes thicker and more uniform.
In addition, in order to stir in the basin, you can move the dishes themselves, but you will have to put something into the pan and, as a result, possibly damage the berries or fruits.
Therefore, if you choose dishes, take a stainless steel or enameled basin that has a thick bottom. Just don't go too deep.
KIWI AND LEMONS JAM
Ingredients: Kiwi 1 kg, lemon 1 piece, juice of 1 lemon, sugar 900 g.
Preparation: 1. Wash the lemon thoroughly with a brush and cut into thin circles. Place in a saucepan along with 100g sugar and 100ml water. Cook over low heat for 10 minutes. 2. Peel the kiwi, cut into slices and place in a saucepan with lemon slices. Add lemon juice and remaining sugar. Boil. Pour into a ceramic bowl and leave at room temperature overnight. 3. The next day, return the jam to the pan, bring to a boil again and cook for 20 minutes, stirring occasionally. Pour into sterilized jars and let cool. Then close and store in a cool, dark place.
Nobody canceled the rules
Basic rules to follow unless the recipe specifies otherwise:
- proportions - about a kilogram of sugar per kilogram of raw materials, so that the jam is stored and does not sour;
- stages - the jam is cooked not by one boiling, but by 2-3 boils;
- paper or parchment - when the jam is “resting”, use parchment so that the berries or fruits do not get chapped;
- flame - after boiling, reduce the flame in order to control the foam;
- only jam - do not cook other dishes nearby, jam actively absorbs odors.
Follow these tips and you will get the perfect recipe.
How to make jam
Jam is a product that almost everyone loves. Therefore, any housewife wants to know the secrets of making jam so that it turns out tasty and can be stored for a long time.
A classic recipe for jam made from any berries.
For one kilogram of berries - it can be raspberries, cherries, gooseberries, currants, Victoria, any berry, take one kilogram of granulated sugar, that is, one to one. Next, the berries are sorted, washed (except for raspberries, they do not need to be washed), put in some container, covered with granulated sugar and left overnight so that the berries give juice. By morning, the sugar is completely dissolved in the syrup. Place the container with the berries in syrup on the fire and bring to a boil.
Many housewives are interested in how to make jam without foam. The answer is simple: as soon as the jam begins to boil, add one teaspoon of butter and one tablespoon of lemon juice. Butter is added so that foam does not form in the jam, and lemon juice is added so that the jam has a beautiful natural color and does not darken. After everything you need has been added, cook the jam further; it should boil for about five more minutes. Then remove it from the stove. It needs to cool completely, that is, be cold and you can continue cooking on the same day, or the next day, until it is completely ready.
How long to cook the jam until it’s ready?
It should cook after boiling for about another twenty to thirty minutes. When hot, place it in sterile, dry jars. The jars are sterilized either in the microwave or in the oven without pouring water into them. The lids are boiled for ten minutes. The jam turns out exceptionally tasty.
Special approach
There are also special tips that apply to special raw materials. These are the tips:
- pre-cooking – quinces, apples, pears require short pre-cooking before the main process;
- black rowan - pre-cook for a couple of minutes in boiling water and add citric acid while preparing the jam itself;
- black currants – pre-blanched in boiling water for 40-50 seconds;
- apricot - requires pre-soaking in water, to which soda has been added, one and a half spoons per liter of water, hold the apricot there for five minutes to maintain its shape;
- apples - cut into slices are first kept for a couple of minutes in water, to which a couple of tablespoons of salt were added, then in boiling water for the same amount of time, so they do not darken;
- berries - to keep their shape, pierce them with a toothpick.
Pan-fried blackcurrant jam
An unusual, but very simple, easy and quick way to make currant jam. And you need less sugar than usual.
For three glasses of currants, just one glass of granulated sugar is enough.
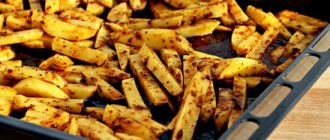
Heat the frying pan and pour clean berries into it.
Boil over high heat for 5 minutes, stirring. During this time, a lot of juice will appear.
Now pour sugar here and continue to fry for another 7-10 minutes, without reducing the heat.
All is ready! Very tasty jam, not cloying, pure pleasure!
Choosing a cooking method
In general, there are two main methods: classic (long) and modern (short). In the classic version, you first cook the syrup, then add the raw materials, after which you perform a couple of stages of cooking and boiling. The manipulations are lengthy and labor-intensive.
In the modern version, you first put raw materials and sugar in a container and leave it for five hours, and then do one cooking. After this, they are immediately put into jars.
I can’t say that any method is better; they differ not only in the number of stages and technology, but also in taste.
How to make jam so it is thick
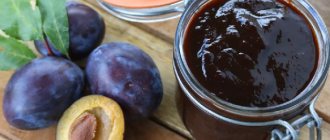
You can learn how to make thick jam using apricot jam as an example.
Apricot jam according to this recipe is very thick, rich, bright yellow-orange in color, moderately sweet, not cloying, with a very good structure, with intact pieces that do not fall apart.
• So, take 2 kilograms of apricots.
• They are washed, pitted and cut into small cubes.
• Weigh the finished peeled apricots.
• Two kilograms of unpeeled apricots yields approximately 1 kilogram 600 grams of peeled apricots.
• Sugar is taken in a 1:1 ratio, which means 1 kilogram 600 grams.
• Pour sugar into a container with apricots, mix and leave overnight.
• The apricots stood sprinkled with sugar for one night and released good juice.
• Place the container on the stove, bring the apricots to a boil and immediately after boiling remove from the heat. And once again leave the jam to stand overnight.
How long to cook the jam until it thickens
After two days, it is brought to a boil again and removed from the heat. But in order for the syrup to be thicker and the pieces of apricots to remain intact, place the container on the stove again and bring to a boil. After the jam has boiled a second time, remove it from the heat. And while it cools a little, the jars and lids are sterilized. Next, bring the container with the jam to a boil for the third time, cook for exactly five minutes, constantly skimming off the foam. After five minutes, the jam is removed from the heat and poured into jars. The result is a thick, absolutely non-liquid jam with preserved pieces of apricots.
Correct packaging
In order to obtain the optimal composition in jars, only cooled jam should be laid out.
If you do not cool it first, the jars will have layers that consist of syrup and the main product itself.
In addition, the jars do not need to be sealed immediately , since warm jam can release steam, which in turn produces condensation, which remains in droplets in the container and mold can appear from there.
By the way, the jars must first be sterilized and there are many ways to do this, from oven to boiling.
Only after sterilization should the jars be thoroughly dried.
RASPBERRY JAM WITH VANILLA
Ingredients: 250 g raspberries Juice of half a lemon 2 tablespoons 500 g sugar Vanilla (1 vanilla pod / 1 tablespoon vanillin)
Preparation: Place raspberries, juice and 2 tablespoons of water in a saucepan and bring to a boil. Reduce temperature and leave to cook for 5 minutes. Add sugar and stir until completely dissolved. Scrape out the vanilla bean and leave to simmer for another 10 minutes. Taste the jam and if it is not ready, leave it to cook for another 5 minutes. Pour the jam into a jar and serve.