How to clean herring
Before cleaning the herring, you need to prepare your workplace and all the necessary tools. To prevent the cutting board from smelling fishy, you need to wrap it in cling film. After cutting, it is removed and thrown away. You will need a bowl of water to wash your hands or rough gloves. Prepare paper towels or 6-8 napkins to wipe the herring. Unnecessary tweezers are very useful for removing small bones. It is better to choose a sharp and thin knife for cutting herring. After finishing work, you need to lubricate the knife and board with a slice of lemon to eliminate the fishy smell.
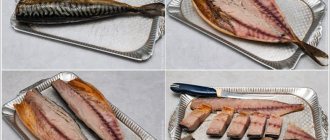
The answer to the question of how to cut a herring depends on what it is intended to be used for. If it is fillet, it is better to use the classic method of careful cutting. If you plan to use the herring for salads, you can use a faster method, which does not guarantee the safety of the sirloin. The first method is more suitable for beginners, the second - for professionals.
Gutting
First, the herring must be dried with paper towels. Next, the gutting process looks like this:
- The fin near the herring's head is raised at an angle of 45 degrees, and an even cut is made to the spinal part. Then the procedure is repeated on the other side until the scruff is completely separated.
- It is better to cut the fins with kitchen scissors or a knife - for this, cuts are made on both sides of the fin, and it is carefully removed by hand.
- Next, you need to make an incision from the tail up the abdomen. The insides are removed by hand, and the black stripes are scraped off with a knife. Caviar and milk are placed in separate dishes.
Peeling
After the main cutting, the stage of removing the herring skin follows. The following steps will help you do this:
- To make it easier to remove the skin, make a cut along the center line from the cut of the head to the tail. At the same time, the dorsal and ventral fins are also trimmed and removed.
- Peeling must begin from the head. The skin must be lifted at the head part and slowly pulled together towards the tail. You need to pull at a slight angle to the herring. If the pulp is removed at the same time, you need to remove it and continue removing the skin until the end.
- The whole procedure is repeated on the other side of the fish.
How to quickly cut a herring
Prepare a cutting board, a sharp knife and a container in which you will put the caviar or milk. Then follow the instructions and get the perfect fillet.
- Moving from the head of the fish to the tail, rip open the belly of the herring with a sharp knife.
- Take out the milk. Set aside in a separate container.
- Cut off the tail and head of the fish. Clean the insides of the herring.
- Wash the intestines under running water, removing the dark film on the inside of the peritoneum.
- Make a longitudinal cut along the ridge. It is important to go around the fin on the back on both sides.
- Pull the fins. They will quite easily detach from the peritoneum along with the skin. Use a knife to pick up the remaining skin and remove it towards the tail. Separate the fillet from the bone along the cut on the back.
Get it right the first time. Many of us always make the same mistake of cutting off the fins along with the tail and head. But if you leave them, removing the skin is much easier . This simple tip works every time!
How to clean herring in the traditional way?
The most common cleaning method involves several stages:
- Place the fish on the prepared board and use a knife to separate the head and then the tail. Holding the herring by the top fin, carefully trim it;
- By inserting a knife into the hole left after removing the head, cut the abdomen, which will allow you to easily remove the insides. Look, perhaps you got some milk or caviar, which many people eat on bread;
- Place the fish on its side and cut strips about 0.5 cm wide first from one side and then from the other. This will remove the ventral fins and hard, inedible parts;
- Remove the black film from the inside as it will taste bitter. Rinse the fish inside and out under running water;
- Place the herring on the board with its back facing you and use your thumb to make an indentation where the top fin was located. Move to the top of the fish, dividing the carcass into two halves, and then do the same, moving down;
- Place the herring on the board and pick up the skin. After this, grab the edge and quickly remove the skin in one motion. Do the same with the other half. The herring is cleaned, it remains to be cut into portions and served.
Deboning fillets
In order to obtain a whole, undamaged fillet, as in the photo of gastronomic magazines, it is necessary to prepare the herring carcass. To do this, you first need to gut the fish, then remove the skin. A neat sirloin is obtained in the following way:
- Make a deep cut along the back.
- Starting from the tail, at the level of the cut, divide the fish into 2 halves.
- After this process, the bones and spine will remain on only one part of the fillet.
- On the second part of the herring, it is necessary to pry the ridge from the side of the head with a knife and separate it from the carcass. In this case, small bones are removed with a knife or tweezers.
Let's learn how to cut herring for the holiday table. Step-by-step instruction
Who doesn't love herring? Everyone loves her. Herring goes perfectly with vodka. It is appropriate for a festive feast. And the salad “Herring under a fur coat” is a real masterpiece, without which not a single celebration is complete - New Year, wedding, name day. The only obstacle that young housewives face is the proper preparation of this delicious fish for the table. Many, unfortunately, do not know how to cut herring. Even my parents used to simply cut it, then pour it over with vinegar and oil, and decorate it with onions and herbs. Naturally, this is not an option, since guests are forced to get their hands and plate dirty, cleaning the fish from skin and bones.
By the way
There is no need to be embarrassed that you don’t know how to cut a herring. It's not hard to learn, you just have to try it once. For example, for the first time I learned how to cut herring correctly when I worked in a cafe. There, the cooks can easily clean about 10 kg of this fish in just about half an hour. They do it quickly and deftly. Apparently, it's all a matter of skill and habit. This is what we will learn.
Advantages and disadvantages
Without proper experience, this process takes a lot of time - this is a minus. Therefore, many avoid it, preferring to buy ready-made fillets. But, as a rule, ready-made herring is less tasty because, firstly, it is trimmed too carefully, and secondly, it is filled with refined oil and preservatives so that it can be stored for up to a month. Therefore, its taste is very different from fresh cut fish, which is kept in brine for no more than 3 days. So, lightly salted herring, which the housewife processes on her own, is more tasty, healthy and nutritious. And that's a plus. That's why…
Learning how to cut herring
- Take fresh salted fish. We select a board for it. It is better if it is plastic, since wood absorbs odors too much. I personally prefer to also put a newspaper or paper towel on the board so that liquid does not spread on the table. Next, take the sharpest knife for cutting herring and cut off the head and tail of the beauty (that is, the fish). These parts are inedible, and we safely throw them away (I do not recommend giving salted fish to pets - this may cause them problems with the genitourinary system).
- Then we open the belly of the fish and carefully remove the insides. If the herring has caviar or milk, we take them out, wash them and set them aside separately - many people love them. Now you need to thoroughly clean the abdomen with a knife from excess blood and films. There is no need to rinse it - this will make the fish taste too bland. It is better to remove stubborn dirt with a napkin.
- After this, we cut off all the fins - they are not needed. We cut the back of the herring up to the ridge.
- Now it will be easy to remove the skin from the herring in one motion, starting from the top. You can start by helping yourself with a knife. Over time, you will easily learn to do it without it.
- Then we cut the carcass lengthwise, being careful not to touch the rib bones.
- Finally, we take out the ridge and rid the pulp of the stuck bones.
Result
Well, we have a beautiful herring fillet, separated from the bones.
Then you can do whatever you want with it - include it in salads, cut it into pieces, decorate it with onions, vegetables and herbs. Season with vinegar, oil or mustard to your liking. Your herring will definitely be the most delicious!
For a fur coat
If filleted fish is intended for a salad or other dish where its appearance is not important, 2 methods of cleaning the backbone and bones are used. The first method is called the “book”.
- After gutting, the herring must be wrapped in a bag or cling film and the package should be knocked forcefully on the surface of the board several times.
- After removing the film, the fish must be placed on its belly and pressed firmly on top with your hand, spreading the carcass like a book.
- Next, the flat fish turns over, and the ridge with bones is easily removed with your fingers. Afterwards, you need to peel each part of the fillet and remove small bones.
The second method is considered the fastest, but at the same time the most difficult in terms of execution. But here you just need practice and skill:
- After removing the head, fins and entrails, it is necessary to clean the skin and make a centimeter incision on the tail of the herring.
- Next, with both hands you need to firmly grasp the fish by the tail and make a rotational movement of the carcass around you.
- After 1 full rotation, with a sharp movement you should tear the herring into 2 parts. As a result, your hands will be left with boneless bellies. The backbone of the loin is easily removed along with the small bones.


