Delicious and beautiful Oreo cookies appeared on the shelves of our stores relatively recently, but throughout the world they have been famous for their high quality for many years. In 1912, an American company began producing chocolate cookies with an incredibly delicate creamy layer, which quickly won the hearts of many sweets lovers and has not lost its popularity to this day. Today, the round “Oreo” has become a favorite among domestic consumers, and therefore many confectioners have been inspired by the idea of creating delicious cakes and desserts “based on” their favorite cookies.
What kind of cakes are there with the famous cookies?
There are many recipes that can be used to reproduce the style and taste of Oreo in a cake, and there are also those that use the original cookies as a basis.
The origin of the name "Oreo" is unknown, but several theories exist, including from the French word for "gold" ("or"), as the cookie originally came in gold packaging, or from the Greek word "oreo", meaning "beautiful".
Among the most popular cake options, we note the following:
- No-bake Oreo cake. A very interesting recipe that does not involve the use of an oven, which includes Oreo cookies as one of the main ingredients. It is especially relevant in the summer, when you don’t want to turn on the oven.
No-Bake Oreo Cake Recipe for Cheese and Cookie Lovers - Oreo cakes with various ingredients and flavors, styled after the design of Oreo cookies or using them as decoration.
Decorating a cake with cookies depends only on the imagination of the pastry chef - Oreo cakes that fully match the taste and appearance of the original delicacy.
Oreo cake in the form of cookies will surprise guests not only with its taste, but also with its appearance.
Most recipes are extremely simple to follow, but there are also quite complex variations with many ingredients and necessary tools. Here are the most accessible cake recipes, which will not be difficult to prepare even for young housewives.
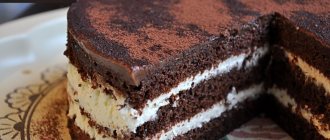
Chocolate cakes stand out in contrast against the background of light buttercream - the Oreo cake turns out not only amazingly tasty, but also very beautiful
The traditional Oreo cookie consists of two chocolate discs and a layer between them, but many other varieties have been released throughout the history of production.
Useful tips
The following tips will help you prepare a delicious dessert:
No Bake Oreo Cake Recipe
The most simple and interesting cake recipe that does not require much effort, but has excellent aesthetic and taste qualities. To prepare it you will need a minimum of equipment:
Ingredients for the cake base:
- Oreo cookies - 300 g;
- melted butter - 100 g.
- cream (at least 35% fat) - 200 ml;
- Nestle Desserts dark chocolate - 200 g;
- butter - 50 g;
- condensed milk - 70 g.
To decorate the cake:
- halves of 5 Oreo cookies;
- a few drops of chocolate to add a touch of color.
If you want the cake base to be crispier, remove the white cream from the cookies
Having collected all the necessary ingredients and equipment, you can proceed directly to preparing the Oreo cake. The step-by-step cooking recipe is as follows:
- For the base of the cake, crush the cookies. You can do this using a mixer.
- Melt the butter in the microwave and mix with the crushed biscuits, stirring thoroughly until the paste is smooth.
- Place a sheet of parchment on the bottom of the pan and spread the resulting mass evenly over it. The mold should then be refrigerated overnight.
The mass must be well distributed over the base and sides of the mold, pressing with a spoon - To prepare the cream, place the cream in a saucepan and bring it to a boil over low heat, stirring gently. Remove cream from heat, add grated chocolate, condensed milk and butter. Mix well until you get a homogeneous cream.
After mixing all the ingredients for the cream, it will become homogeneous. - Pour the cream into the mold with the mixture and let stand for 5 minutes.
After spreading the cream over the surface of the cake, it must be carefully leveled. - Decorate the cake as you wish with chocolate chips or Oreo cookies and refrigerate for 3-4 hours.
It is advisable to leave the finished cake in the refrigerator overnight
Oreo Cake with Salted Caramel
It’s hard to believe in the existence of such a dessert, but it really exists and, moreover, has won a lot of sympathy. When there is nothing left to surprise guests with, it is Oreo cake with salted caramel that will save any avid cook. To prepare it, you should take a little time and preheat the oven to 180˚C. Total preparation time is 40 minutes, baking time is 25 minutes.
- Oreo cookies – 300 g;
- butter – 100 g.
For the curd cream:
- cottage cheese – 230 g;
- Turkish yogurt – 100 g;
- vanilla sugar – 1 sachet;
- egg – 1 pc.;
- sugar – 2 tbsp. l.;
- chopped chocolate – 100 g.
- butter – 100 g;
- brown sugar – 80 g;
- cream - 180 ml;
- salt – 0.5 tsp.
- pistachios - at your discretion
- Oreo cookies - 6-10 pcs.
- Crush the cookies in a convenient way. Mix with butter. Achieve a uniform consistency.
- Transfer the dough into a baking dish and make the curd cream. Mix all the ingredients to prepare it. Use a mixer to achieve a homogeneous creamy mass.
- Pour the cream over the formed cake and bake for 25 minutes.
- Prepare caramel from these ingredients: melt butter with brown sugar in one bowl. After the boiling point, keep on fire for another 2 minutes. Remove from heat, add salt and pour a small stream of cream into the sugar mixture. Before applying caramel, the cake layer should be cooled.
- Carefully place caramel onto the chilled dessert with curd mass and place in a cool place for 30 minutes.
Before serving, sprinkle with chopped nuts and decorate with cookie slices at your discretion.
Baking recipe
Another simple and affordable recipe for Oreo cake with an original, delicate taste.
To prepare you will need:
- mixer;
- ceramic tableware;
- baking dishes of the same diameter (about 20 cm).
Ingredients for one biscuit (two in total will be baked):
- flour - 110 g;
- egg;
- sugar - 120 g;
- cocoa - 30 g;
- milk - 85 ml;
- refined oil - 45 ml;
- boiling water - 85 ml;
- soda - 1 tsp. (on the edge);
- baking powder - 1 tsp. (on the edge).
Oreo with strawberries
Strawberries are a great addition to decorating any cake. Those who are fond of chocolate novelties have repeatedly noted the superior taste of strawberries with chocolate. Once you try it, you can’t stop; you want to enjoy it again and often. Any tea party will be more enjoyable with Strawberry Oreo Cake. Prepared based on the original classic recipe.
Ingredients:
For the base:
- cookies – 300 g;
- melted butter – 100 g.
For cream:
- heavy cream – 200 ml;
- condensed milk – 100 g;
- butter – 50 g;
- dark chocolate bar.
For decoration:
- strawberries - quantity at your discretion;
- whipped pastry cream.
Preparation procedure:
- Make the crust according to the basic recipe.
- Mix cream, butter, chocolate, condensed milk.
- Take a few berries, crush them, add to the cream for taste.
- Pour the resulting mixture over the cake layer, smooth it out, and decorate with strawberries and cream on top.
Photos of finished cake options
All over the world, Oreo cake is incredibly popular. Confectioners use it not only as a decoration, but also as a base for sponge cakes. There are many recipe options and original designs.
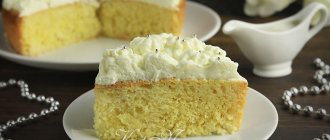
One of them is a snow-white, airy Oreo cake with the addition of a large amount of dairy ingredients.
White Oreo Cake requires dairy products such as milk, whipping cream, butter and cream cheese
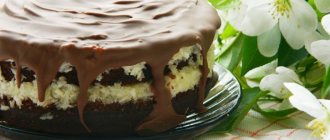
The dark color of the chocolate cake with cookies and the light color of the cream cheese cream contrast perfectly with each other, allowing the masters to prepare real masterpieces of culinary art.
One of the main ingredients of Oreo cake in different recipes is cream cheese.
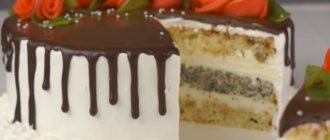
To decorate the cake, you can use the technique of creating chocolate smudges from icing or ganache.
You can create chocolate drips using a spoon or pastry bag.
And, of course, many masters try to beat the shape and appearance of the famous cookies in making a cake. One of the original dessert ideas is to imagine cookies pouring out of the packaging onto the cake.
This unusual cake is sure to lift the spirits of your holiday guests.
Or a cake made up of cookies... or cookies made into a cake?
This cake can be made in a small size - from one or two tiers
And this cake will become the main decoration of Halloween and will give many joyful emotions to children.
Spider cookies are just one interesting idea, how many more can anyone come up with when they decide to make an Oreo cake?
This is how you can quickly and easily prepare an Oreo cake, consistent with the general style and very attractive both in appearance and taste. Bon appetit!
Hello my friends! Today on our agenda is a recipe for Oreo cake with mascarpone cream and cheesecake inside. Is your child also crazy about these narcotic cookies that have taken over the universe? Then I propose to make him this wonderful chocolate cake based on Oreo cookies for his birthday. 1-2 times a year I prepare this as a standard. Typically no cheesecake. But it's especially wonderful with cheesecake. I recommend it without reservation! If you still don’t want to bother, then you can simply omit the cheesecake layer.
Two ideas for decorating a cake with M&M candies
Cheerfully colored candies are an excellent decoration for a children's dessert.
Young sweet tooths will definitely love your idea.
Cooking time from ready-made cakes is 20 minutes.
- marshmallows (white) – 2 halves;
- marshmallows – 1 pack;
- powdered sugar (for sprinkling mastic) – 90 grams;
- food coloring (red, yellow, brown, pink);
- ganache – 250 gr.;
- “M&M” candies – 1 pack (130 gr.)
- bars (Kit-Kat, Twix) or cookies (the quantity depends on the width of the chocolates and the diameter of the cake).
- Cover the prepared cake with ganache or cream.
- Place chocolates or long cookies around the cake vertically close to each other. These elements should form a “fence”. Tie the chocolates around the circumference with a beautiful ribbon.
- The “fence” should rise above the surface of the cake by at least 1 centimeter.
- Cover the top of the dessert with candy. To do this, pour them out of the pack inside the “fence” and distribute them evenly.
- Prepare the mastic. Melt the marshmallows in the microwave and mix with sugar until elastic.
- Divide the mastic into 5 parts and paint 4 of them in different colors (leave one part white).
- To change the color of the mastic, just add dye to the mixture and mix until smooth.
- Cut one half of the marshmallow into a circle, and give the other half an oval shape. Cut the marshmallow halves into a circle shape.
- Roll out the red mastic into a thin layer on a board sprinkled with powder, and wrap it around the round half of the marshmallow. Also roll out the yellow mastic thinly and wrap it around the oval marshmallow.
- Use pink fondant to make arms and legs for the “heroes” and attach the limbs to M&M. Use mastic of different colors to make inscriptions, “faces” and shoes.
- “Sit” the figures directly on the scattered candies.
There is an even simpler option to decorate the cake with M&M candies. You just need to stick a long wooden skewer into the surface of the dessert, and put an empty pack of M&M on the “shaft”. You need to place colored candies around so that it looks like the sweets are spilling out of a torn package.
Biscuit
Before moving on to the recipe, I’ll tell you one life hack . Still, you know that the distinctive feature of Oreo cookies is their jet-black color. If I'm not mistaken, Oreo was the first chocolate chip cookie to be black rather than brown. Then he gained many followers, but Oreo was the pioneer))
So, to get a chocolate biscuit of the same absolutely black color, you don’t need any special cocoa, much less a dye. Simply cook the biscuit in boiling water. It turns out as black as Oreo cookies.
How to make Oreo mousse cake (step-by-step recipe with photos):
Grind 150 g of almonds in a blender.
You can leave the mixture uneven, with large pieces (at your discretion), I decided to make a finely ground mixture.
Break 50 g dark chocolate into pieces.
Beat 3 egg whites with a mixer at medium speed (about 1 minute).
Without stopping whipping, gradually add 100 g of brown sugar to the whites and beat the mixture with a mixer, first at medium and then at high speed until the meringue is fluffy (marks from the whisks should not float).
Add 1 tsp to meringue. vanilla extract, ground almonds and chocolate pieces, carefully mixing the mixture with a spatula.
Set the oven to preheat to 160 C. Grease the inner surface of a round baking dish with a diameter of 20 cm with vegetable oil, then line the bottom with parchment. Pour the mixture with meringue, chocolate and ground almonds into the mold, carefully level it with a spatula or spoon and bake for about 25 minutes (depend on your oven) until a toothpick comes out dry.
The finished base should have a light cream color and a slight smell of roasted almonds and chocolate. The main thing is not to eat it! Control yourself, my friends! Remove the finished base from the oven, after 15 minutes carefully (!) remove it from the mold using a spatula and cool completely on a wire rack.
Oreo Cake Recipe
We will need:
mold diameter - 24 cm
for chocolate sponge cake
all ingredients should be at room temperature
- sugar - 380 gr.
- vanilla sugar - 10 gr. ( prefer with natural vanilla )
- flour - 260 gr.
- cocoa powder - 100 gr.
- soda -1.5 tsp.
- baking powder - 1.5 tsp.
- salt - 1 tsp.
- eggs - 2 pcs.
- milk - 260 gr.
- odorless vegetable oil - 130 gr.
- boiling water - 260 gr.
for Oreo cheesecake
all ingredients should be at room temperature
- curd/cream cheese ( Hochland , Almette, Violette) - 400 gr.
- sugar - 65 gr.
- vanilla sugar - 5 gr.
- eggs - 1 whole + 1 yolk
- sour cream, 20% - 65 gr.
- Oreo cookies - 100 gr.
for impregnation
- sugar - 100 gr.
- water - 100 gr.
- liqueur (Baileys, Sheridance) or rum or cognac - 25 gr.
for Oreo cream
- heavy cream 33-35%, cold - 500 gr.
- mascarpone cheese - 250 gr.
- powdered sugar - 100 gr.
- Oreo cookies - 200 gr.
Cooking technology
Biscuit in boiling water
It is advisable to prepare the biscuit the day before.
- Preheat the oven to 170º.
- Place all ingredients except water in a deep bowl in the order indicated and mix well until smooth.
- Pour in boiling water and mix thoroughly again until smooth. The dough turns out liquid!
- Pour the dough into a 24 cm mold without greasing it with anything.
- Bake the biscuit at 170º for 50-60 minutes. We check the readiness with a dry skewer, and if the biscuit is ready, then remove it from the oven.
- Leave the biscuit in the mold until it cools completely, then remove it from the mold, wrap it in film and put it in the refrigerator overnight to stabilize.
New York cheesecake
We also prepare the cheesecake the day before.
- Preheat the oven to 150º and place a container of hot water on the lower level of the oven.
- Place the cream cheese with sugar and vanilla sugar in a mixer bowl and beat until fluffy, periodically scraping the cream from the sides of the bowl.
- Add the yolk into this mixture, and then the egg: add the egg only after the yolk has completely dissolved. From time to time we collect the cream from the walls of the bowl.
- After the mass becomes homogeneous, add sour cream and beat for several seconds at high speed until a homogeneous cream is formed.
- Using your hands, break the Oreo cookies into small pieces and add to the cheese mixture.
- We transfer the finished mass into a mold with a diameter of 20-22 cm, the bottom of which is covered with parchment.
You can bake the cheesecake in the same pan in which we baked the sponge cake. Then the cheesecake layer will be the same diameter as the cake, but much thinner.
Syrup
- Mix sugar and water in a saucepan, bring to a boil over moderate heat and cook for about a minute.
- Remove from heat, add liqueur or other alcohol, stir and cool completely.
Oreo cream
- Before preparing the cream, cool the cream, mixer bowl and whisk for 15 minutes in the freezer.
- Grind the Oreo cookies (along with the filling) in a blender or using a bag and a rolling pin into fine crumbs.
- In a chilled mixer bowl, combine the cream, mascarpone, and powdered sugar and beat first on low, then at high speed until soft peaks form.
- Pour Oreo crumbs into the cream and gently fold in with a spatula.
- Before assembling the cake, store the cream in the refrigerator.
Assembling the cake
- After a night in the refrigerator, we cut off the caramelized crust of the biscuit so that the surface is smooth (we don’t eat the leftovers, we need them for sprinkling)).
- Using a ruler and a knife, divide the biscuit into 3 equal parts and make 2 shallow cuts along the entire diameter of the biscuit.
- Using a large sharp knife or thread, cut the biscuit into cake layers in the marked places.
- Soak the bottom sponge cake in syrup and place it on a base coated with a small amount of cream.
- Transfer the Oreo cream into a pastry bag and weigh it (divide by 4 in your head, or on a calculator): approximately 235 grams each. cream.
- Place 235 grams on the first cake layer. cream, level with a palette .
- Place the second cake layer, soak it, and add 100 grams. cream, level it, carefully place the cheesecake on top.
If the cheesecake is smaller in diameter than the cake layers, place a border of cream around the perimeter and cover with the remaining portion of cream (100 g). That is, the cheesecake should be between two thin layers of cream.
That's all for me. I wish you success in making this wonderful cake!
Other Oreo Cookie Recipes:
I accept all questions and photo reports in the comments ⇓
You will learn how to make a delicious Oreo cake using a simple step-by-step recipe with photos. The cake turns out to be multi-layered with various ingredients, the preparation of which will take some time, but the result is worth it - the cake will come out large, tender, and simply melt in your mouth. The cake has a rich chocolate taste that both children and adults love.
Chocolate flavored
The classic Oreo cake is already chocolate. But among those with a sweet tooth there are lovers of more chocolatey desserts. For those with a sweet tooth, a recipe for a mega-chocolate miracle was invented. Baking this cake with Oreo cookies is not difficult. Its cakes are baked at 170˚C in a large rectangular pan.
Ingredients:
For the base:
- sifted flour – 250 g;
- baking powder – 0.5 tsp;
- sugar – 410 g;
- salt – 1 tsp;
- soda – 2 tsp;
- cocoa powder – 100 g;
- purified sunflower oil – 110 ml;
- milk – 230 ml;
- eggs – 2 pcs.;
- hot water -230 ml.
For impregnation:
- condensed milk – 320 g;
- dark chocolate bar.
For chocolate cream:
- chilled heavy cream – 500 ml;
- cocoa powder - 35 g;
- powdered sugar – 85 g;
- Oreo cookies – 240 g.
Note! Before baking, be sure to coat the pan with vegetable oil.
Preparation procedure:
- Place the bulk ingredients for the crust into the first container and mix everything thoroughly.
- Add all other ingredients (except hot water) to container No. 2: butter, milk and eggs. Mix to obtain a homogeneous consistency.
- Mix the masses from containers No. 2 and 1. Knead everything, add hot water little by little. Get a homogeneous mass. Pour it into the mold and place it in a preheated oven for 30 minutes.
- Take out the baked cake and make holes across its entire area using bamboo skewers.
- Combine condensed milk with chopped chocolate. Melt in a steam bath until smooth and glossy. Cover the cooled chocolate cake crust with the resulting impregnation. Place in the refrigerator.
- Beat cream, cocoa powder, powdered sugar with a mixer, obtain a thick consistency, add crushed cookies, mix everything well. Smooth the resulting cream over the impregnation.
Use cookies to decorate the cake as you wish. To serve the delicacy on the table, you should use a bread knife.
Step-by-step preparation
Making chocolate sponge cake
- In a saucepan, combine 15 g of cocoa and 100 g of sugar.
- Pour in 50 ml of water.
- Add 65 ml of odorless vegetable oil and mix. Place the saucepan on the stove and bring to a boil over medium heat.
- Drive 2 chicken eggs into a deep bowl and beat with a mixer for 1 - 2 minutes until fluffy.
- Then add 25 g of sugar and continue beating for 5 – 7 minutes. The mass should lighten well, become fluffy and airy.
- Measure 100 g of flour into a separate container.
- Add ¼ tsp. salt and ¼ tsp. soda
- Add 2 g of baking powder and mix the dry ingredients well.
- Pour the cooled chocolate mixture into the egg mixture in portions and stir.
- Gradually sift the dry ingredients into the liquid ingredients, mixing well each time.
- A springform baking pan with a diameter of 16 cm must be lined with parchment paper. Pour the prepared dough into the mold and place in the oven at 175 degrees for 40 - 45 minutes.
- We check the readiness of the biscuit with a toothpick or wooden skewer; it should be dry and clean.
- Remove the biscuit from the mold, remove the baking paper, transfer to a wire rack and let cool completely.
- After the biscuit has cooled, wrap it in cling film and leave for at least 4 hours.
Cooking cheesecake
- Place 400 g of cottage cheese at room temperature in a deep bowl.
- Pour in 100 g of sugar, mix with a silicone spatula, no need to stir with a mixer.
- Then add 2 chicken eggs one at a time, mixing the mixture well each time.
- Pour in 140 ml of cream 33% fat.
- Take 70 g of Oreo cookies, remove the white layer and grind in a blender into crumbs.
- Add the crushed cookies to the cheesecake and stir.
- Grease a baking dish with a diameter of 16 cm with butter and lay out the cheesecake.
- Place a container of water on the bottom of the oven, and place the cheesecake on the middle level at 130 degrees for 60 minutes. The middle of the finished cheesecake should vibrate. Cool it in the slightly open oven for two hours. Then let the cheesecake sit at room temperature for 60 minutes.
- Place the cheesecake in the refrigerator for 6 hours.
Preparing the layer – ganache
- Pour 125 ml of cream 33% fat into a saucepan.
- Bring the cream to a boil, remove from heat and add 250 g of white chocolate, stir until smooth.
- Cover the ganache with cling film and refrigerate overnight.
- The next day, take the ganache out of the refrigerator and beat it with a mixer for 4 minutes. The mass should increase in volume and become denser.
- Grind 100 g of Oreo cookies into crumbs and add to the cream, mix.
Preparing chocolate cream
- Pour 170 g of 33% fat cream into a saucepan, place it on the stove and heat until hot.
- Add 200 g of dark chocolate, mix until smooth. Cover the ganache with cling film and place it in the refrigerator for several hours.
- Place 370 g of boiled condensed milk in a deep bowl and beat with a mixer so that there are no lumps.
- Add 180 g of softened butter, beat with a mixer for another 2 - 3 minutes.
- Take the ganache out of the refrigerator and beat for 3 minutes.
- Transfer the ganache to the condensed milk and butter and beat until smooth.
Forming the cake
- Cut off the top of the biscuit and divide it into two parts. To do this, make a cut in a circle with a knife, and then use a thread to cut the cakes.
- Place the first cake layer and soak it in any syrup or milk with sugar.
- Place a layer of ganache on top and spread it into an even layer.
- Next add the cheesecake.
- Then spread the ganache layer again.
- Cover with the second cake layer.
- We soak it again.
- Cover the cake with a split ring and place acetate film inside. Place the cake in the refrigerator for at least 4 hours.
Covering the cake with cream
- First, cover the cake with the first layer, which will hold all the crumbs together. Place the cake on the turntable, apply cream along the height of the cake using a scraper and distribute it along the side of the cake.
- Next, apply the cream on top and smooth it out.
- Place the cake in the refrigerator for 60 minutes.
- Then we proceed to apply the second layer of cream. Squeeze the cream out of the pastry bag in strips onto the entire surface of the cake. Place the scraper vertically and, moving the turntable, level the cream.
- Level the top of the cake using a spatula, going beyond it. Next, smooth out the cream again with a scraper.
- Finally, using a scraper or spatula, smooth the top from the edge to the center, constantly clearing the tool of cream.
- Place the remaining cream in a pastry bag and, using any nozzle, decorate the cake.
- Top with Oreo cookies. Bon appetit!
Oreo cake without baking
Products for the base:
- butter – 55 grams;
- Oreo cookies – 20 pieces.
Products for filling:
- milk 3.2% – 75 ml;
- heavy cream – 120 ml;
- butter – 30 grams;
- powdered sugar – 20 grams;
- Oreo cookies – 18 pieces;
- white chocolate without additives – 110 grams;
- cottage cheese – 420 grams.
Decoration:
- heavy cream – 160 ml;
- powdered sugar – 30 grams.
Cooking process:
To make an Oreo cake according to the recipe with photos without baking cookies, start with the base. To do this, the cookies are crushed into crumbs; it is better to do this using a food processor. Next, add softened butter to it and mix thoroughly. If the mixture comes out a little dry, you can add a little cream or sour cream.
The mold is prepared; the container should have a diameter of 16 to 20 cm. The mold is lined with baking paper, and then a mixture of cookies and butter is placed. When the base is ready, start preparing the cream.
Preparation of cream:
To do this, milk is poured into a saucepan and put on fire. White chocolate and butter are also placed there; the entire contents must be stirred all the time until the ingredients are completely dissolved. Thus, we get chocolate cream. Now the cottage cheese is crushed using a sieve. You can use a food processor for chopping; add crushed cottage cheese to the chocolate cream and mix thoroughly.
For the Oreo cake, according to the recipe with the photo without baking, use heavy cream; it is better to buy a product with a fat content of at least 33%. Whip the cream and gradually add powdered sugar. The chocolate mass is gradually added to the cream and carefully kneaded until smooth. You can add crushed cookies to the cream and mix again. The mold is filled with the resulting cream, everything is leveled and covered with cling film. In this form, the dessert is sent to the refrigerator for three hours, and then topped with whipped cream.
Delicious and beautiful Oreo cookies appeared on the shelves of our stores relatively recently, but throughout the world they have been famous for their high quality for many years. In 1912, an American company began producing chocolate cookies with an incredibly delicate creamy layer, which quickly won the hearts of many sweets lovers and has not lost its popularity to this day. Today, the round “Oreo” has become a favorite among domestic consumers, and therefore many confectioners have been inspired by the idea of creating delicious cakes and desserts “based on” their favorite cookies.
Video recipe - Bounty roll at home in 10 minutes
This dessert is the same one from childhood that my dad prepared.
The necessary products will always be found in the kitchen. And the cooking process will take a minimum of time. The juiciness of the delicacy depends on the fat content and amount of sour cream. I recommend experimenting by decorating with berries, buttercream, melted chocolate or multi-colored dragees. Will it turn out very beautiful? Grocery list:
- 500 ml sour cream;
- 1 banana;
- 250 g square cookies;
- 3 tbsp. l. Sahara;
- 50 g chocolate.
1. Beat sour cream with sugar. Finely chop the banana and mix with sour cream.
2. Pour some cream into the bottom of the square pan and start laying out the cookies.
3. Each layer must be soaked in sour cream filling.
4. Spread the last layer of the treat with the remaining cream and decorate with grated chocolate.
Place the pan in the refrigerator for at least 3 hours. Serve the treat chilled with aromatic tea or fruit compote.
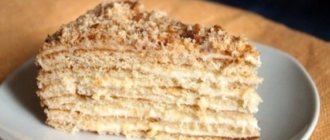
This option has a special delicate taste and airiness thanks to unsalted Rybki crackers. Soaked in cream, they turn out juicy and have a creamy taste. This dessert is a frequent guest on my table.
You will need:
- 400 g unsalted fish cracker;
- 650 g sour cream;
- 2 bananas;
- 160 g sugar;
- 10 g vanilla sugar;
- 50 g chocolate.
1. Prepare the cream in a deep bowl from sour cream and sugar, whipping them with a mixer. You can add vanilla sugar to taste.
2. Peel the bananas and cut into thin slices.
3. Add crackers, bananas to the cream and mix. Leave for 10-15 minutes.
4. Cover the mold with film and place the whole mass there. Place in a cool place for several hours. Then remove, invert onto a serving dish and decorate with chocolate. Bon appetit!
Even a teenager can make this incredibly delicious no-bake coconut roll using the video recipe. The combination of cream, chocolate, and coconut will not leave anyone indifferent. Be sure to take note!
The favorite treat of all those with a sweet tooth is chocolate cake. But it takes a long time to prepare it from cakes and there is always not enough time for it. Even the busiest housewives will love making this miracle.
You will need:
- 200 g chocolate cookies;
- 800 g cream;
- 100 g butter;
- 250 g milk chocolate;
- 300 g dark chocolate;
- 1 tsp vanilla sugar.
1. Grind cookies and 50 g of dark chocolate in a blender. Melt the butter and pour into the shortbread chocolate chips. Stir and transfer to the mold, press with your hands to form a crust, and place in the refrigerator for half an hour.
2. Beat 500 g of cream with vanilla sugar (or vanilla extract) until fluffy. Melt milk chocolate and combine with whipped cream. Transfer to the cookie crust pan and place back in the refrigerator for an hour or two.
3. Heat the remaining cream, melt the dark chocolate in it and cool.
4. Remove the pan from the refrigerator and pour the chocolate-cream mixture over the dessert. Place in the refrigerator for an hour.
This chocolate airy cake can be prepared without any extra effort.
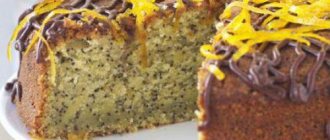
A sweet treat made from cookies, gingerbread or chocolate balls is a reason for a good mood, a feast with loved ones. For those who are watching their figure, you can cook it with long or lean cookies, with orange, and vegetable cream. In my family, such delicacies with custard, meringue, and sour cream are popular. You can serve such delicacies not only on weekdays, but also on holidays.
We suggest you familiarize yourself with Planting vegetative grape seedlings - Vegetable garden at the dacha
Write your favorite quick cake or dessert recipe in the comments. Don't forget to follow my blog for updates. Eat sweets in moderation for your health. See you.
How to Assemble Oreo Mousse Cake
Place the almond-chocolate base on the bottom of a springform pan with a diameter of 20 cm. Place creamy mousse with Oreo pieces on the base.
Decorate the top of the cake with the remaining cookies and refrigerate for 6 hours.
Fast, and most importantly delicious! Enjoy!
Hello, dear sirs and madams! How are you spending your summer? I heard that many people did not have a very happy summer... Let's come to us, to warm countries! We have heat, sea and delicious food. Although there is one big plus
There is, of course, such a summer - YOU CAN NOT LOSE WEIGHT)) You can forget about going to the gym, put on your favorite sweater and sit in the evenings with a cup of tea and cake, and not think about anything.
And again we live from Saturday to Saturday. Because every Saturday we go out of town, to the sea, spend the night with my husband’s sister, sleep on the balcony, on an inflatable mattress (godfather, thank you!), under a canopy, wake up to the singing of birds and the clatter of cicadas, have breakfast there, on the balcony: fried eggs, cheese, bread, butter, pies, buns, tea, etc., which is forbidden to me at home. etc., we go to the beach, drink coffee, swim, sunbathe, lie on sun loungers. It's like a mini-vacation every weekend. In short, you can't imagine anything worse!
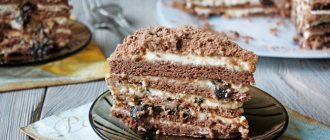
But again and again I mentally return to your sweaters, teas and cakes. And just for you, I’m preparing this mega-chocolate dessert - Oreo cake - with a chocolate sponge cake soaked in chocolate condensed milk and covered with chocolate cream with Oreo cookies.
So, let's begin.
Our chocolate cake is very rich, soft and porous. And the cookies add their own unique fabulous aroma.
The sponge cake for this cake is incredibly simple to prepare. By the way, you will see that the dough turns out to be very liquid, don’t be alarmed by this, everything will be baked!
Awesome dessert “Ice cream” – video recipe from Alena Mitrofanova
To please your loved ones with a delicious dessert, you don’t have to stand at the stove all day. It is enough to prepare “Anthill” from any fresh crumbly cookies. Average cooking time is 10-15 minutes. You won't be able to spoil this delicacy.
You will need:
- 500 g cookies;
- 350 ml boiled condensed milk;
- 200 g walnuts;
- 50 g butter;
- 50 g chocolate (for decoration).
1. Finely crumble any fresh cookies with your hands or a rolling pin. Then fold into a deep pan.
2. Peel the nuts and fry until golden brown. Grind them with a rolling pin or a kitchen hammer. Add them to the cookie crumbs and mix well.
3. For the cream, mix softened butter with boiled condensed milk. Beat with a blender until smooth.
4. Pour the resulting cream into a bowl with dry ingredients and mix thoroughly. Place the dessert in a mound shape into a serving bowl and garnish with grated chocolate. Then put it in a cool place for 2-3 hours.
In 10 minutes you will make a very tasty cake that both adults and children will love.
This beautiful sweet snack is perfect for both the cold season and the summer heat. All products can be purchased at your nearest store. And an interesting presentation will not leave anyone indifferent.
Ingredients:
- 200 g crumbly cookies;
- 100 g butter;
- 30 g nuts (any);
- 500 g cream cheese;
- 1 banana (can be replaced with any fresh berries);
- 50 g chocolate;
- 100 ml condensed milk;
- 30 g marmalade in small pieces.
This delicacy is made from store-bought sponge cakes. It has a special taste, lightness and sourness that comes from fresh fruits and berries. It's good to cook in the summer when you don't want to turn on the stove. And fresh aromatic berries are sold in every shop. Households and guests will ask for more!
To prepare, take:
- 300 g of ready-made sponge cakes;
- 400 g of any fruits and berries;
- 700 g sour cream 20% fat;
- 300 g sugar;
- 30 g gelatin;
- ½ glass of water;
- 1 tsp powdered sugar;
- 1-2 g vanillin (can be replaced with vanilla sugar).
1. Pour cold water over the gelatin and stir until the grains dissolve. Leave it to swell for about 20 minutes.
2. For the cream, place the sour cream in a deep bowl, add sugar, vanillin, and beat with a mixer. You should get a homogeneous air mass.
3. Place the swollen gelatin in a saucepan or saucepan and heat over low heat until completely dissolved. Then turn off the stove and leave the gelatin to cool.
4. Cut the sponge cakes into pieces, approximate size 5x5 cm.
5. Add the cooled gelatin into the sour cream and beat well with a mixer again.
6. Wash all kinds of berries and fruits. Kiwis, tangerines, grapes, bananas, cherries and strawberries go well together. Cut large fruits into slices, circles, cubes, cut grapes and strawberries in half. Leave a few berries for decoration.
7. Divide the fruit and biscuit into three parts. Place circles and slices of fruit in the first layer - forming the top. Make the next layer of sponge cake, then add fruit again. Again a layer of sponge cake, the remaining fruit and cover everything with pieces of cake.
8. Fill everything with cream, distribute evenly with a spoon so that there are no voids. Place in the refrigerator for 2 hours.
Turn the frozen dessert onto a serving tray or plate and carefully remove it from the mold. Decorate with berries. The cake holds its shape well and turns out very tasty and tender.
We invite you to read How to plant an apple tree: simple instructions for beginners
This no-bake delicacy is tender, with a bright creamy taste; you can treat it to guests and children. To create it, it is better to use a deep mold to get a tall and voluminous cake. In the video recipe you will find detailed cooking instructions.
How to get children and men to eat healthy cottage cheese? Baking is best for this. But when there is no time for baking, you can make a wonderful curd cheesecake based on cookies.
Ingredients:
- 200 g cookies;
- 250 g cottage cheese;
- 100 g butter;
- 250 g sour cream;
- 150 ml cherry juice;
- 200 g pitted cherries;
- ½ glass of water;
- 30 g gelatin.
1. Pour gelatin with half a glass of cool water and stir. Leave for 20-30 minutes.
2. Grind the cookies into crumbs; you can use a blender or coffee grinder for this. Melt the butter over low heat and pour into the crumbs, mix well.
3. Cover the bottom of the mold with cling film. Spread the cookie mixture evenly over the bottom of the pan and press well with your hands. Place the crust in the freezer for 15-20 minutes.
4. Grind the cottage cheese with an immersion blender until smooth and without grains. Add sour cream and sugar to the curd mass, mix everything well.
5. Dissolve half of the frozen gelatin in 100 ml of hot water. Break up all the lumps and add to the curd filling. Pour this mixture over the cookies and place in the refrigerator for an hour.
6. Dissolve the remaining gelatin in the heated cherry juice. Pour the juice over the frozen cheesecake, garnish with cherries and refrigerate for another couple of hours.
Carefully place the frozen dessert on a flat plate. It turns out to be a very beautiful and most importantly delicious pie.
Not only cookies can be the basis for a no-bake pie. Soft gingerbread cookies are another way to prepare a delicious and simple treat for your family. For decoration, I recommend using whipped cream, chocolate or nut crumbs.
You will need:
- 600 g fresh gingerbread;
- 3 bananas;
- 400 g sour cream;
- 1 cup of sugar.
1. Cut the gingerbread cookies in half lengthwise. Peel the bananas and cut into thin slices. For the cream, beat sour cream with sugar.
2. Cover the bottom of the mold with film or a bag. Start filling the pan with gingerbread, flat side down. The voids can be filled with pieces of gingerbread.
3. Fill the first layer with some of the cream. Add 1/3 of the bananas. And so on for two more layers in the same sequence.
4. Evenly distribute the remaining sour cream on top. Place in the refrigerator for several hours.
Carefully invert the dessert onto a flat plate. You can decorate the top with berries, grated or melted chocolate.
This unusual version of “Pancho” will appeal to busy housewives. Ready-made biscuits make the process of preparing it easier. Pineapples and cherries add piquancy and pleasant sourness.
You need to prepare:
- 3 ready-made sponge cakes;
- 800 g 20% sour cream;
- 150 g sugar;
- 200 g walnuts;
- 1 can of canned pineapple;
- 10 pieces. canned pitted cherries;
- 50 g chocolate.
1. Prepare cream from sour cream and sugar. Chop the nuts.
2. Cut the pineapples into small slices. Crumble 2 cake layers and combine with sour cream, stir.
3. Cover the bottom of a deep dish with cling film. Start layering the soaked sponge cake, then the nuts and chopped pineapple. The second time, sponge cake, nuts, pitted cherries and pineapple. Again biscuit, nuts, pineapple.
4. Cover the cake with the remaining cake layer and put it in the refrigerator for a couple of hours.
Invert the cooled dessert onto a platter. Decorate with melted chocolate. Bon appetit!
In the classic version of preparation, such a delicacy is prepared from puff pastry. But it can be easily replaced with cookies. It turns out just as tasty, moderately sweet and tender. And most importantly, it's quick and simple.
We invite you to familiarize yourself with How to ferment cabbage - a folk and classic recipe.
Take for preparation:
- 400 g cottage cheese;
- 10-12 pcs. round cookies;
- 100 ml milk;
- 100 ml 20% cream;
- 2 tbsp. Sahara;
- 100 g dark chocolate;
- 30 g coconut flakes;
- vanilla sugar to taste.
1. Grind the cottage cheese with a blender, add sugar to it. Pour in the milk and blend in a blender.
2. Grease one side of the cookies (you can make them from ears) with curd cream and combine the cookies in the shape of a roll (sausage). Brush the remaining cream on all sides of the roll to create a log. Place the roll in the freezer for 1 hour.
3. Melt the chocolate with cream over low heat. Pour this glaze over the cooled roll. Garnish with coconut flakes and refrigerate for another hour.
The juicy and creamy roll is ready.