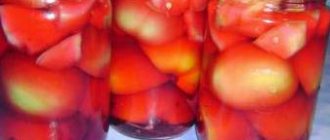
Hello, we continue the topic of raspberry canning. And earlier there was a selection of various jams from it. Next up is jelly. It is obtained by boiling the juice and pulp of berries with sugar.
In this case, the gelling ability of the juice is of great importance. The more pectin it contains, the better it gels. Raspberry juice has average capacity, so thickeners in the form of lemon or gelatin are sometimes added to it. Pectin can also be added additionally. We’ll look at how to do this in the recipes themselves.
To preserve the beneficial properties of the jelly as much as possible, it is prepared in a container with a wide bottom to speed up the boiling process. If you have more than 1 kg of berries, then it is advisable to boil them in 1 kg portions. The cooking process should not exceed 30 minutes, otherwise the pectin is destroyed. Therefore, we will not use sterilization in this type of preservation.
Readiness can be checked in three ways: drop the syrup onto a cold dish, if it does not spread and hardens quickly, then it’s ready. A drop of ready-made jelly, dropped into cold water, turns into a ball. The volume of juice at the end of cooking should be no more than 2/3 of the original volume.
Other fruits and berries are rarely added to raspberry preparation, all because it is very aromatic and tasty in itself.
Thick raspberry jelly for the winter without sterilization
First of all, let's look at the classic recipe for making jelly. Since raspberry juice does not contain enough pectin, we will use an assistant. Take 5 g of citric acid per 1 liter of juice with pulp.
Interesting! Lemon stabilizes the gelling, this will prevent the workpiece from becoming sugary and will give the desired thickness. It will also help maintain the jelly’s beautiful rich color.
Let's take:
- 1300 g raspberries,
- 600 g sugar,
- 5 g citric acid.
Step 1. First set the jars and lids to sterilize. We remember that any conservation requires cleanliness.
Separately, rinse the raspberries under water. This must be done, because when boiled, wet berries release juice well and therefore there is no need to add water to the recipe.
Step 2 . Pour the wet berries into a wide-bottomed saucepan. Bring to a boil and cook for 3 minutes. In this case, be sure to stir the fruits with a wooden or silicone spatula.
Step 3. Partially transfer the aromatic mass into a sieve and grind. There is no need to throw away the learned cake; it is better to cook compote on it.
Next, the resulting seedless puree needs to be weighed. For example, we got 900 g.
Step 4. Boil this homogeneous mass over medium heat for about 20 minutes. It will boil down by almost 40%. We weigh it, it turns out to be 600 g of mass. Add sugar to it 1 to 1. For 600 g of mass there are 600 g of sugar.
Immediately add citric acid here and mix the puree, trying to dissolve all the sugar.
Step 5. Do extreme cooking. On medium heat on the stove, bring the raspberries to a boil and skim off any foam that appears. And boil the mass for another 7-10 minutes.
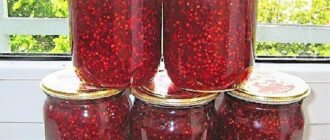
Pour the liquid puree into sterile jars, screw on the lids and turn the preparations upside down.
Be sure to wrap them in a blanket or blanket and leave them alone for a day. During this time, peptide bonds will be actively formed.
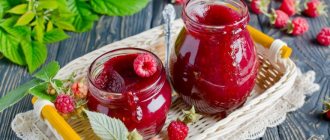
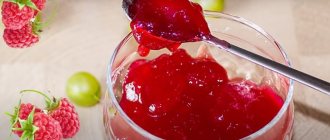
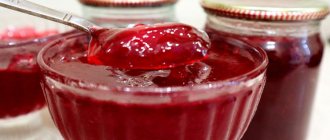
After cooling, the jelly will be thick, bright and very tasty. It holds its shape well, is not at all hard and spreads easily on toast.
Bon appetit.
Necessary ingredients for jelly: how to choose the right raspberries
To prepare raspberry jelly for the winter, it is important to choose the right main ingredient - raspberries . In this recipe I use berries collected from the garden. Therefore, the main property of raspberries is their fresh state. It doesn’t matter if it’s watery or if some of the seeds are a little dry from the sun. It is important to use freshly picked berries, which will give the jelly an indescribable smell. The second ingredient is sugar , with which our juice will thicken and turn into a delicious jelly. Also, when preparing dessert, it is necessary to use clean water, which will allow the berries to boil and simplify the work of obtaining raspberry juice.
| Raspberries | 1 kg |
| Sugar | 3 kg |
| Water | 2 l |
A simple recipe for raspberry jelly “Five Minutes”
Many housewives have been adhering to a single recipe for making absolutely any preserves and jams for years. It's called "Five Minute". Surprisingly, it is so versatile that it is also suitable for making jelly.
Its meaning consists of several five-minute cooking with alternating cooling of the berries. The density of the workpiece depends on the number of cooking sessions. For raspberry jelly, it is enough to make 3. If you want a more liquid consistency, then do one or two cookings.
On a note! If you do more than 1 brew, then the whole process will require a sufficient amount of time. Sometimes it can take almost two days.
Let's take:
- 1 kg raspberries,
- 1 kg sugar.
Step 1. Immediately cover the berries with sugar. Stir and leave for 3-4 hours to release the juice.
Step 2. Place the pan or bowl with the berry mixture on the stove and turn on the heat to maximum. Bring to a boil. Then reduce the heat to medium and cook the jam for five minutes.
Then remove from heat and let cool for 5-6 hours. During this time, the mass will be well saturated with sugar. Next, grind the mass through a sieve, separating the cake from the pulp and juice.
Step 3. Do a second five-minute cooking. We also record the time after the syrup actively boils. Remove any foam that appears. Then turn off the heat again and leave the puree to cool completely.
Step 4. Before the third final cooking, you need to sterilize the jars and lids.
For the third time, boil the puree from the moment of boiling for five minutes. Look how much it has boiled down. We roll the future jelly into jars and seal them with lids.
Be sure to turn it over and put it on the lids, wrap it in a blanket or rug. The workpieces need to be put away for storage only after 24 hours.
When hot, the jelly will always be liquid; it will show its consistency only after it has completely cooled.
Delicious jam using gelatin
Do you want to preserve the appetizing quality of fresh berries for a long time? Then use recipes for raspberry jam with gelatin. For example, you can use this ingredient to make popular jams, as it makes the consistency of the berry mass more gelatinous. We should not forget that the heat treatment time for such jam is significantly reduced, and this allows for maximum preservation of useful substances in it.
To prepare jam, you need to take 1 kg of fresh raspberries, 1.5 kg of sugar, 0.3 l of water, 5 g of gelatin, 5–10 g of citric acid. We dilute the gelatin with water at room temperature (about 20–25 °C), you will always find the proportions on the package, and leave it for some time to swell. Cover the berries with sugar and add water to them. Boil the resulting mass, simmer over low heat for 25–30 minutes, stirring continuously. Add swollen gelatin and citric acid to the berries, cook for 15 minutes, remembering to stir. Pour the finished jam into pre-sterilized jars, roll them up, and place them upside down to cool. After a day, we hide the jam in a dark place with a low temperature.
To avoid burning and thereby spoil the food, you must use enamel cookware for cooking.
For those who like to experiment, there is a spicy recipe for raspberry jam with the addition of liqueur or cognac. To do this, take 1 kg of berries, 0.8 kg of sugar and 50 g of liqueur, beat it all until a puree is formed. 1 tbsp. l. Dissolve gelatin with water and set aside to swell. Place the berry puree in a water bath, boil and cook for another 7 minutes. Then set aside, add the swollen gelatin and mix thoroughly. We pour the jam into storage containers, and it can be kept without sealing, however, only in a cool place with a temperature no higher than 5 °C.
If you want a softer jam consistency, you should use a seedless jam recipe. 1 kg of raspberries should be poured with 1-2 glasses of water and placed on low heat, after boiling, cook for 20 minutes, skimming off the foam. Then you should remove the raspberries from the stove, let them cool, and then strain through a sieve or cheesecloth, this way we will get rid of the seeds. Next, add 1.3 kg of sugar to the raspberry mixture, mix and return to the heat. Add pre-soaked gelatin - 4 g, lemon juice to taste to the boiling mass and cook slowly for 10 minutes. The finished jam just needs to be poured into jars and screwed.
Raspberry jam should be stored in small containers, as it may dry out within a short time after opening. To maintain the stickiness of the jam, do not shake or beat it, but only stir it gently. You need to scoop raspberry mixtures from a jar with a dry, clean spoon so that the processes of sugaring and fermentation do not occur.
Like fresh raspberries, jam and jelly made from them can be either a separate dish or an excellent addition to desserts, a filling for pies, and a decoration for cakes. And the combination of taste with the presence of many vitamins and microelements makes this berry indispensable in the arsenal of every caring mother or grandmother.
“Live” raspberry jelly for the winter without cooking
Any heat treatment involves the loss of vitamins from any berries and fruits. Unfortunately, this process always happens. Therefore, if you want to preserve absolutely all the vitamins and microelements of raspberries, then you need to put them away for the winter without cooking them.
And there are two options. The first involves double the amount of sugar. Of course, the result is a strong concentrate, but such a preparation can be stored even at room temperature. In the second option, you can, on the contrary, reduce the amount of sugar to 500 g per 1 kg of berries, but then you need to store the workpiece in the freezer. Choose any option. Below I will describe the procedure for preparing “live” jelly.
Let's take:
- 1 kg raspberries,
- 2 kg of sugar (or for storing in the freezer 500-600 g of sugar).
Step 1. To squeeze juice from raspberries, use a screw juicer. She very carefully sorts the pulp with the juice from the seeds.
The cake turns out almost dry. Of course, you can grind the berries through a sieve or squeeze them through cheesecloth, but a juicer will significantly save time on this.
Step 2. Add sugar to the resulting puree, mix thoroughly, trying to completely dissolve the crystals.
Step 3. And pour the mass into containers. We put it away for storage.
If you decide to store the jelly at room temperature and choose the option with double the sugar content, then you need to pour the puree into sterile dry jars. They also need to be sealed with dry and sterile lids.
If you prefer to freeze, then you can pour it into any plastic containers with a lid.
Traditional recipe for the winter
A classic way to make raspberry jelly without any additives. It, of course, is not as thick as store-bought, but it does not contain unnecessary chemicals.
For raspberry jelly for the winter, it is recommended to use freshly picked berries - they are filled with juice and not limp. If raspberries have been brought from the forest or from the country for a long time, it is better to freeze them; they are no longer suitable for jelly.
Components:
- Raspberries – 2 kg;
- Sugar – 1 kg.
And here are the step-by-step instructions that must be followed to obtain a wonderful delicacy. Wash the jars thoroughly and be sure to sterilize them by placing them in the oven tray with water and setting the special function.
You can use the old method of boiling - placing a glass container over the spout of a bubbling kettle.
Grind the berries in a blender or grind through a colander. Transfer to an enamel bowl and bring to a boil over low heat, stirring systematically to avoid burning.
Set aside, let cool and strain the entire mass through cheesecloth so that not a single gram of pulp gets in and the juice is pure.
Pour the berry juice back into the bowl and add sugar in batches. The heat should be moderate so that it does not boil or jump out of the pan. Do not move far from the stove, stir so that a bitter, burnt taste does not appear.
Raspberries are a very tender berry that does not require long cooking.
It is enough to boil it for ten to fifteen minutes, set it aside, cool and put it on the burner again for five to seven minutes.
Stirring with a spoon, lift the mass up and, pouring the jelly back, look at the consistency: if it suits you, you can distribute it into jars and seal.
Keep in mind that after final cooling the mass will become even thicker.
How to make seedless raspberry jelly with gelatin
Now there will be a selection of recipes for making jelly with the addition of thickeners. Let's start with gelatin. It is almost always present in housewives' bins, so making preserves with it will not be difficult.
The consistency of the finished product will be dense and elastic.
Paying attention! Gelatin is produced by denaturation of collagen contained in the bones, cartilage, skin, and veins of animals. Therefore, vegetarians and people of certain nationalities may not eat it.
Let's take:
- 1 kg raspberries,
- 1 kg sugar,
- 2.5 liters of water,
- 50 g gelatin per 1 kg of jelly.
Step 1. Pour water over ripe raspberries and boil for 15 minutes. Pour water to thin the mass, then the pulp will be easier to separate from the seeds.
Grind the hot mass through a sieve, separating the berry puree from the cake.
Step 2. Weigh the resulting homogeneous mass and mix with the same amount of sugar. In this recipe we stick to a 1:1 ratio.
Step 3. We dilute gelatin with water, as described in the instructions. When it swells, melt it in a water bath without bringing it to a boil. When boiling, it loses its gelling properties.
Step 4. Mix the berry mass and boil it on medium heat for 25-30 minutes. Don’t forget to stir it constantly, it will thicken a lot and may burn a little on the bottom.
Check the readiness of the syrup. A drop poured onto a cold plate should freeze. The result is a good dense consistency, which will thicken greatly after cooling.
Step 5. Turn off the heat and let the raspberries cool a little, literally 5-7 minutes. Then pour the melted gelatin into the puree in a stream and mix vigorously.
Pour the jelly into sterile jars.
Roll up with clean lids. And turn the workpieces upside down. We check the tightness of the seaming and cover them with a blanket or towel.
Leave it in this state for a day. And only after that we put the preservation away for storage.
Can be stored anywhere, also at room temperature. But not near heat sources.
Several proven recipes
Many housewives switch to making jellies and jams because it is easier compared to jams; children prefer them. Europeans generally cannot imagine breakfast without toast with a sweet treat.
Raspberry juice jelly with pulp
Traditional raspberry jelly is prepared according to a classic recipe. For 1 kg of berries take the same amount of sugar, 100–120 g of water, 2–3 g of citric acid. The step-by-step cooking process is as follows.
- The prepared raspberries are kneaded or crushed using a blender, water and sugar are added, and brought to a boil.
- Stirring and constantly skimming off the foam, cook over low heat for half an hour.
- Cool the finished mass slightly and grind through a fine sieve to separate the seeds and obtain a homogeneous structure.
- The pureed juice, boiled with sugar, is put back on the fire, citric acid dissolved in a tablespoon of water is added, and boiled for 2-3 minutes.
- Hot jelly is poured into sterile containers, sealed hermetically and cooled without turning the jars over.
Advice! The jelly is considered ready if the formation of foam noticeably decreases, it does not spread along the edges of the pan, and a drop of syrup after cooling does not spread on the glass or plate.
Raspberry jam
You can cook raspberry jelly without separating the seeds - this recipe for the winter will appeal to those who are short on time and not so scrupulous in terms of following the classic recipe. Raspberry seeds are smaller than strawberries, they do not affect the consistency too much and do not impair the taste. On the contrary, thanks to the “cake”, the confiture will turn out thicker, similar to jam. The cooking technology is the same as in the recipe described above, only without rubbing through a sieve.
Recipe with gelatin or pectin
Many people prefer to make raspberry jelly with gelatin. In this case, the gelatinous consistency is achieved using a thickener, in addition to gelatin, it can be pectin, agar-agar, jamfix. The cooking process is significantly shortened (up to 10–15 minutes), vitamins and biologically active compounds are better preserved, and less sugar can be added.
If gelatin is used (40–50 g per 1 kg of raspberries), it is pre-soaked in 100–150 g of cold boiled water, then heated until completely dissolved, and filtered. Pectin-based thickeners are used according to instructions.
Mash the raspberries, add half a glass of water, boil for 2-3 minutes, then rub through a sieve. Add sugar and thickener to the mixture and cook over low heat for 10–15 minutes. When hot, they are packaged in jars and sealed.
Proportions: 1 kg of berries, 0.7–1 kg of sugar, 100–150 g of water, 40–50 g of gelatin (pectin).
Homemade raspberry jelly with agar-agar
The next thickener option is agar-agar. It is also easily introduced into the workpiece and shows amazing results. The jelly turns out homogeneous and elastic. This recipe is quick to prepare. After all, raspberry juice is cooked here for only three minutes.
Agar-agar is a natural ingredient created from seaweed. Most often it is used as a jelly-forming component and thickener in the preparation of confectionery and desserts. Its gelling ability is much better than that of gelatin, so during the cooking process it is required about 3 times less.
Let's take:
- 600 g raspberries,
- 300 g sugar,
- 100 ml water,
- 7 g agar-agar.
Step 1. Pour the berries into the pan. We beat them with a blender.
Pour water into the resulting mass so that the consistency becomes more liquid and passes through the sieve easier.
If the mass still remains thick and does not flow well, then you can add water during the process.
We get beautiful and aromatic berry puree and cake.
Step 2. Mix the puree with sugar and put the mixture on low heat on the stove. You want the sugar to gradually dissolve.
Step 3. Dilute agar-agar with water as described in the instructions. After all, the powder differs from different companies, so there is no uniform instruction.
Pour the resulting mixture into the boiling jelly.
Stir and cook from the moment of boiling for 3 minutes. If foam appears, remove it.
Step 4. Since the jam begins to thicken before our eyes, immediately pour the mixture into prepared sterile containers.
We seal them with sterile lids, turn them over and place them on the lid. Let's put it under the fur coat for gradual cooling.
It must be stored underground after at least 12 hours.